Portable Photo Booth Named Buzz

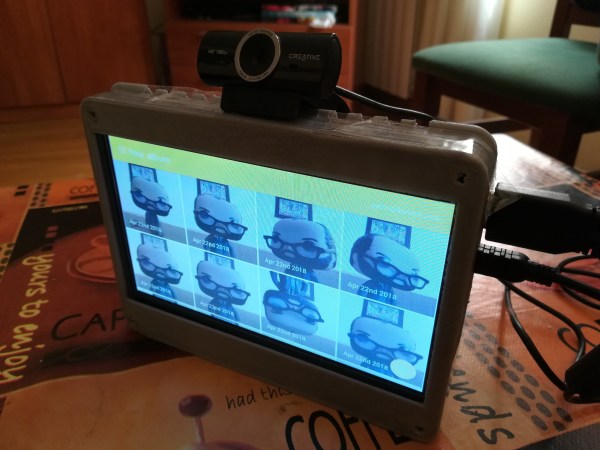
We’re all used to posing for a picture — or a selfie — but there’s something about photo booths that make getting your photo taken an exciting and urgent affair. To make this experience a bit easier to tote about, Redditor [pedro_g_s] has laboriously built, from the ground up, a mobile photo booth named Buzz.

He needed a touchscreen, a Raspberry Pi, almost definitely a webcam, and a 3D printer to make a case — although any medium you choose will do — to build this ‘booth.’ That said, he’s built the app in a way that a touchscreen isn’t necessary, but carting around a mouse to connect to and operate your portable photo booth seems a bit beside the point. On the back end, he used Electron to code the photo booth app, React helped him build a touchscreen UI, and Yarn kept the necessary dependencies in order.

Operation is simple, and every time a photo is taken it is sent to and collated within a previously set-up email service. To set it up, [pedro_g_s] is here to guide you through the process.

Continue reading “Portable Photo Booth Named Buzz”

Build Your Own Black Hole

Okay, perhaps the title here is a bit of an exaggeration, but this black hole lamp made by [Will Donaldson] is an interesting approach to creating a black hole simulation without destroying the earth. This lamp uses a ring of LEDs surrounding a piece of black Lycra. A motor in the lamp base pulls the Lycra, representing the distorting effect that a singularity has on space-time. It also demonstrates how black holes can (in theory) evaporate by emitting radiation, a phenomenon called Hawking radiation. It’s a simple, but effective approach that physicists have used to demonstrate gravity for some time, using stretch fabric to simulate space-time and show how gravity warps it. It’s a two-dimensional version of a three (or more) dimensional phenomenon, but it works. And, hopefully, it won’t swallow the planet and destroy us all like the real thing might.

Continue reading “Build Your Own Black Hole”

3D Printed Tank Scores Suspension

Tanks are highly capable vehicles, with their tracks giving them the ability to traverse all manner of terrain at speed. An important part of a tank is its suspension setup, without which its treads are far less capable. When [Ivan]  began work on his 3D printed tank project, he couldn’t ignore the comments. His tank would need a suspension system.

The tank build itself is impressive, consisting almost entirely of 3D printed components held together with off-the-shelf bearings and threaded rod. [Ivan] retools the tank from the beginning to fit a pivoting suspension system which is surprisingly simple in its design, yet capable in operation. Particularly impressive are the 3D printed springs, which [Ivan] tunes the stiffness of to suit the weight of the vehicle.

It’s a build that shows just how far you can go when you master the basics of 3D printing and mechanical design. It doesn’t take a lot of advanced theory to design cool things, just a willingness to learn and experiment and the right set of tools behind you. [Ivan]’s tank treads are worth taking a look at, too. Video after the break.

Continue reading “3D Printed Tank Scores Suspension”

Colossal Hydraulic Hulkbuster Is Classic Colin Furze

[Colin Furze] is back at it – once again shrugging off the confines of feasibility and laughing in the face of sanity, all whilst sporting the signature tie with unrivalled style.

Teaming up with [James Bruton], the result of their collective talent this time is a hydraulic hulkbuster suit, at a frankly ridiculous scale. This is the third and final episode of the build process, with the first two covering the legs and body

To demonstrate the strength of his latest toy, [Colin] tapes himself to the arm of his creation and promptly gets swung into a wall. We still don’t entirely understand how [Colin] survives his antics, but we’re very glad he does.

The steel frame is a masterclass in welding and fabrication, providing support for three hydraulic pumps, the accompanying rams, some seriously hefty bearings (think 1 m diameter), and one Colin. As if a giant moving steel behemoth wasn’t enough, each arm houses a weapon: a flamethrower and a power-fist. All parts are sourced from eBay.

The control electronics and 3D-printed skin are pretty nifty too – you can see [James]’s first video here.

We’re hard pressed to pick our favourite Furze projects, but we have to mention the flamethrower guitar and hoverbike.

Continue reading “Colossal Hydraulic Hulkbuster Is Classic Colin Furze”

Robot Radar Module

For his Hackaday Prize entry, [Ted Yapo] is building a Robot Radar Module breakout board. His design uses the A111 60 GHz pulsed coherent radar (PCR) sensor from Acconeer AB (New Part alert!) .

The A111 is a low power, high precision sensor ideal for use in object detection or gesture sensing applications. The BGA package is tiny – 5.5 mm x 5.2 mm, but it does not appear very difficult for a hacker to assemble. The sensor includes an integrated baseband, RF front-end and Antenna in Package so you don’t have to mess with RF layout headaches. Acconeer claims the sensor performance is not affected with interference from noise, dust, color and direct or indirect light. Sensing range is about 2 m with a +/- 2 mm accuracy. And at just under $10 a pop for 10 units or more, it would make a nice addition to augment the sensor package on a Robot.

To get started, [Ted] is keeping his design simple and small – the break out board measures just 32 mm x 32 mm. The radar sensor itself doesn’t require any parts other than a crystal and its loading capacitors. A LDO takes care of the 1.8 V required by the A111. Three 74LVC2T45 chips translate the SPI digital interface from 1.8 V to external logic levels between 1.8 V to 5 V. The three level translation chips could possible be replaced by a single six or eight channel translator – such as one from the TXB series from TI. For his first PCB iteration, [Ted] is expecting to run in to some layout or performance issues, so if you have any feedback to give him on his design, check out his hardware repository on Github.

Acconeer provides a Getting Started guide for their Evaluation Kits, which includes a detailed Raspberry-Pi / Raspbian installation and an accompanying video (embedded after the break) targeted at hackers. We are eagerly looking forward to the progress that [Ted] makes with this sensor breakout. Combined with LiDAR ToF sensor breakout boards, such as the MappyDot, it would be a great addition to your robot’s sensing capabilities.

Continue reading “Robot Radar Module”

Circuit VR: Sink Or Swim With Current Sources

If you got your start in electronics sometime after 1980 your first project might well have been to light up an LED. Microcontroller projects often light up an LED, too, and a blinking LED is something of the “hello world” program for embedded systems. If you tried lighting up your LED with a 9 V battery directly — not that you’d admit to it — you found it would light up. Once, anyway. The excess current blows up the LED which is why you need a current-limiting resistor. However, those current limiting resistors are really a poor excuse for a current source or sink. In many applications, you need a real current source and luckily, they aren’t hard to create.

As always with Circuit VR, we’ll be using LT Spice to examine the circuits. If you need a quick tutorial, start here and come back after that. If you use Linux, don’t be dismayed. I run LT Spice under WINE and it works great. You can find all the Spice files on GitHub.

Continue reading “Circuit VR: Sink Or Swim With Current Sources”

San Francisco: Let’s Learn To Build Some Robots!

Hone your skills at basic robot building. You’re invited to join Hackaday for a Beginner Robotics Workshop on Saturday, May 12.

For this workshop we’re pairing up with FIRST robotics mentors and students from the Bay Area. FIRST is an international high school robotics competition and you won’t believe what these teams can do. The workshop will start with an overview of the three major parts that go into a robot project: mechanical design, electronic design, and programming. From there, choose one of the three you want to focus on for the afternoon and let the hands-on fun begin as we break out into small groups to tackle some robotics problems!

The mechanical group will explore robot building using OnShape CAD software. The electronic group will work hands-on with Arduino-based prototyping and breakout boards. The programming group will utilize the Arduino IDE. Workshops will wrap up with a group discussion of how these three concepts are integrated in a single robotics effort.

Right now the Robotics Module Challenge of the 2018 Hackaday Prize is in full swing. We’re excited to see more roboticists in the world and are happy to bring you a workshop that is both technical and accessible. Come build some ‘bots and take home some new knowledge to pour into your project, and your Hackaday Prize entries!