ESP8266 Keeps Tabs On The Kid’s Tablets

Assuming you have a child and it’s no longer womb-bound, there’s a fairly high chance they’ve already had some experience with the glowing beauty that is the LCD display; babies of only a few months old are often given a tablet or smartphone to keep them occupied. But as the child gets to the age where they are capable of going outside or doing something more constructive, staring slack-jawed and wide-eyed at their tablet becomes a concern for many parents.
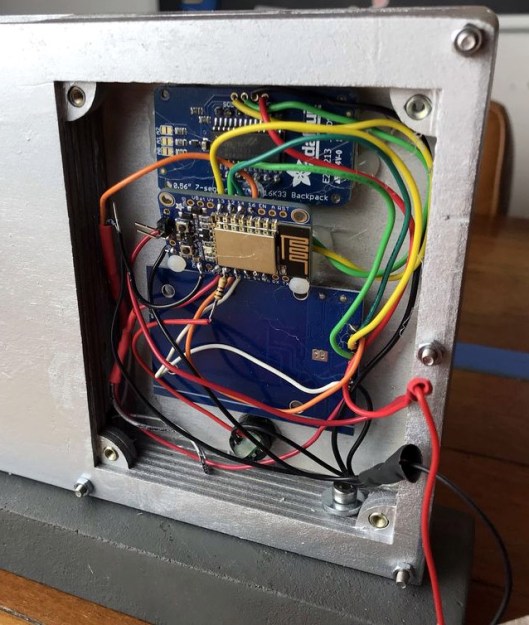
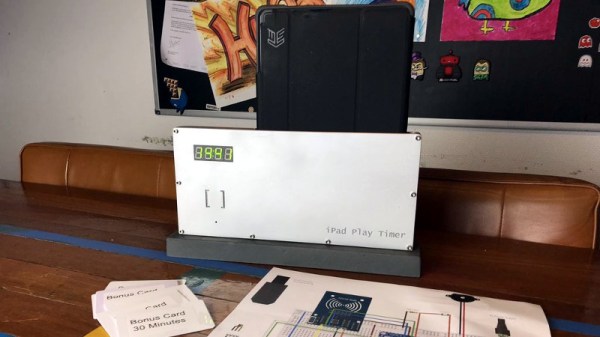
[Richard Garsthagen] is one such parent. He wanted a way to monitor and control how much time his children were using their iPad, so he came up with an automated system based on the ESP8266. Not only does it keep track of how long the tablet is being used, it even includes a reward system which allows the parent to add extra usage time for good behavior.

At the most basic level, the device is a sort of “holster” for the child’s tablet. When the tablet is placed in the slot, it presses a microswitch at the bottom of the cavity which stops the timer. When the switch is open, the LED display on the front of the device counts down, and the ESP8266 pushes notifications about remaining time to the child’s device via IFTTT.

Time can be added to the clock by way of RFID cards. The cards are given out as a reward for good behavior, completion of chores, etc. The child only needs to pass the card in front of the system to redeem its value. Once the card has been “spent”, the parent can reset it with their own special card.

It’s a very slick setup, making perfect use of the ESP8266. Reading the RFID cards, updating the timer, and using IFTTT’s API keeps the little board quite busy; [Richard] says it’s completely maxed out.

You might be wondering what happens when the clock reaches zero. Well, according to the video after the break…nothing. Once the time runs out, a notification simply pops up on the tablet telling them to put it away. Some might see this as a fault, but presumably it’s the part of the system where humans take over the parenting and give the ESP8266 a rest.

This isn’t the first time we’ve seen a microcontroller used to get the little hackers on schedule. At least (so far) none of them have gone full Black Mirror and started tracking when the kiddos are watching it.

Continue reading “ESP8266 Keeps Tabs On The Kid’s Tablets”

Open Source DIY Printers Are Alive And Well: What We Saw At ERRF 18

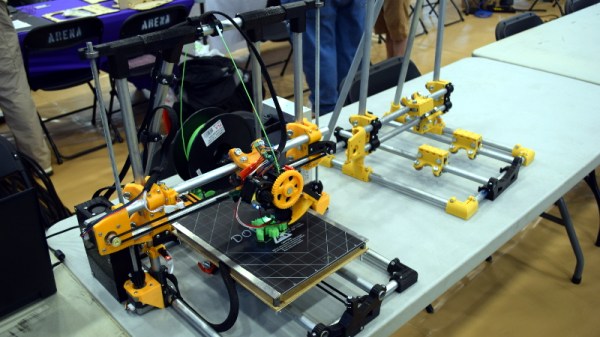
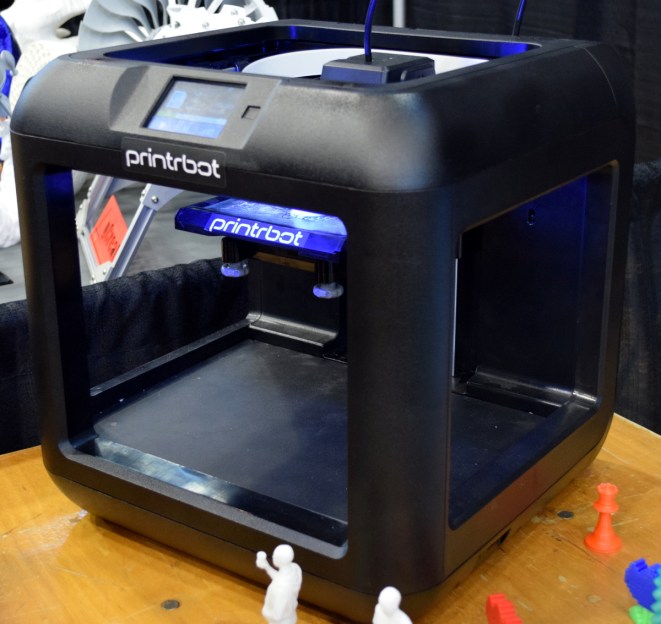
If you follow the desktop 3D printer market, it probably won’t surprise you to hear that nearly every 3D printer on display at the inaugural East Coast RepRap Festival (ERRF) was made in China. Even Printrbot CEO Brook Drumm had to admit that this was the year his company may finally bite the bullet and begin selling a branded and customized printer built overseas.

When you can get a decent (but let’s be clear, not great) 3D printer for $200 USD, it’s no surprise that American and European manufacturers are having a hard time staying competitive. But not everyone is seduced by low-cost printers. They know they could buy a decent printer for a couple hundred bucks, but for them that’s not the point. Some hackers are just as (if not more) interested in designing and building the machines than they are churning out little plastic boats with the finished product.

Luckily for us, these are also the type of folks who document their builds and make all their collected information and design files available for others under an open source license. Such builders exemplify the true spirit of the RepRap movement, and we’re happy to report that in a sea of imported printers, there were several interesting home built open source printers.

Whether you want to build your own copy of one of these machines, or simply get inspired by some of the ideas their creators had, these machines are physical proof that just because you can order a cheap 3D printer on eBay right now doesn’t mean you have to.

Continue reading “Open Source DIY Printers Are Alive And Well: What We Saw At ERRF 18”

Tattoo Your 3D Prints With Velocity Painting

Just when it seems like we’ve juiced all the creative potential out of our 3D printers, a bold new feature lands on the table. Enter Velocity Painting, a concept brought to life by [Mark Wheadon] that textures our 3D prints with greyscale images.

At its core, the technique is straightforward: skin an image onto a 3D print by varying the print speed in specific locations and, thereby, varying just how much plastic oozes out of the nozzle. While the concept seems simple, the result is stunning.
Velocity Painting opens up new ways of expression on top of an existing print with all the skinning opportunities. Imagine adding a texture for realism like this rook that’s been patterned with a brick layout, or imagine an aesthetic embellishment like the flames on [Mark’s] dragon print.

The results speak for themselves, and the growing number of users are proving it. Head on over to the gallery to indulge yourself in this delightful oozing aesthetic that’s sure to turn a few heads.

[Mark Wheadon’s] hack takes the mechanics of how we print and adds another creative tuning knob. If you’re looking for other embellishments for your prints, have a look at [David Shorey’s] work on texturizing fabrics.

Shooting For The First Time With Help From A Raspberry Pi

Like many people, [Mike] has a list of things he wants to do in life. One of them is “fire a gun with a switch,” and with a little help from some hacker friends, he knocked this item off last weekend.

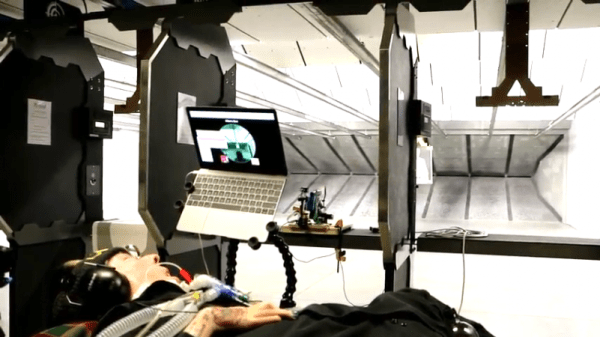
For those wondering why the specificity of the item, the backstory will help explain. [Mike] has spinal muscular atrophy, a disease that was supposed to end his life shortly after it began. Thirty-seven years later, [Mike] is still ticking items off his list, but since he only has voluntary control of his right eyebrow, he faces challenges getting some of them done. Enter [Bill] and the crew at ATMakers. The “AT” stands for “assistive technologies,” and [Bill] took on the task of building a rig to safely fire a Glock 17 upon [Mike]’s command.

Before even beginning the project, [Bill] did his due diligence, going so far as to consult the Bureau of Alcohol, Tobacco, and Firearms (ATF) and arranging for private time at a local indoor gun range. The business end of the rig is a commercially available bench rest designed to control recoil from the pistol, which is fired by a servo connected to the trigger. The interface with [Mike]’s system is via a Raspberry Pi and a Crikit linked together by a custom PCB. A PiCam allowed [Mike] to look down the sights and fire the gun with his eyebrow. The videos below show the development process and the day at the range; to say that [Mike] was pleased is an understatement.

We’re not sure what else is on [Mike]’s list, but we see a lot of assistive tech projects around here — we even had a whole category of the 2017 Hackaday Prize devoted to them. Maybe there’s something else the Hackaday community can help him check off.

Continue reading “Shooting For The First Time With Help From A Raspberry Pi”