Down The DIY Rabbit Hole With A Shop AC Installation

There’s a fine line between a successful DIY project and one that ends in heartbreak. It’s subjective too; aside from projects that end up with fire trucks or ambulances in the driveway, what one DIYer would consider a disaster might be considered a great learning opportunity to someone else.

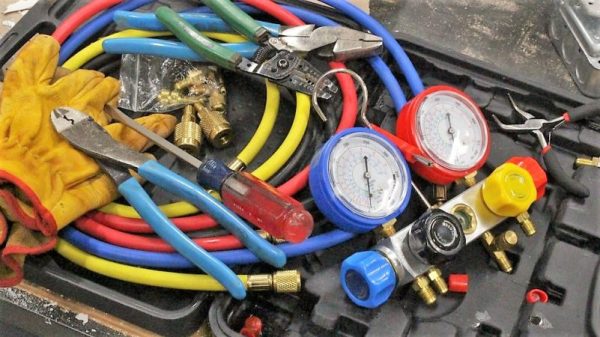
We’re pretty sure [Cressel] looks at his recent DIY mini-split AC installation for his shop as a series of teachable moments. Most folks leave HVAC work to the pros, but when you run a popular YouTube channel where you make your own lathe from scratch, you might be persuaded to give anything a go. [Cressel] did everything possible to do this job like a pro, going so far as to get training in the safe handling of refrigerants and an EPA certification so he knew how to charge the system correctly. He also sunk quite a bit of money into tools; between the manifold gauge set, vacuum pump, and various plumbing bits, that was a hefty $300 bite alone.

The install went well until he started charging the refrigerant, when a mistake with a fitting caused him to contaminate his nice, new batch of R-410A. Rather than back out and call a pro to finish up, [Cressel] stuck with it, to the tune of $900 in extra tools and materials needed to recover the old refrigerant safely and replace it with virgin R-410A. The video below has a condensed version of the whole tale.

It all worked out in the end, but at a cost that probably meets or exceeds what an HVAC contractor would have charged. [Cressel] seems like a glass-half-full kind of guy, though, so we expect he’s happy to have learned something new, and to have a bunch of neat new tools to boot.

Continue reading “Down The DIY Rabbit Hole With A Shop AC Installation”

Retrotechtacular: Robots And Bowling Pins

On a recent bowling excursion it occurred to us that this is one of the most advanced robotics systems most Americans will directly interact with. That’s a bold claim today, but certainly one that was correct decades ago. Let’s take a stroll back to 1963 for a look at the state of the art in bowling at the time, the AMF automatic pinspotter.

With their basis in industrial automation, bowling was a perfect problem for the American Machine and Foundry company (AMF) to take on. Their business began at the turn of the 20th century with automated cigarette manufacturing before turning their sights on bowling pins after the second world war. The challenge involves more than you might think as pinspotters are confined to a narrow area and need to work with oddly-shaped pins, the bowling ball itself, and deal with setting up fresh frames but also clearing out the field after the first roll.

Separating the ball from the pins is handled by gravity and an oscillating plunger that pushes errant pins back onto a conveyor. That conveyor stretches the width of the lane and moves pins back to a pin elevator — a wheel moving perpendicular to the ground with orients and raises them to a swiveling conveyor belt that can drop them into the setting jig waiting for the next full frame setup.

Everything in this promo video has jargon which is just delightful. We especially enjoyed the non-mechanical mention of how the machine “clears dead wood from the pin deck”. We could watch this kind of automation all day, and in fact found some other gems while searching about. Here’s a more recent look a the AMF 82-70 (the same model as in the promo video). We also wondered about manual pinspotting and found this manual-with-mechanical-assist setup to be interesting despite the audio.

Much to our surprise we’ve featured AMF in a Retrotectacular article before. Once their bowling automation started to take off, they set their sights on restaurant automation. Looks like Brian Benchoff’s visit to the robo-hamburger joint was actually a retro experience!

Continue reading “Retrotechtacular: Robots And Bowling Pins”

You Should Not Try These Taser NERF Darts

For most of us, a good part of our childhood involved running around someone’s backyard (or inside the house) trying to score hits with a toy NERF gun. The fun level was high and the risk of personal injury was low. Now that we’re all mostly adults, it’s probably time to take our NERF game to the next level with some risk of serious personal harm.

In an effort to help his brother get back at him for being somewhat of a bully in their youth, [Allen Pan] gifted him with an upgraded NERF gun. Specifically, one with darts that pack a punch. Each of the “Elite” darts was equipped with a 300 V capacitor packed into the interior of the dart. New tips were 3D printed with special metal tips that allow the capacitor to discharge upon impact.

Besides the danger, there’s a good bit of science involved. Parts were scavenged from a new (and surprisingly expensive) disposable camera, and a customized circuit was constructed around the barrel of the dart gun that allows the darts to charge up when they’re loaded. It’s an impressive build that would be relatively simple to reconstruct for yourself, but it’s probably not the worst thing we’ve seen done with high voltage and a few small capacitors.

Thanks to [Itay] for the tip!

Continue reading “You Should Not Try These Taser NERF Darts”

Seeing A Webcam’s PCBs In A Whole Different Light

When it comes to inspection of printed circuits, most of us rely on the Mark I eyeball to see how we did with the soldering iron or reflow oven. And even when we need the help of some kind of microscope, our inspections are still firmly in the visible part of the electromagnetic spectrum. Pushing the frequency up a few orders of magnitude and inspecting PCBs with X-rays is a thing, though, and can reveal so much more than what the eye can see.

Unlike most of us, [Tom Anderson] has access to X-ray inspection equipment in the course of his business, so it seemed natural to do an X-ray enhanced teardown and PCB inspection. The victim for this exercise was nothing special – just a cheap WiFi camera of the kind that seems intent on reporting back to China on a regular basis. The guts are pretty much what you’d expect: a processor board, a board for the camera, and an accessory board for a microphone and IR LEDs. In the optical part of the spectrum they look pretty decent, with just some extra flux and a few solder blobs left behind. But under X-ray, the same board showed more serious problems, like vias and through-holes with insufficient solder. Such defects would be difficult to pick up in optical inspection, and it’s fascinating to see the internal structure of both the board and the components, especially the BGA chips.

If you’re stuck doing your inspections the old-fashioned way, fear not – we have tips aplenty for optical inspection. But don’t let that stop you from trying X-ray inspection; start with this tiny DIY X-ray tube and work your way up from there.

Thanks for the tip, [Jarrett].