An Achievable Underwater Camera

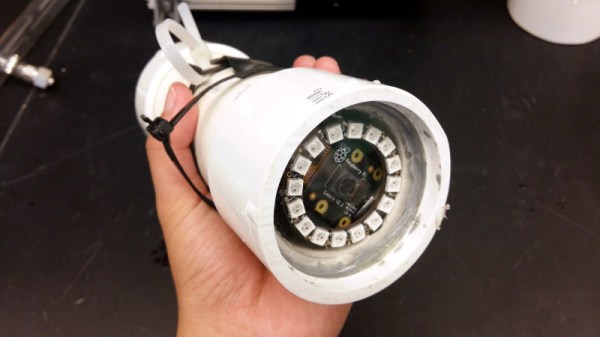
We are surrounded by sensors for all forms of environmental measurement, and a casual browse through an electronics catalogue can see an experimenter tooled up with the whole array for a relatively small outlay. When the environment in question is not the still air of your bench but the turbulence, sand, grit, and mud of a sea floor, that pile of sensors becomes rather useless. [Ellie T] has been addressing this problem as part of the study of hypoxia in marine life, and part of her solution is to create an underwater camera by encasing a Raspberry Pi Zero W and camera in a sturdy enclosure made from PVC pipe. She’s called the project LoBSTAS, which stands for Low-cost Benthic Sensing Trap-Attached System.

The housing is simple enough, the PVC has a transparent acrylic disk mounted in a pipe coupler at one end, with the seal being provided at the other by an expansion plug. A neopixel ring is mounted in the clear end, with the Pi camera mounted in its centre. Meanwhile the Pi itself occupies the body of the unit, with power coming from a USB battery bank. The camera isn’t the only sensor on this build though, and Atlas Scientific oxygen sensor  completes the package and is mounted in a hole drilled in the expansion plug and sealed with silicone sealant.

Underwater cameras seem to have featured more in the earlier years of Hackaday’s existence, but that’s not to say matters underwater haven’t been on the agenda. The 2017 Hackaday Prize was carried off by the Open Source Underwater Glider.

Bench Power Supply Packs A Lot Into A DIN-Rail Package

We’re not sure why we’ve got a thing for DIN-rail mounted projects, but we do. Perhaps it’s because we’ve seen so many cool industrial control cabinets, or maybe the forced neatness of DIN-mounted components resonates on some deep level. Whatever it is, if it’s DIN-rail mounted, chances are good that we’ll like it.

Take this DIN-mounted bench power supply, for instance. On the face of it, [TD-er]’s project is yet another bench supply built around those ubiquitous DPS switching power supply modules, the ones with the colorful displays. Simply throwing one of those in a DIN-mount enclosure isn’t much to write home about, but there’s more to this project than that. [TD-er] needed some fixed voltages in addition to the adjustable output, so a multi-voltage DC-DC converter board was included inside the case as well. The supply has 3.3, 5, and 12 volt fixed outputs along with the adjustable supply, and thanks to an enclosed Bluetooth module, the whole thing can be controlled from his phone. Plus it fits nicely in a compact work area, which is a nice feature.

We haven’t seen a lot of DIN-rail love around these pages — just this recent rotary phase converter with very tidy DIN-mounted controls. That’s a shame, we’d love to see more.

JB Weld – Strong Enough To Repair A Connecting Rod?

JB Weld is a particularly popular brand of epoxy, and features in many legends. “My cousin’s neighbour’s dog trainer’s grandpa once repaired a Sherman tank barrel in France with that stuff!” they’ll say. Thankfully, with the advent of new media, there’s a wealth of content out there of people putting these wild and interesting claims to the test. As the venerable Grace Hopper once said, “One accurate measurement is worth a thousand expert opinions“, so it’s great to see these experiments happening.

[Project Farm] is one of them, this time attempting to repair a connecting rod in a small engine with the sticky stuff. The connecting rod under test is from a typical Briggs and Stratton engine, and is very much the worse for wear, having broken into approximately 5 pieces. First, the pieces are cleaned with a solvent and allowed to properly dry, before they’re reassembled piece by piece with lashings of two-part epoxy. Proper technique is used, with the epoxy being given plenty of time to cure.

The result? Sadly, poor — the rod disintegrates in mere seconds, completely unable to hold together despite the JB Weld’s best efforts. It’s a fantastic material, yes – but it can’t do everything. Perhaps it could be used to cast a cylinder head instead?

Continue reading “JB Weld – Strong Enough To Repair A Connecting Rod?”

A Motion Coprocessor Without The Proprietary Layer

When you have a complex task that would sap the time and energy of your microprocessor, it makes sense to offload it to another piece of hardware. We are all used to this in the form of the graphics chipsets our computers use — specialised processors whose computing power in that specific task easily outshines that of our main CPU. This offloading of tasks is just as relevant at the microcontroller level too. One example is the EM Microelectronics EM7180 motion co-processor. It takes input from a 3-axis gyroscope/accelerometer and magnetometer, acting for all intents and purposes as a fit-and-forget component. Given an EM7810, your host can determine its heading and speed at a simple command, with no need for any hard work.

[Kris Winer] used the EM7810, but frustrated at its shortcomings decided to create a more versatile alternative. The result is a small PCB holding a Maxim MAX32660 ARM Cortex M4F microcontroller and the relevant sensors, with the MAX32660’s increased power and integrated flash easily eclipsing the EM7810.

As a design exercise it’s an interesting read even if you have no need for one. His write-up goes into detail on the state of the motion coprocessor art, and then looks carefully at pushing the limits of what is possible using an inexpensive PCB fabrication house such as OSH Park — you can get this chip as a Wafer-Level Package (WLP) which is definitely off-limits. Even with the TQFN-24 he picked though, the result is a tiny board and we’re happy to see it as an entry in the Return of the Square Inch Project!

It is perhaps surprising how few projects like this one make it into our sphere, as a community we tend to focus upon making one processor do all the hard work. But with the ready availability of inexpensive and powerful devices, perhaps this is an approach that we should reconsider.

Multi-switch Useless Box Is Useless In Multiple Ways

We’ve probably all seen (and built) a useless box, in which you flip a switch that activates a servo that pops out a finger and flips the switch off. [Coffeman500] decided to take this a step further by building a useless box with multiple switches. Flip one, the finger pops out to flip it back. Flip several switches, and the finger pops out and flips each back in turn.

It’s a smart build that [coffeeman500] says is his first electronics build. The compulsively switching brain of this is an ATmega328 driving an A4988 stepper motor driver, with one stepper moving the finger mechanism and the other moving the finger along a rail to reach each switch in turn. [Coffeeman500] has released the complete plans for this wonderful waste of time, including 3D models for the box and mechanism, plus the code. Redditors are already planning bigger and more useless designs with more switches, a pursuit that we fully support.

Continue reading “Multi-switch Useless Box Is Useless In Multiple Ways”

Radio Antenna Mismatching: VSWR Explained

If you have ever operated any sort of transmitting equipment, you’ve probably heard about matching an antenna to the transmitter and using the right co-ax cable. Having everything match — for example, at 50 or 75 ohms — allows the most power to get to the antenna and out into the airwaves. Even for receiving this is important, but you generally don’t hear about it as much for receivers. But here’s a question: if a 100-watt transmitter feeds a mismatched antenna and only delivers 50 watts, where did the other 50 watts go? [ElectronicsNotes] has a multi-part blog entry that explains what happens on a mismatched transmission line, including an in-depth look at voltage standing wave ratio or VSWR.

We liked the very clean graphics showing how different load mismatches affect the transmission line. We also liked how he tackled return loss and reflection coefficient.

Continue reading “Radio Antenna Mismatching: VSWR Explained”

A Tiny Steering Wheel You Can Print

Racing games are a great way to test drive that Ferrari you can’t quite afford yet, and the quality of simulations has greatly improved in the last 30 or so years. While there are all manner of high-quality steering wheels to connect to your PC or home console, many gamers still choose to play using a typical controller, using the thumbstick for steering. What if there was something in between?

What we have here is a tiny steering wheel you can print for an Xbox One controller, that mounts to the controller frame and turns rotational motion into vaguely linear horizontal motion on the thumbstick. It does come with some pitfalls, namely blocking a button or two and it also obscures some of the D-pad. However, for those of you driving in automatic mode without using the buttons to shift gears, this could be a fun device to experiment with. Files to print your own are available on Thingiverse.

It’s a neat hack, and there’s plenty of room to take the idea further and personalise it to suit your own tastes. While you’re there, why stop at steering? You could make your own custom buttons, too!

[via Gizmodo, thanks to Itay for the tip!]