[Cody] Builds A Chlorine Machine

In his continuing bid to have his YouTube channel demonetized, [Cody] has decided to share how he makes chlorine gas in his lab. Because nothing could go wrong with something that uses five pounds of liquid mercury and electricity to make chlorine, hydrogen, and lye.

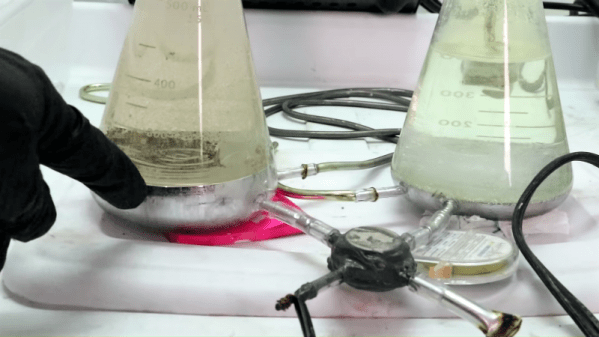
We’ll be the first to admit that we don’t fully understand how the Chlorine Machine works. The electrochemistry end of it is pretty straightforward – it uses electrolysis to liberate the chlorine from a brine solution. One side of the electrochemical cell generates chlorine, and one side gives off hydrogen as a byproduct. We even get the purpose of the mercury cathode, which captures the sodium metal as an amalgam. What baffles us is how [Cody] is pumping the five pounds of mercury between the two halves of the cell. Moving such a dense liquid would seem challenging, and after toying with more traditional approaches like a peristaltic pump, [Cody] leveraged the conductivity of mercury to pump it using a couple of neodymium magnets. He doesn’t really explain the idea other than describing it as a “rail-gun for mercury,” but it appears to work well enough to gently circulate the mercury. Check out the video below for the build, which was able to produce enough chlorine to dissolve gold and to bleach cloth.

We need to offer the usual warnings about how playing with corrosive, reactive, and toxic materials is probably not for everyone. His past videos, from turning urine into gunpowder to mining platinum from the side of the road, show that [Cody] is clearly very knowledgeable in the ways of chemistry and that he takes to proper precautions. So if you’ve got a jug of mercury and you want to try this out, just be careful.

Continue reading “[Cody] Builds A Chlorine Machine”

NASA Wants You… To Design Their Robot

No one loves a good competition more than Hackaday. We run enough to keep anyone busy. But if you have a little spare time after designing your one inch PCB, you might check out the competition to develop a robotic arm for NASA’s Astrobee robot.

Some of the challenges are already closed, but there are quite a few still open for a few more months (despite the published closing date of and these look like great projects for a hacker. In particular, the software architecture and command, data, and power system are yet to start.

But don’t let the $25,000 fool you. That’s spread out over a number of awards for the entire series. Each task has an award that ranges from $250 to $5,000. However, you also have to win that award, of course. If you register, however, you do get a sticker that has flown on the space station.

If you haven’t seen Astrobee, it is a flying robot made to assist astronauts and cosmonauts on the International Space Station. The robot is really a floating sensor platform that can do some autonomous tasks but can also act as a telepresence robot for flight controllers. You might enjoy the second video below if you haven’t seen Astrobee, before.

We covered the Astrobee before. If you’d like to visit the space station yourself, it isn’t quite telepresence, but Google can help you out.

Continue reading “NASA Wants You… To Design Their Robot”

Weaponized Fidget Spinners

Fidget spinners were the hottest new craze at one point, but their 15 minutes of fame has well and truly passed. They’re great for fidgeting, and not a whole lot else. One of the main objectives around their use is to spin them as quickly as possible. After [Sushi Ramen] hurt himself after spinning one up with compressed air, however – a new and dangerous idea came to mind.

What you’re looking at is a fidget spinner sword, powered by compressed air. That alone is somewhat of a blessing, as it prevents this horrifying device from being easily man-portable. Through a breakneck build montage, we see almost fifty fidget spinners (in hyperchrome, no less) mounted to a shaft. The shaft is then attached to a hilt and a plastic line is artfully bent up to deliver compressed air at the pull of a trigger, causing the fidget spinners to rotate at moderate speed.

It’s true that the fidget spinners don’t receive a whole lot of torque from the compressed air and thus most of the damage is done purely by swinging the presumably quite heavy device at fragile glass objects. That said, with nothing ventured, nothing is gained, and we’re always glad to see research and development continuing in the fidget spinner space.

Looking for more effective ways to spin, and spin quickly? Check out this brushless motor setup. Video after the break.

Continue reading “Weaponized Fidget Spinners”

Custom Split-Flap Display Is A Unique Way To Show The Weather

There’s little doubt about the charms of a split-flap display. Watching a display build up a clear, legible message by flipping cards can be mesmerizing, whether on a retro clock radio from the 70s or as part of a big arrival and departure display at an airport or train station. But a weather station with a split-flap display? That’s something you don’t see often.

We usually see projects using split-flap units harvested from some kind of commercial display, but [gabbapeople] decided to go custom and build these displays from the ground up. The frame and mechanicals for each display are made from laser-cut acrylic, as are the flip-card halves. Each cell can display a full alphanumeric character set on 36 cards, with each display driven by its own stepper. An Arduino fetches current conditions from a weather API and translates the description of the weather into a four-character code. The codes shown in the video below seem a little cryptic, but the abbreviation list posted with the project makes things a bit clearer. Bonus points if you can figure out what “HMOO” is without looking at the list.

We like the look and feel of this, but we wonder if split-flap icons might be a neat way to display weather too. It seems like it would be easy enough to do with [gabbapeople]’s detailed instructions. Or you could always look at one of the many other custom split-flap displays we’ve featured for more inspiration.

Continue reading “Custom Split-Flap Display Is A Unique Way To Show The Weather”

PC In An SNES Case Is A Weirdly Perfect Fit

For better or for worse, a considerable number of the projects we’ve seen here at Hackaday can be accurately summarized as: “Raspberry Pi put into something.” Which is hardly a surprise, the Pi is so tiny that it perfectly lends itself to getting grafted into unsuspecting pieces of consumer tech. But we see far fewer projects that manage to do the same trick with proper x86 PC hardware, but that’s not much of a surprise either given how much larger a motherboard and its components are.

So this PC built into a Super Nintendo case by [NoshBar] is something of a double rarity. Not only does it ditch the plodding Raspberry Pi for a Mini-ITX Intel i5 computer, but it manages to fit it all in so effortlessly that you might think the PAL SNES case was designed by a time traveler for this express purpose. The original power switch and status LED are functional, and you can even pop open the cart slot for some additional airflow.

[NoshBar] started by grinding off all the protruding bits on the inside of the SNES case with a Dremel, and then pushed some bolts through the bottom to serve as mounting posts for the ASUS H110T motherboard. With a low profile Noctua CPU cooler mounted on top, it fits perfectly within the console’s case. There was even enough room inside to add in a modified laptop charger to serve as the power supply.

To round out the build, [NoshBar] managed to get the original power slider on the top of the console to turn the PC on and off by gluing a spring-loaded button onto the side of the CPU cooler. In another fantastic stroke of luck, it lined up almost perfectly with where the power switch was on the original SNES board. Finally, the controller ports have been wired up as USB, complete with an adapter dongle.

[NoshBar] tells us the inspiration for sending this one in was the Xbox-turned-PC we recently covered, which readers might recall fought back quite a bit harder during its conversion.

8087's -5V bias charge pump circuit

How The 8087 Coprocessor Got Its Bias

Most of us have been there. You build a device but realize you need two or more voltages. You could hook up multiple power supplies but that can be inconvenient and just not elegant. Alternatively, you can do something in the device itself to create the extra voltages starting with just one. When [Ken Shirriff] decapped an 8087 coprocessor to begin exploring it, he found it had that very problem. It needed: +5 V, a ground, and an additional -5 V.

His exploration starts with a smoking gun. After decapping the chip and counting out all the bond wires going to the various pads, he saw there was one too many. It wasn’t hard to see that the extra wire went to the chip’s substrate itself. This was for providing a negative bias to the substrate, something done in some high-performance chips to get increased speed, a more predictable transistor threshold voltage, and to reduce leakage current. Examining where the bond wire went to in the circuitry he found the two charge pump circuits shown in the banner image. Those worked in alternating fashion to supply a -5 V bias to the substrate, or rather around -3 V when you take into account voltage drops. Of course, he also explains the circuits and dives in deeper, including showing how the oscillations are provided to make the charge pumps work.

If this is anything like [Ken’s] previous explorations, it’ll be the first of a series of posts exploring the 8087. At least that’s what we hope given how he’d previously delighted us with a reverse engineering of the 76477 sound effects chip used in Space Invaders and then went deeper to talk about integrated injection logic (I2L) as used in parts of the chip.

When Every Last Nanoamp Matters

You can get electricity from just about anything. That old crystal radio kit you built as a kid taught you that, but how about doing something a little more interesting than listening to the local AM station with an earpiece connected to a radiator? That’s what the Electron Bucket is aiming to do. It’s a power harvesting device that grabs electricity from just about anywhere, whether it’s a piece of aluminum foil or a bunch of LEDs.

The basic idea behind the Electron Bucket is to harvest ambient radio waves just like your old crystal radio kit. There’s a voltage doubler, a rectifier, and as a slight twist, a power management circuit that would normally be found in battery-powered electronics.

Of course, this circuit can do more than harvesting electricity from ambient radio waves. By connecting a bunch of LEDs together, it’s possible to send a few Bluetooth packets around. This is pretty impressive — the circuit is using LEDs as solar cells, which normally produce about 50nA of current at 0.5V in direct sunlight. By connecting 12 LEDs in parallel and series, it manages to harvest just enough energy to run a small wireless module. That’s impressive, and an interesting entry to the Power Harvesting Challenge in this year’s Hackaday Prize.