Lack Of Space Is No Longer An Excuse For Not Having A Pen Plotter

Pen plotters, those mechanical X-Y drawing machines that have in many cases been superseded by inkjet and other printer technologies, exert a fascination from a section of our community. Both analogue and digital machines are brought out of retirement for some impressive graphical effects, and we suspect that more than one of you wishes you had the space for one in your lives.

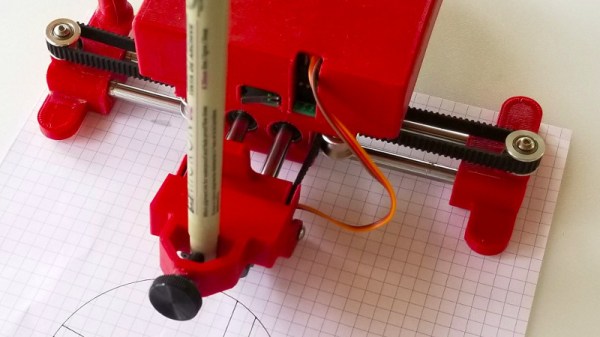
The good news is that you now no longer need room for a hefty piece of 1970s instrumentation, because the ever-inventive [Bart Dring] has produced a tiny 3D-printed plotter with an ESP32 at its heart. The ESP runs his ESP32 port of the Grbl firmware, and can handle a G-code file placed wirelessly upon the controller’s SD card.

The mechanism is particularly clever, using a single belt for both X and Y axes. The pen lift Z axis is a hinged design rather than a linear one, with a hobby servo doing the lifting. The hinge bearings are placed as close as possible to the paper surface to achieve an approximation to a vertical lift. You can see the machine in action in the video below the break, drawing its own self-portrait.

If you are a long-time reader you will recognise [Bart]’s work, he has appeared here quite a few times. His coaster-cutting machine and his CNC plotter badge are particularly memorable.

Continue reading “Lack Of Space Is No Longer An Excuse For Not Having A Pen Plotter”

Build Your Own LED Glow Poi

Spinning poi is an entertaining pastime, and LEDs can make a great addition to the experience. [MilanDer] built some LED poi of their very own, using a few maker staples along the way.

A 3D printed enclosure is first created, using “clear” PLA that in practice produces translucent white parts. This acts as a great diffuser for the APA102 LEDs inside. The LEDs are driven by an Arduino Pro Mini, which is fitted inside the enclosure along with a buck-boost converter, lithium battery and charge board. Finally, a strap is added to allow the poi to be spun easily by the user.

The visual effect is great, and through the use of an infrared receiver, the poi can be remotely controlled to deliver different RGB animations at the touch of a button. We’d love to see a group of spinners with synchronized colored poi thanks to a master controller, and this hardware would be more than capable of the task.

We’ve seen some advanced networked Poi before, too. If you’ve got a great LED build, be sure to let us know.

Building A Safe ESP32 Home Energy Monitor

The first step to reducing the energy consumption of your home is figuring out how much you actually use in the first place. After all, you need a baseline to compare against when you start making changes. But fiddling around with high voltage is something a lot of hackers will go out of their way to avoid. Luckily, as [Xavier Decuyper] explains, you can build a very robust DIY energy monitoring system without having to modify your AC wiring.

In the video after the break, [Xavier] goes over the theory of how it all works, but the short version is that you just need to use a Current Transformer (CT) sensor. These little devices clamp over an AC wire and detect how much current is passing through it via induction. In his case, he used a YHDC SCT-013-030 sensor that can measure up to 30 amps and costs about $12 USD. It outputs a voltage between 0 and 1 volts, which makes it extremely easy to read using the ADC of your favorite microcontroller.

Once you’ve got the CT sensor connected to your microcontroller, the rest really just depends on how far you want to take the software side of things. You could just log the current consumption to a plain text file if that’s your style, but [Xavier] wanted to challenge himself to develop a energy monitoring system that rivaled commercial offerings so he took the data and ran with it.

A good chunk of his write-up explains how the used Amazon Web Services (AWS) to process and ultimately display all the data he collects with his ESP32 energy monitor. Every 30 seconds, the hardware reports the current consumption to AWS through MQTT. The readings are stored in a database, and [Xavier] uses GraphQL and Dygraphs to generate visualizations. He even used Ionic to develop a cross-platform mobile application so he can fawn over his professional looking charts and graphs on the go.

We’ve already seen how carefully monitoring energy consumption can uncover some surprising trends, so if you want to go green and don’t have an optically coupled electricity meter, the CT sensor method might be just what you need.

Continue reading “Building A Safe ESP32 Home Energy Monitor”

This Wristwatch Is A Free Form Work Of Art

Free-form circuitry built as open wire sculpture can produce beautiful pieces of electronics, but it does not always lend itself to situations in which it might be placed under physical stress. Thus the sight of [Mile]’s free-form wristwatch is something of a surprise, as a wristwatch cam be exposed to significant mechanical stress in its everyday use.

A wire Wrencher graces thewe underside.
A wire Wrencher graces the underside.

The electronic side of this watch is hardly unusual, the familiar ATmega328-AU low-power microcontroller drives a tiny OLED display. Mechanically though it is a different story, as the outline of a wristwatch shell is traced in copper wire with a very neat rendition of a Wrencher in its base, and a glass lens is installed over the screen to take the place of a watch glass. A strap completes the wristwatch, which can then be worn like any other. Power comes from a small 110 mAh lithium-polymer cell, which it is claimed gives between 6 and 7 hours of on time and over a month of standby with moderate use.

Unfortunately there does not seem to be much detail about the software in this project, but since ATmega328 clocks and watches are ten a penny we don’t think that’s a problem. The key feature is that free-form construction, and for that we like it a lot.

Does This Timber Have The Right Timbre?

A hi-fi amplifier used to be a rite of passage for the home electronic constructor, back in the days when consumer electronics was still dominated by analogue entertainment. It’s unusual then to see [carbono.silício]’s stereo amplifier project, constructed in an open-wire circuit sculpture form on a log. You didn’t read that incorrectly, it’s built not on a breadboard but on a piece of Olea Maderensis, or Madiera Olive wood, complete with bark. This endangered tree was not felled, instead it was a piece blown down after a storm.

The circuit is slightly unusual for a project such as this, in that it uses a pair of LM386 audio amplifier chips. This isn’t an unusual component, but it’s one more commonly seen providing the amplification for a small speaker project than in a stereo hi-fi amplifier. But the construction is beautifully done, with very neatly routed wires, a single central volume knob, and a blue LED power light. A particularly nice touch are the aluminium electrolytic capacitors, we suspect having had their plastic sleeving removed.

We’ve had our share of stereo amp projects here, and some of them are surprisingly simple. We have even been known to partake of them ourselves.

Add An Ant To Your Desk For Some Compact PCB Manufacturing

Usually when one thinks of using a CNC machine for producing PCBs, one thinks of those big, bulky CNC machines that pretty much fill an entire desk. But what if a CNC machine could be small enough to fit on a desk without getting in the way, yet still be useful enough to make single- and double-sided PCBs? This was the idea behind The Ant, the compact PCB manufacturing machine which [Mattia] and [Angelo] designed and open sourced.

In addition to the above linked Bitbucket repository for the project, the ‘Ant Team’ has a YouTube channel on which they have a range of rather professionally edited videos on the project, ranging from constructing the little machine, to various updates and more  Also see the video that is attached after the link for a visual introduction to the project.

Support and community interaction is mostly performed via the Reddit group for the project, where the diminutive machine finds a welcoming community as it continues to evolve. The machine itself is specified at this point as being able to built from commercially available and 3D printed parts, requiring no further tools for cutting or shaping. The precision is about 0.2 mm trace spacing.

Optical alignment for double-sided boards is achieved using a USB micro camera and the bCNC software, while the cost for materials is said to be quite inexpensive when compared with commercial solutions

Honestly, after seeing the machine in action, wouldn’t you want to have a CNC machine that’s so small and good-looking on your desk? If there’s one thing one might want to add, it’s probably a way to deal with the copper dust that’s produced while creating PCBs. Having to clean that off the desk after each PCB manufacturing session would get a bit cumbersome, we imagine.

Continue reading “Add An Ant To Your Desk For Some Compact PCB Manufacturing”

Familiar Parts Make Interfacing Weather Station Easy

Hackers love to measure things, and enjoy monitoring the world around them. Weather stations are a big part of this, and many tinkerers have tried to interface such hardware with varying levels of success. [Ray] is one such individual, and was pleasantly surprised when working on a recent project.

Unlike more old-school models, the model [Ray] found himself working on was a modern unit with a significant number of sensors, a WiFi interface, and even a color screen. Reading the manual, [Ray] noted the device used the IP 192.168.4.1, which is commonly used by the ESP8266 when running in AP mode. The hunch proved to be correct, and opening the device revealed an ESP-WROOM-2 running the show.

Now working with familiar parts, it was simple to hook up to the onboard serial port to scope for data. To [Ray]’s delight, the device was outputting all the weather data out over the connection, and in plaintext to boot. The station also featured the ability to connect to Weather Underground, and watching the debug messages during this process helped [Ray] to understand the format of the information.

It’s rare that manufacturers make it so easy, but debug ports can often be a treasure trove of information to the budding hacker. We’ve seen others cracked before, too.