For some, the idea of several hours of painting and designing intricate models with minute details and features sounds like a delightful afternoon spent. Some of us would much rather just have it come already painted with motors so that it can move. [Cory Collins] sought to combine these two hobbies by building a highly detailed motorized tank dubbed Tankbot 2.3. (Video, embedded below.)
It’s based on a simple hexapod kit ordered online that includes a built-in Arduino compatible board (it’s based on the Arduino 2560 Mega). The legs were redesigned to match the aesthetic that [Cory] was going for. The redesign allows for an extra pivot in the leg mechanism. The turret section was designed and built on top of the base with support for a servo to turn it (though the firmware isn’t quite there yet). After all the parts were 3d printed, the laborious process of painting began. With some delicate airbrushing and some quick stencils cut for the decals, it was complete.
We are amazed by the types of kits and parts that you can find online and the fact that they’re usually inexpensive to boot. We’ve come a long way since 2013 when we covered a much simpler Arduino based tank.
Code obfuscation has been around for a long time. The obfuscated C contest first ran way back in 1984, but there are examples of natural language obfuscation from way earlier in history. Namely Cockney rhyming slang, like saying “Lady from Bristol” instead of “pistol” or “lump of lead” instead of “head”. It’s speculated that Cockney was originally used to allow the criminal class to have conversations without tipping off police.
Code obfuscation in malware serves a similar purpose — hiding from security devices and applications. There are known code snippets and blacklisted IP addresses that anti-malware software scans for. If that known bad code can be successfully obfuscated, it can avoid detection. This is a bit of a constant game of cat-and-mouse, as the deobfuscation code itself eventually makes the blacklist. This leads to new obfuscation techniques, sometimes quite off the wall. Well this week, I found a humdinger of an oddball approach. Morse Code.
Yep, dots and dashes. The whole attack goes like this. You receive an email, claiming to be an invoice. It’s a .xlsx.hTML file. If you don’t notice the odd file extension, and actually let it open, you’re treated to a web page. The source of that page is a very minimal JS script that consists of a morse code decoder, and a payload encoded in Morse. In this case, the payload is simply a pair of external scripts that ask for an Office 365 login. The novel aspect of this is definitely the Morse Code. Yes, our own [Danie] covered this earlier this week, but it was too good not to mention here. Continue reading “This Week In Security: Morse Code Malware, Literal And Figurative Watering Holes, And More”→
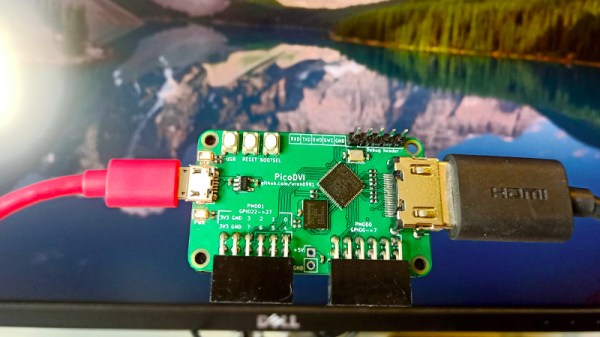
When we first saw the Raspberry Pi Pico and its RP2040 microcontroller last month it was obvious that to be more than just yet another ARM chip it needed something special, and that appeared to be present in the form of its onboard PIO peripherals. We were eagerly awaiting how the community might use them to push the RP2040 capabilities beyond their advertised limits. Now [Luke Wren] provides us with an example, as he pushes an RP2040 to produce a DVI signal suitable to drive an HDMI monitor.
It shouldn’t be a surprise that the chip can be overclocked, however it’s impressive to find that it can reach the 252 MHz necessary to generate the DVI timing. With appropriate terminations it proved possible for the GPIO lines to mimic the differential signalling required by the spec. A PCB with the RP2040 and an HDMI socket was created, also providing a couple of PMOD connectors for expansion. All code and software can be found in a GitHub repository.
The result is a usable DVI output which though it is a relatively low resolution 640×480 pixels at 60 Hz is still a major advance over the usual composite video provided by microcontroller projects. With composite support on monitors becoming a legacy item it’s a welcome sight to see an accessible path to an HDMI or DVI output without using an FPGA.
If you’ve ever pushed the needle a bit on your Raspberry Pi, there’s a good chance you’ve been visited by the dreaded lightning bolt icon. When it pops up on the corner of the screen, it’s a warning that the input voltage is dipping into the danger zone. If you see this symbol often, the usual recommendation is to get a higher capacity power supply. But experienced Pi wranglers will know that the board can still be skittish.
Sick of seeing this icon during his MAME sessions, [Majenko] decided to attack the problem directly by taking a close look at the power supply circuitry of the Pi 4. While the official schematics for everyone’s favorite single-board computer are unfortunately incomplete, he was still able to identify a few components that struck him as a bit odd. While we wouldn’t necessarily recommend you rush out and make these same modifications to your own board, the early results are certainly promising.
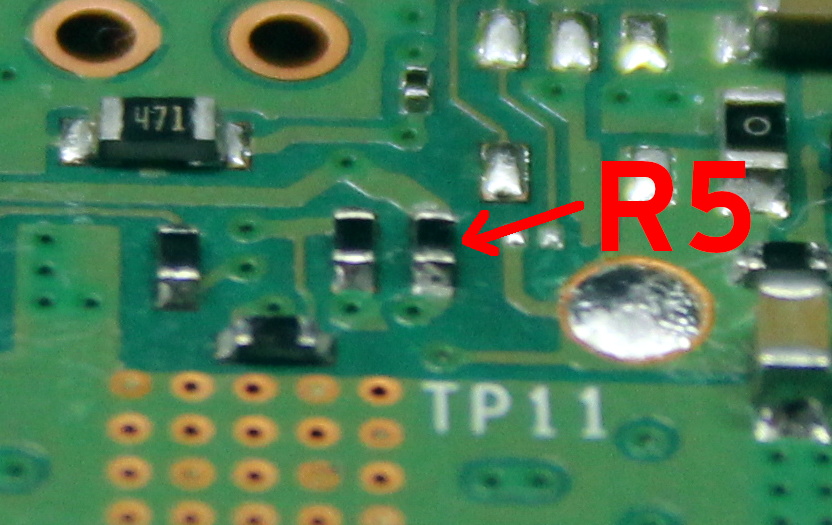
The first potential culprit [Majenko] found was a 10 ohm resistor on the 5 V line. He figured this part alone would have a greater impact on the system voltage than a dodgy USB cable would. The components aren’t labeled on the Pi’s PCB, but with a little poking of the multimeter he was able to track down the 0402 component and replace it with a tiny piece of wire. He powered up the Pi and ran a few games to test the fix, and while he definitely got fewer low-voltage warnings, there was still the occasional brownout.
Do we really need this part?
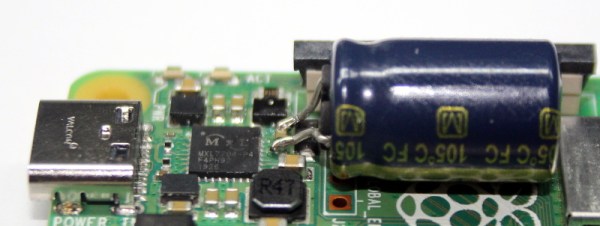
Going back to the schematic, he noticed there was a 10 uF capacitor on the same line as the resistor. What if he bumped that up a bit? The USB specifications say that’s the maximum capacitive load for a downstream device, but he reasoned that’s really only a problem for people trying to power the Pi from their computer’s USB port.
Tacking a 470 uF electrolytic capacitor to the existing SMD part might look a little funny, but after the installation, [Majenko] reports there hasn’t been a single low-voltage warning. He wonders if the addition of the larger capacitor might make removing the resistor unnecessary, but since he doesn’t want to mess with a good thing, that determination will be left as an exercise for the reader.