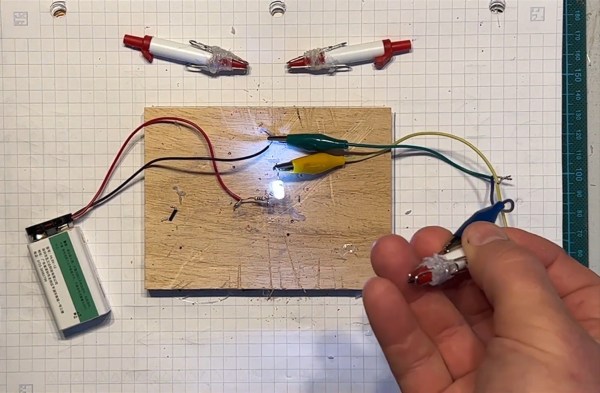
Alright, here’s your quick and dirty hack for the day. The astute among you may recall [Peter Waldraff]’s bookshelf train build of a few days ago, and the fact that he used a switch made from a dead ballpoint pen to light up the scene. Fortunately, [Peter] wrote in to give us the details of this low-voltage sub-build, which you can see in the video after the break.
Essentially, [Peter] starts by making a shortened version of the pen. He modifies nearly every bit of it, including cutting down the ink cartridge, so if you try this, make sure the thing is all dried up first. Then, as he is screwing the point holder back on the barrel, he wraps elastic cord around the inside barrel in lieu of having sewing thread lying around. This cord along with some hot glue will hold a pair of paper clips to the sides of the point holder. When the pen is clicked into the writing position, it makes a connection between the paper clips and closes the circuit on whatever is wired into it.
What types of little hacks like this have gotten you through the build? Let us know in the comments, or better yet, write it up and drop us a tip. By the way, here is that bookshelf train build in case you missed it.
When most people think of tube circuits, the first thing that comes to mind is often the use of high-voltage power supplies. It wasn’t a given for tube circuits, though, as a range of low-voltage devices were developed for applications such as car radios. It’s one of these, an ECH83 triode-heptode, which [mircemk] has taken as the basis of an audio preamplifier circuit.
The preamp circuit is pretty simple, being a two-stage single-ended design using both halves of the tube. Between the two is a three-band tone control circuit as used in classic guitar amplifiers, making for a serviceable and easily achievable way to chase that elusive “valve sound.”
There is much discussion among audio enthusiasts about the supposed benefits of vacuum technology as opposed to transistors in an amplifier. Much of it centres around the idea that tubes distort in the even harmonics while semiconductors are supposed to do so in the odd harmonics. Still, we’d be inclined to spot a bit of snake oil instead and point to early transistor amplifiers simply being not very good compared to the tube amps of the day. That said, a well-made tube amplifier set-up will sound just as amazing as it always did, and since this one is paired with a matching power amp we wouldn’t say no to it ourselves.
Typically, when we want to build something with a DC motor, we might grab a bunch of AAs, or a single lithium cell at the very least. Electric toothbrushes often run on more humble power sources, like a single NiMH battery. They’re designed to get useful motion out of just 1.2V, and [Marian Hryntsiv] has taken a look at what makes them tick.
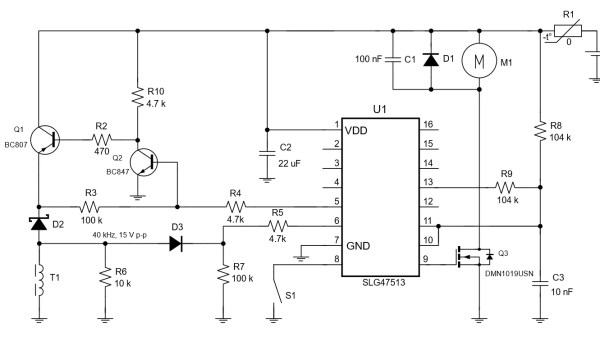
The article focuses on an electric toothbrush built around the Low Voltage GreenPAK™ SLG47513 chip. It’s designed to work at voltages from just 1 to 1.65 V. To make the most of the limited power available, the toothbrush stays in sleep mode most of the time when it’s not working in oral health.
[Marian] steps through the various parts of the circuit, and also explains the unique functionality baked into the brush. Of particular interest are the timer routines that guide the user through brushing each section of the mouth in turn, before a notification that tells them that 2 minutes of brushing time has elapsed. There’s also a useful explanation of the inductive charging method used.
Electric toothbrushes may be mundane home items today, but they’re an example of a product that has largely already been optimized to the nth degree. Until laser-based plaque removal or enamel regeneration technology gets off the ground, this is as good as it gets. We can dream, though!
Much like vinyl records, tube amplifiers are still prized for their perceived sound qualities, even though both technologies have been largely replaced otherwise. The major drawback to designing around vacuum tubes, if you can find them at all, is often driving them with the large voltages they often require to heat them to the proper temperatures. There are a small handful of old tubes that need an impressively low voltage to work, though, and [J.G.] has put a few of them to work in this battery-powered audio tube amplifier.
The key to the build is the Russian-made 2SH27L battery tubes which are originally designed in Germany for high-frequency applications but can be made to work for audio amplification in a pinch. The power amplifier section also makes use of 2P29L tubes, which have similar characteristics as far as power draw is concerned. Normally, vacuum tubes rely on a resistive heater to eject electrons from a conductive surface, which can involve large amounts of power, but both of these types of tubes are designed to achieve this effect with only 2.2 volts provided to the heaters.
[J.G.] is powering this amplifier with a battery outputting 5V via a USB connection, and driving a fairly standard set of speakers borrowed from a computer. While there aren’t any audio files for us to hear, it certainly looks impressive. And, as it is getting harder and harder to find vacuum tubes nowadays, if you’re determined to build your own amplifier anyway take a look at this one which uses vacuum tubes built from scratch.
Nowadays, some people in Europe worry about energy prices climbing, and even if all the related problems disappear overnight, we’ll no doubt be seeing some amounts of price increase. As a hacker, you’re in a good position to evaluate the energy consuming devices at your home, and maybe even do something about them. Well, [Peter] put some solar panels on his roof, but couldn’t quite figure out a decent way to legally tie them into the public grid or at least his flat’s 220V network. Naturally, a good solution was to create an independent low-voltage DC network in parallel and put a bunch of devices on it instead!
He went with 48V, since it’s a voltage that’s high enough to be efficient, easy to get equipment like DC-DCs for, safe when it comes to legal matters concerned, and overall compatible with his solar panel setup. Since then, he’s been putting devices like laptops, chargers and lamps onto the DC rail instead of having them be plugged in, and his home infrastructure, which includes a rack full of Raspberry Pi boards, has been quite content running 24/7 from the 48V rail. There’s a backup PSU from regular AC in case of overcast weather, and in case of grid power failures, two hefty LiFePO4 accumulators will run all the 48V-connected appliances for up to two and a half days.
The setup has produced and consumed 115kWh within the first two months – a hefty contribution to a hacker’s energy independence project, and there’s enough specifics in the blog post for all your inspiration needs. This project is a reminder that low-voltage DC network projects are a decent choice on a local scale – we’ve seen quite viable proof-of-concept projects done at hackercamps, but you can just build a small DC UPS if you’re only looking to dip your feet in. Perhaps, soon we’ll figure out a wall socket for such networks, too.
Building a Raspberry Pi laptop is not that uncommon. In fact, just a few clicks from any of the major electronics suppliers will have the parts needed for such a project speeding on their way to your house in no time at all. But [joekutz] holds the uncontroversial belief that the value in these parts has somewhat diminishing returns, so he struck out to build his own Pi laptop with a €4 DVD player screen and a whole lot of circuit wizardry to make his parts bin laptop work.
The major hurdle that he needed to overcome was how to power both the display and the Pi with the two small battery banks he had on hand. Getting 5V for the Pi was easy enough, but the display requires 8V so he added one lithium ion battery in series (with its own fuse) in order to reach the required voltage. This does make charging slightly difficult but he also has a unique four-pole break-before-make switch on hand which doesn’t exactly simplify things, but it does make the project function without the risk of short-circuiting any of the batteries he used.
The project also makes use of an interesting custom circuit which provides low voltage protection for that one lonely lithium battery as well. All in all it’s a master course in using some quality circuit-building skills and electrical theory to make do with on-hand parts (and some 3D printing) rather than simply buying one’s way out of a problem. And the end result is something that’s great for anything from watching movies to playing some retro games.
If you’ve ever pushed the needle a bit on your Raspberry Pi, there’s a good chance you’ve been visited by the dreaded lightning bolt icon. When it pops up on the corner of the screen, it’s a warning that the input voltage is dipping into the danger zone. If you see this symbol often, the usual recommendation is to get a higher capacity power supply. But experienced Pi wranglers will know that the board can still be skittish.
Sick of seeing this icon during his MAME sessions, [Majenko] decided to attack the problem directly by taking a close look at the power supply circuitry of the Pi 4. While the official schematics for everyone’s favorite single-board computer are unfortunately incomplete, he was still able to identify a few components that struck him as a bit odd. While we wouldn’t necessarily recommend you rush out and make these same modifications to your own board, the early results are certainly promising.
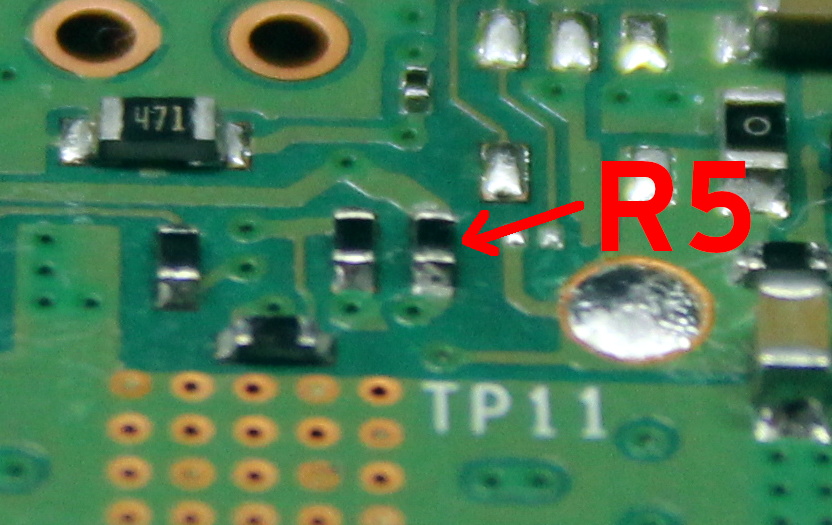
The first potential culprit [Majenko] found was a 10 ohm resistor on the 5 V line. He figured this part alone would have a greater impact on the system voltage than a dodgy USB cable would. The components aren’t labeled on the Pi’s PCB, but with a little poking of the multimeter he was able to track down the 0402 component and replace it with a tiny piece of wire. He powered up the Pi and ran a few games to test the fix, and while he definitely got fewer low-voltage warnings, there was still the occasional brownout.
Do we really need this part?
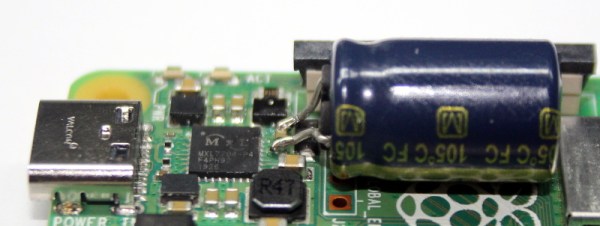
Going back to the schematic, he noticed there was a 10 uF capacitor on the same line as the resistor. What if he bumped that up a bit? The USB specifications say that’s the maximum capacitive load for a downstream device, but he reasoned that’s really only a problem for people trying to power the Pi from their computer’s USB port.
Tacking a 470 uF electrolytic capacitor to the existing SMD part might look a little funny, but after the installation, [Majenko] reports there hasn’t been a single low-voltage warning. He wonders if the addition of the larger capacitor might make removing the resistor unnecessary, but since he doesn’t want to mess with a good thing, that determination will be left as an exercise for the reader.