Grinding Coffee Beans The Machine Shop Way

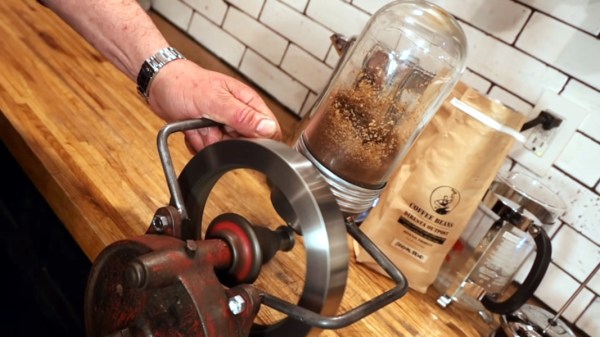
Okay, so you bought a bag of heavenly-smelling single-origin beans down at the hipster coffee shop, but forgot to have them ground. What do you do? If you’re [Jimmy DiResta], there’s no way you can run down to Walmart and pick up a grinder for $15. You commune with your tools and spend a few hours building a grinder from stuff lying around in the workshop.

This hand-crank grinder would make a great post-apocalyptic appliance, as long as we still have a way to heat water. [Jimmy] started with an old manual abrasive disc grinder, like for grinding metal, not beans.

After oiling it up to run without a hitch, he pulled out a couple of conical gears and got to work mounting one to the grinder shaft and the other to the business part of a vintage industrial light fixture.

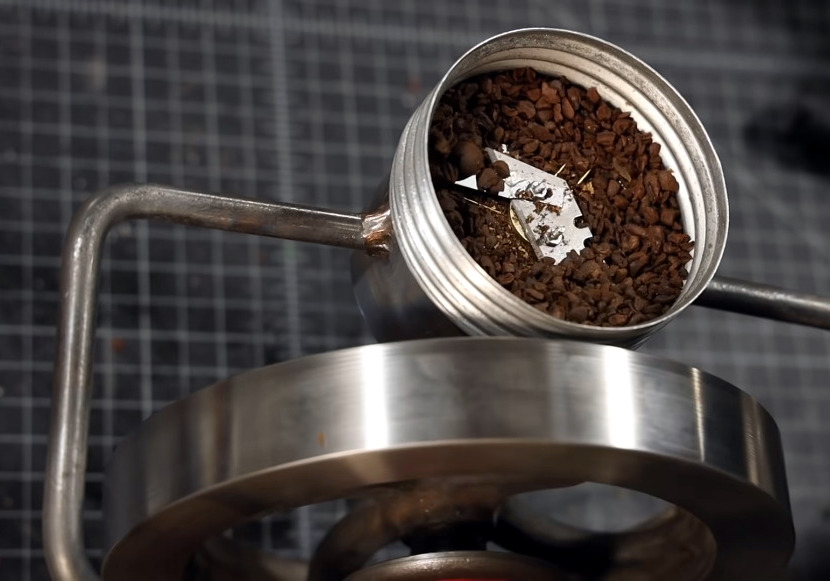
We thought for sure this was going to be a burr grinder, but were a bit disappointed to watch [Jimmy] drill holes through a utility knife blade in order to make a blade grinder. Honestly, we’re kind of surprised that he didn’t machine some burrs, but the result is impressive and lovely nonetheless.

We love that the whole thing quick-disconnects from the grinder thanks to a custom cuff that holds the light bulb just so, we just hope that [Jimmy] gave that light bulb a good cleaning first. Grab a cup of whatever and check out the build video after the break.

Not exactly your kind of shop? You could always print an emergency coffee grinder.

Continue reading “Grinding Coffee Beans The Machine Shop Way”

Exploring The World Of Nintendo 3DS Homebrew

When Nintendo officially ended production of the 3DS in September 2020, it wasn’t exactly a surprise. For one thing, some variation of the handheld system had been on the market since 2011. Which is not to say the product line had become stagnant: the system received a considerable mid-generation refresh, and there was even a more affordable variant introduced that dropped the eponymous stereoscopic 3D effect, but nearly a decade is still a fairly long life in the gaming industry. Of course Nintendo’s focus on the Switch, a hybrid device that blurs the line between console and handheld games, undoubtedly played a part in the decision to retire what could effectively be seen as a competing product.

While putting the 3DS out to pasture might have been the logical business move, a quick check on eBay seems to tell a different story. Whether it’s COVID keeping people indoors and increasing the demand for at-home entertainment, or the incredible library of classic and modern games the system has access to, the fact is that a used 3DS in good condition is worth more today than it was when it was brand new on the shelf this time last year.

I’ve certainly made more expensive mistakes.

In short, this was the worst possible time for me to decide that I finally wanted to buy a 3DS. Then one day I noticed the average price for a Japanese model was far lower than that of its American counterpart. I knew the hardware was identical, but could the firmware be changed?

An evening’s worth of research told me the swap was indeed possible, but inadvisable due to the difficulty and potential for unexpected behavior. Of course, that’s never stopped me before.

So after waiting the better part of a month for my mint condition 3DS to arrive from the land of the rising sun, I set out to explore the wide and wonderful world of Nintendo 3DS hacking.

Continue reading “Exploring The World Of Nintendo 3DS Homebrew”

CubeSat For Under $1000?

Want to build your own CubeSat but have been put off by the price? There may be a solution in the works — [RG Sat] has challenged himself to design and build one for less than $1,000. (Video, embedded below.)

He begins by doing a survey of available low-cost options in the first video, and finds there isn’t a complete package for less than $10,000. By the time you added all necessary “options”, the final tally would probably be well over $20,000.

His idea isn’t just a pipe dream, either. In the the fifteen months since he began the project, [RG Sat] has designed and built the avionics and electrical power system circuit boards, and is currently testing his sun tracker design. Software is written in Rust, just because he wants to learn something new. You can check out the hardware and software design files on the project’s GitHub repositories, if you are inclined to build one yourself.

[RG Sat] lays out a compelling case, but we wonder if there’s a major gotcha lurking in the dark somewhere. In fact, [RG Sat] himself asks the question, “where do these high costs come from?” Our first instinct is to point the finger at qualifying parts for space and/or testing. But if you don’t care about satellite longevity or failure rates, then maybe [RG Sat] is onto something here.

Stepping back and looking at the big picture, however, the price of a CubeSat can be a drop in the bucket when compared to the launch costs, unless you’ve got a free ride. Is hardware the best place to focus cost reduction efforts?  Regardless, [RG Sat]’s project is bound to provide interesting and useful results whether he succeeds in his goal or confirms that indeed you need $10,000 to build a CubeSat. We’ll be following his progress with interest.

We’ve written about open source CubeSats before, and also a port-mortem analysis of a failed mission that contains some good lessons. Thanks to [Jeremy Grosser] for the tip.


Run Out Of GPIO On Your Pi? Don’t Despair!

When the first Raspberry Pi rolled off the production line back in 2012 it sported a 26-pin expansion header that seemed to conceal endless possibilities. A later upgrade to the 40-pin header we have today unleashed a few more precious interfaces, but even then it’s still possible to run out. This was the problem faced by [woj], who needed a PWM line to drive a cooling fan  but whose other work had used everything on the header. The solution? Dive into the other connectors on board looking for an unused GPIO.

Every full-sized Pi has a connector for the camera and the LCD screen, and to operate some of the functions of those peripherals they contain a few extra GPIOs that aren’t normally used by end users. If  the camera or LCD is not being used then these lines are potentially up for grabs. In particular there’s a GPIO that turns the camera on or off that’s relatively easy to solder a wire to, and it was this one that fed the PWM line.

There are of course a few other ways to  find some more lines on a Pi and indeed almost any microcontroller, with one of the many types of GPIO expansion chips.  This trick is a particularly simple one though. and perhaps unsurprisingly it has surfaced here before.