Just What On Earth Is A Therm?

With the news here in Europe full of the effect of the war in Ukraine on gas supplies and consequently, prices, there it was on the radio news: a unit of measurement so uniquely British that nobody uses it in the real world and nobody even has a clue what it really means. We’re speaking of the Therm, one of those words from our grandparents’ era of coal gas powered Belling cookers and Geyser water heaters hanging over the bath, which has somehow hung on in the popular imagination as a mysterious unit of domestic gas referred to only in the mass market news media. What on earth is a therm, and why are we still hearing it on the news in the UK?

You can’t Buy A Therm

Asking the internet what a therm is reveals the answer, it’s 100,000 BTU. What’s a BTU? A British Thermal Unit, another anachronistic measurement five decades after the UK went metric, it’s the amount of energy required to raise a pound of water by a degree Fahrenheit. Which in turn is about 1,054 joules, in today’s measurements. So a therm is thus a unit of energy, can we take a look at our gas meters and see how many of them we’ve used this winter? Not so fast, because gas isn’t sold by the therm. Older gas meters had cubic feet on them, and we’re guessing that now they’re calibrated in cubic meters. We can’t even buy a therm of gas, so why on earth are the British media still using it? Continue reading “Just What On Earth Is A Therm?”

Custom Macro Keyboard With Sweet Backlighting

From the smallest 60% keyboards for those with no desk space to keyboards with number pads for those doing data entry all day, there’s a keyboard size and shape for just about everyone. The only problem, even with the largest keyboards, is that they’re still fairly limited in what they can do. If you find yourself wishing for even more functionality, you might want to build something like this custom macro keyboard with built-in LED backlighting.

Rather than go with a standard mechanical keyboard switch like a Cherry MX, this build is based around TS26-2 pushbuttons with built-in LED lighting. [atkaper] only really needed one button for managing the mute button on MS Teams, but still built a total of eight switches into this keyboard which can all be individually programmed with different functions. The controller is an Arduino Leonardo and the enclosure was 3D printed.

Paired with the classic IBM Model M keyboard, this new macro keyboard adds plenty of functionality while also having control over LED backlighting. Macro keyboards are incredibly useful, especially with their ability to easily change function with control over the software that runs on them. The key to most builds is the 32U4 chip found in some Atmel microcontrollers which allows it to easily pass keyboard (and mouse) functionality to any computer its plugged in to.

A camera slider made from wood and recycled parts

Turning Old Plotter Parts Into A Smooth Camera Slider

Taking apart old stuff and re-using the parts to make something new is how many hackers first got started in the world of mechanical and electronic engineering. But even after years working in industry we still get that tinge of excitement whenever someone offers us an old device “for parts”, and immediately begin to imagine the things we could build with the components inside.

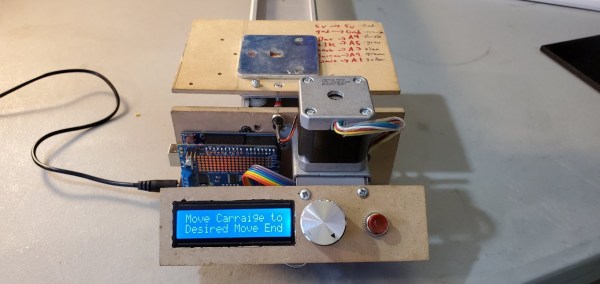
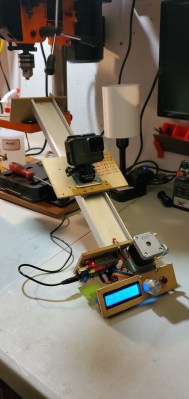
A GoPro mounted on a moving platform made from recycled partsSo when [Victor Frost] was offered an old Cricut cutting plotter, he realized he could use its parts to create the camera slider he’d been planning to build. The plotter’s X stage, controlled by a stepper motor, was ideal for moving a camera platform back and forth. [Victor] wanted to build the entire thing in a “freehand” way, without making a detailed design or purchasing any new parts. So he dived into his parts bin and dug up an Arduino, a 16×2 LCD, some wires and buttons, and a few pieces of MDF.

The camera mount is simply a piece of steel that a GoPro’s magnetic mount can latch onto, but [Victor] keeps open the possibility of mounting a proper tripod ball head. The Arduino drives the stepper motor through an Adafruit Motor Shield, with a simple user interface running on the LCD. The user can set the desired end points and speed, and then run the camera back and forth as often as needed. In this way, the software follows the same “keep it simple” philosophy as the hardware design.

If you’re planning to build your own camera slider, [Victor]’s design should be easy to copy, if you happen to have an old cutting plotter. If not, you can try this simple yet well-engineered model. Want even more? Then check out this fancy multi-axis camera motion control rig.

Continue reading “Turning Old Plotter Parts Into A Smooth Camera Slider”