Custom Macro Keyboard With Sweet Backlighting

From the smallest 60% keyboards for those with no desk space to keyboards with number pads for those doing data entry all day, there’s a keyboard size and shape for just about everyone. The only problem, even with the largest keyboards, is that they’re still fairly limited in what they can do. If you find yourself wishing for even more functionality, you might want to build something like this custom macro keyboard with built-in LED backlighting.

Rather than go with a standard mechanical keyboard switch like a Cherry MX, this build is based around TS26-2 pushbuttons with built-in LED lighting. [atkaper] only really needed one button for managing the mute button on MS Teams, but still built a total of eight switches into this keyboard which can all be individually programmed with different functions. The controller is an Arduino Leonardo and the enclosure was 3D printed.

Paired with the classic IBM Model M keyboard, this new macro keyboard adds plenty of functionality while also having control over LED backlighting. Macro keyboards are incredibly useful, especially with their ability to easily change function with control over the software that runs on them. The key to most builds is the 32U4 chip found in some Atmel microcontrollers which allows it to easily pass keyboard (and mouse) functionality to any computer its plugged in to.

Four On The Floor For Your Virtual Race Car

There was a time when building realistic simulations of vehicles was the stuff of NASA and big corporations. Today, many people have sophisticated virtual cockpits or race cars that they use with high-resolution screens or even virtual reality gear. If you think about it, a virtual car isn’t that hard to pull off. All you really need is a steering wheel, a few pedals, and a gear shifter. Sure, you can build fans to simulate the wind and put haptics in your seat, but really the input devices alone get you most of the way there. [Oli] decided he wanted a quick and easy USB gear shifter so he took a trip to the hardware store, picked up an arcade joystick, and tied it all together with an Arduino Leonardo. The finished product that you can see in the video below cost about $30 and took less than six hours to build.

The Leonardo, of course, has the ability to act like a USB human interface device (HID) so it can emulate a mouse or a keyboard or a joystick. That comes in handy for this project, as you would expect. The computer simply has to read the four joystick buttons and then decide which gear matches which buttons. For example up and to the left is first gear, while 4th gear is only the down button depressed. A custom-cut wooden shifter plate gives you the typical H pattern you expect from a stick shift.

Continue reading “Four On The Floor For Your Virtual Race Car”

KVM Uses Many Arduinos

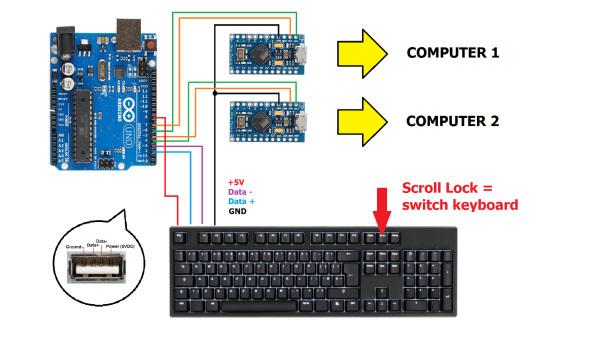
The Arduino platform is one of the most versatile microcontroller boards available, coming in a wide variety of shapes and sizes perfect for everything from blinking a few LEDs to robotics to entire home automation systems. One of its more subtle features is the ability to use its serial libraries to handle keyboard and mouse duties. While this can be used for basic HID implementations, [Nathalis] takes it a step further by using a series of Arduinos as a KVM switch; although admittedly without the video and mouse functionality yet.

To start, an Arduino Uno accepts inputs from a keyboard which handles the incoming serial signals from the keyboard. From there, two Arduino Pro Micros are attached in parallel and receive signals from the Uno to send to their respective computers. The scroll lock key, which doesn’t do much of anything in modern times except upset Excel spreadsheeting, is the toggle switch between the two outputs. Everything is standard USB HID, so it should be compatible with pretty much everything out there. All of the source code and schematics are available in the project’s repository for anyone who wants to play along at home.

Using an Arduino to emulate a USB input device doesn’t have to be all work and no play, the same basic concept can also be used to build custom gaming controllers.

Hacking An Arduino NFC Reader With WebUSB

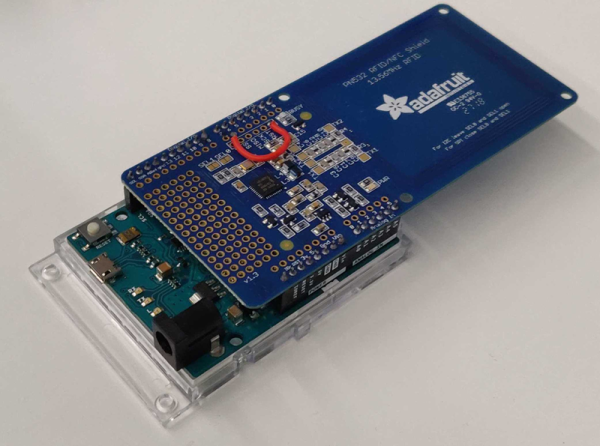
When [gdarchen] wanted to read some NFC tags, he went through several iterations. First, he tried an Electron application, and then a client-server architecture. But his final iteration was to make a standalone reader with an Arduino and use WebUSB to connect to the application on the PC.

This sounds easy, but there were quite a few tricks required to make it work. He had to hack the board to get the NFC reader’s interrupt connected correctly because he was using a Leonardo board. But the biggest problem was enabling WebUSB support. There’s a library, but you have to change over your Arduino to use USB 2.1. It turns out that’s not hard, but there’s a caveat: Once you make this change you will need the WebUSB library in all your programs or Windows will refuse to recognize the Arduino and you won’t be able to easily reprogram it.

Once you fix those things, the rest is pretty easy. The PC side uses node.js. If you back up a level in the GitHub repository, you can see the earlier non-Arduino versions of the code, as well.

If you want to understand all the logic that went into the design, the author also included a slide show that discusses the three versions and their pros and cons. He did mention that he wanted a short-range solution so barcodes and QR codes were out. He also decided against RFID but didn’t really say why.

NFC business cards are a thing. You can also use them to catch some public transportation.

Quickie USB Keyboard Device

There are a ton of applications that we use that can benefit from keyboard shortcuts, and we use ’em religiously. Indeed, there are some tasks that we do so often that they warrant their own physical button. And the only thing cooler than custom keyboards are custom keyboards that you’ve made yourself.

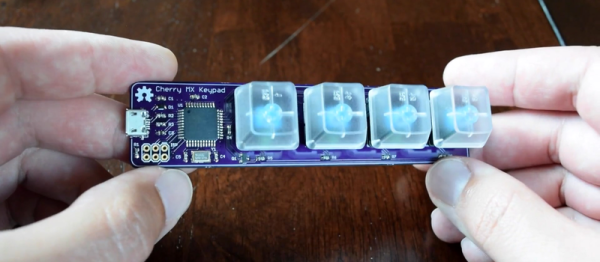
Which brings us to [Dan]’s four-button Cherry MX USB keypad. It’s not really all that much more than four keyswitch footprints and an AVR ATmega32u4, but that plus some software is all you really need. He programs the Arduino bootloader into the chip, and then he’s using the Arduino Leonardo keyboard libraries. Bam! Check out the video below.

Continue reading “Quickie USB Keyboard Device”

Presenting The Internet Of Trash Cans !

This was gonna happen – sooner or later. [matthewhallberg] built a “Smart” trash can that is connected to the Internet and can be controlled by its own Android App. We’re not sure if the world needs it, but he wanted one and so built it. He started it out on a serious note, but quickly realized the fun part of this build – check out his funny Infomercial style video after the break.

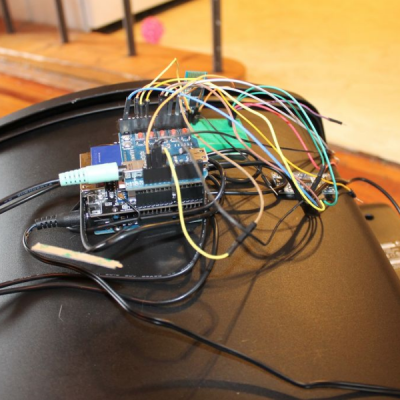
trash_can_02The build itself is uncomplicated and can be replicated with ease. A servo motor helps flip the lid open and close. This is triggered by an ultrasonic ping sensor, which responds when someone waves a hand in front of the trash can. A second ping sensor helps inform the user when it is full and needs to be emptied. A Leonardo with the Idunio Yun shield helps connect the trash can to the internet. An mp3 shield connected to a set of powered computer speakers adds voice capability to the trash can, allowing it to play back pre-recorded sound clips. Finally, a Bluetooth module lets him connect it to an Android phone and the companion app controls the trash can remotely.
For the IoT side of things, [matthewhallberg] uses a Temboo account to send an email to the user when the trash can is full. The Arduino sketch, a header file to configure the Temboo account, and the Android application can all be downloaded from his blog. If this project inspires you, try building this awesome Robotic trash can which catches anything that you throw near it  or read the barcodes off the trash being thrown out and update the grocery list.

Continue reading “Presenting The Internet Of Trash Cans !”

Benchmarking USB Transfer Speeds

boards

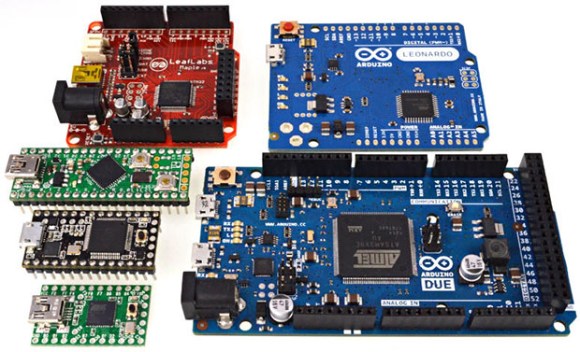
[Paul Stoffregen], creator of the Teensy series of microcontroller dev boards, noticed a lot of project driving huge LED arrays recently and decided to look into how fast microcontroller dev boards can receive data from a computer. More bits per second means more glowey LEDs, of course, so his benchmarking efforts are sure to be a hit with anyone planning some large-scale microcontroller projects.

The microcontrollers [Paul] tested included the Teensy 2.0, Teensy 3.0, the Leonardo and Due Arduinos, and the Fubarino Mini and Leaflabs Maple. These were tested in Linux ( Ubuntu 12.04 live CD ), OSX Lion, and Windows 7, all running on a 2012 MacBook Pro. When not considering the Teensy 2.0 and 3.0, the results of the tests were what you would expect: faster devices were able to receive more bytes per second.  When the Teensys were thrown into the mix, though, the results changed drastically. The Teensy 2.0, with the same microcontroller as the Arduino Leonardo, was able to outperform every board except for the Teensy 3.0.

[Paul] also took the effort to benchmark the different operating systems he used. Bottom line, if you’re transferring a lot of bytes at once, it really doesn’t matter which OS you’re using. For transferring small amounts of data, you may want to go with OS X. Windows is terrible for transferring single bytes; at one byte per transfer, Windows only manages 4kBps. With the same task, Linux and OS X manage about 53 and 860 (!) kBps, respectively.

So there you go. If you’re building a huge LED array, use a Teensy 3.0 with a MacBook. Of course [Paul] made all the code for his benchmarks open source, so feel free to replicate this experiment.