A Game Boy built out of copper wires

The Wonderfully Weird Wireframe Game Boy That Actually Works

We see lots of great hardware projects here at Hackaday: some are extremely clever, some are beautifully made, and some show off their maker’s extraordinary skills. Others are just plain weird, but still manage to include some or even all of the above categories. Case in point: [kgsws]’s Wireframe Game Boy project. It’s probably the weirdest Game Boy mod we’ve seen so far, but also extremely impressive from a technical point of view.

The basic idea was to take a Game Boy Pocket and remove its outer shell, replacing it with a cage-like structure made from thick copper wire. That sounds kind of reasonable; think of those transparent Game Boys, only without the transparent plastic. [kgsws]’s video (embedded below) shows him bending a few pieces of copper wire to match the Game Boy’s overall shape, then adding mounts for the cartridge socket, the display, the D-pad and the four buttons. After that you’d simply slide in the PCB, insert some batteries and off you go, right?

Well, this wouldn’t do for [kgsws]. What he did instead, was use a hot air desoldering station to remove all chips from the motherboard and proceed to mount them directly inside the wireframe without a PCB. He then used dozens of thin copper wires to hook up the cartridge slot, the CPU, RAM, buttons, and everything else to reconstruct the motherboard’s functionality. We cringed a bit when we saw him brutally cut the display’s flat cable with scissors, and that too was connected to the rest of the system through flying wires, soldered directly onto the screen’s contacts.

Amazingly, the system managed to boot up and run its software after it got a pair of fresh batteries. Despite a slightly dodgy D-pad, the naked Game Boy actually turned out to be fully usable, although it probably requires somewhat more delicate handling than Nintendo’s famously bullet-proof hardware. We’ve seen Game Boys modded into all kinds of different shapes and sizes, but none quite as unusual as today’s. If it’s wireframe construction you like, check out this eerie sound generator or this beautiful circuit sculpture clock. Continue reading “The Wonderfully Weird Wireframe Game Boy That Actually Works”


EC Hacking: Your Laptop Has A Microcontroller

Recently, I stumbled upon a cool write-up by [DHowett], about reprogramming a Framework laptop’s Embedded Controller (EC). He shows us how to reuse the Caps Lock LED, instead making it indicate the F1-F12 key layer state – also known as “Fn lock”, AKA, “Does your F1 key currently work as F1, or does it regulate volume”. He walks us through adding custom code to your laptop’s EC firmware and integrate it properly into the various routines the EC runs.

The EC that the Framework uses is a MEC1521 chip from Microchip, and earlier this year, they open-sourced the firmware for it. Now, there’s a repository of microcontroller code that you can compile yourself, and flash your Framework laptop’s motherboard with. In a comment section of HackerNews, a Framework representative has speculated that you could add GPIOs to a Framework motherboard through EC firmware hacking.

Wait… Microcontroller code? GPIOs? This brings us to the question – what is the EC, really? To start with, it’s just a microcontroller. You can find an EC in every x86 computer, including laptops, managing your computer’s lower-level functions like power management, keyboard, touchpad, battery and a slew of other things. In Apple land, you might know them as SMC, but their function is the same.

Why have we not been reprogramming our ECs all this time? That’s a warranted question, too, and I will tell you all about it.

Continue reading “EC Hacking: Your Laptop Has A Microcontroller”

The Origin Of The Fresnel Lens

If you are a Hackaday reader, you probably know what a Fresnel lens is. You find them in everything from overhead projectors to VR headsets. While it seems commonplace now, the Fresnel lens was an important invention for its day because it revolutionized maritime navigation and, according to a post over at IEEE Spectrum, that was the driving force behind its invention. In fact, the lens has been called “the invention that saved a million ships“.

The problem stems from issues in navigation. Navigating by the sun and the stars is fine, but not workable when you have heavy cloud cover, or other reasons you can’t see them. A lighthouse often marked an important point that you either wanted to navigate towards or, sometimes, away from.  Sure, today, we have GPS, but for a long time, a lighthouse was your best bet.

Continue reading “The Origin Of The Fresnel Lens”

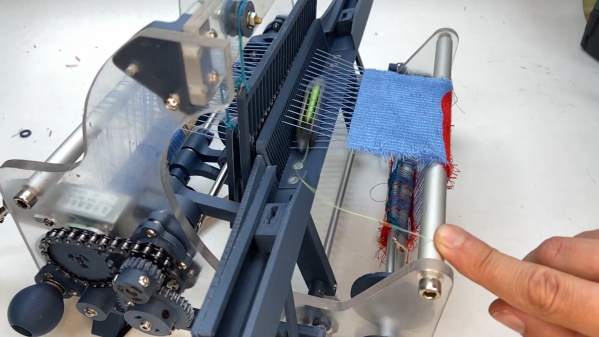
3D-Printed Power Loom Shows How Complex Weaving Really Is

The seemingly humble flying-shuttle loom, originally built to make the weaving of wide cloth faster and easier, stood at the threshold between the largely handcrafted world of the past and the automated world that followed. And judging by how much work went into this miniature 3D-printed power loom, not to mention how fussy it is, it’s a wonder that we’re not all still wearing homespun cloth.

Dealing with the warp and the weft of it all isn’t easy, as [Fraens] discovered with this build. The main idea with weaving is to raise alternate warp threads, which run with the length of the fabric, to create a virtual space, called the shed, through which a shuttle carrying the weft thread is passed. The weft thread is then pressed in place by a comb-like device called the reed, the heddles carrying the warp threads shift position, and the process is repeated.

[Fraens]’ version of the flying-shuttle loom is built mostly from 3D-printed parts, with a smattering of aluminum and acrylic. There are levers, shafts, and cams galore, not to mention the gears and sprockets that drive the mechanism via a 12-volt gear motor. The mechanism that moves the shuttle back and forth in the shed is particularly interesting; it uses cams to release the tension stored in elastic bands to flick the shuttle left and right. Shuttle timing is critical, as a few of the fails later in the video show. [Fraens] had to play with cam shape and lever arm length to get the timing right, not to mention having to resort to a chain drive to get enough torque to move the shuttle.

We’ve seen power looms before, but mainly those that operate at a somewhat more stately pace than this one. Hats off to [Fraens] for showing the true complexity involved in automating weaving.

Continue reading “3D-Printed Power Loom Shows How Complex Weaving Really Is”