An infographic showing a tap with a sensor and a flow meter display

2022 Hackaday Prize: Sensible Flow Helps You Keep Track Of Your Water Usage

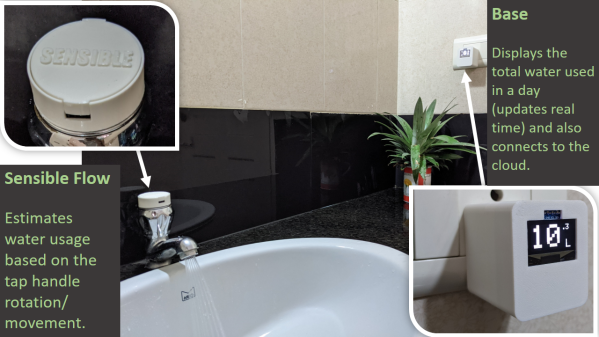
Safe, clean drinking water is a scarce resource that shouldn’t be wasted. But it’s not always easy to see how much you’re using when you turn on the tap: is it one liter a minute? Is it ten? How much do you actually use when washing your hands or brushing your teeth? If you’d like to get some hard data on your water usage, have a look at [Josh EJ]’s Sensible Flow project. It contains designs for a set of sensors that measure your water consumption and a convenient little display that shows the total amount consumed.

The most obvious way of measuring water consumption is to install an off-the-shelf flow meter onto your pipe, which is something that Sensible Flow supports. But probably the most interesting part of the project is a design for a non-invasive flow sensor that you can simply attach to any type of tap. This sensor contains a nine-axis inertial measurement unit (IMU) that detects how far you’ve twisted, turned or tilted the handle, and uses that information to estimate the amount of water flow. You will need to perform an initial calibration step using a timer and measuring cup, but you won’t have to rip open your plumbing just to keep track of your water usage.

Both types of sensors are powered by a coin cell battery that is estimated to work for about one year, thanks to a power-efficient Arduino Pro Mini and a BlueTooth Low Energy (BLE) module to communicate with the base station. The base station plugs into a wall socket and shows the total water consumption on a small one-inch OLED display. STL files for the enclosures are available on the project page, along with detailed circuit diagrams that show how all the parts are connected.

We’ve seen several water flow measurement systems for home use, such as this neat ESP8266-based shower water monitor. If you prefer just a simple visual reminder to turn off the tap, have a look at this LED gadget.

Continue reading “2022 Hackaday Prize: Sensible Flow Helps You Keep Track Of Your Water Usage”

Teardown: Cooler Max Liquid Cooling System

Every week, the Hackaday tip line is bombarded with offers from manufacturers who want to send us their latest and greatest device to review. The vast majority of these are ignored, simply because they don’t make sense for the sort of content we run here. For example, there’s a company out there that seems Hell-bent on sending us a folding electronic guitar for some reason.

At first, that’s what happened when CoolingStyle recently reached out to us about their Cooler Max. The email claimed it was the “World’s First AC Cooler System For Gaming Desktop”, which featured a “powerful compressor which can bring great cooling performance”, and was capable of automatically bringing your computer’s temperature down to as low as 10℃ (50°F). The single promotional shot in the email showed a rather chunky box hooked up to a gaming rig with a pair of flexible hoses, but no technical information was provided. We passed the email around the (virtual) water cooler a bit, and the consensus was that the fancy box probably contained little more than a pair of Peltier cooling modules and some RGB LEDs.

The story very nearly ended there, but there was something about the email that I couldn’t shake. If it was just using Peltier modules, then why was the box so large? What about that “powerful compressor” they mentioned? Could they be playing some cute word games, and were actually talking about a centrifugal fan? Maybe…

It bothered me enough that after a few days I got back to CoolingStyle and said we’d accept a unit to look at. I figured no matter what ended up being inside the box, it would make for an interesting story. Plus it would give me an excuse to put together another entry for my Teardowns column, a once regular feature which sadly has been neglected since I took on the title of Managing Editor.

There was only one problem…I’m no PC gamer. Once in a while I’ll boot up Kerbal Space Program, but even then, my rockets are getting rendered on integrated video. I don’t even know anyone with a gaming computer powerful enough to bolt an air conditioner to the side of the thing. But I’ve got plenty of experience pulling weird stuff apart to figure out how it works, so let’s start with that.

Continue reading “Teardown: Cooler Max Liquid Cooling System”

Classic DOS Games On An Arduino?

It has been a while since we’ve seen a 86Duino, but [TheRasteri] reminded us about it, with his video showing how to use one to run classic MS-DOS games. To be fair, the computer isn’t really an Arduino, it’s essentially a tiny 486 PC on an Arduino-style PCB.

If it were just running DOS games on a tiny PC, that wouldn’t be very newsworthy. However, the board by itself has no video card and, as [TheRasteri] points out, sound card compatibility is also a problem. A carrier board, however, has a tiny VGA card on it, and thanks to some work from another user, it is possible to add an ISA bus to the board if you want to plug in a legacy sound card.

The ISA hack was done neatly, but it is a bit of wiring. Instead of using a normal ISA backplane, it is possible to use a PC/104 backplane, if you have cards that will fit that bus — electrically, they are the same. The board was able to run DOOM and Quake at nearly 30 frames per second. Not bad. He did have problems getting a mouse to work, though.

Got a bit nostalgic watching him use QBasic to directly write to registers on an ISA card. If you want an old DOS machine and don’t want to tie up a lot of space, this could be the ticket. Especially if you need it to run some old piece of hardware that won’t work with modern computers. We have to wonder if anyone would make a USB to ISA adapter out of something like this. The drivers would seem to be the hard part.

We saw the 86Duino nearly 10 years ago when there were a few other x86 single-board computers around. Apparently, lots of people want to run vintage games.

Continue reading “Classic DOS Games On An Arduino?”

A left-hand side unit of a split keyboard. The keys are black with RGB lighting and the key legends are displayed on small OLED screens in each key.

Poly Keyboard Has Screens In Every Key

Aspiring polyglots can be stymied by differing keyboard layouts and character sets when switching between languages. [Thomas Pollak]’s Poly Keyboard circumvents this problem by putting a screen in every key of the keyboard.

In his extensive build logs, [Pollak] details the different challenges he’s faced while bringing this amazing keyboard to life. For example, the OLED screens need glyph rendering to handle the legends on the keys. Since the goal is true universal language support, he used the Adafruit-GFX Library as a beginning and was able to extend support to Japanese, Korean, and Arabic so far in his custom fork of QMK.

The attention to detail on this build is really impressive. Beside the dedication to full glyph support, [Pollak] has measured the amount of extra force the flex cables from the OLEDs add to the actuation of the keyswitches. For the Gateron yellow switch he tested, the difference was about 62.2 g versus the initial 49.7 g.

In case you’re thinking you’ve seen other screen keyboard projects, [Pollak] includes a roundup of similar projects in his logs as well. This isn’t the first keyboard we’ve seen here at Hackaday with an OLED on top of a keyswitch, although [Voidstar Lab]’s MiRage only has three screen keys that were removed in a later iteration. If you’d like a more conventional fixed display in your keyboard, check out [Peng Zhihui]’s modular board with an e-ink display and haptic feedback knob.

Continue reading “Poly Keyboard Has Screens In Every Key”