TCam-Mini: Adding Wireless To Flir Lepton Thermal Imaging Sensors

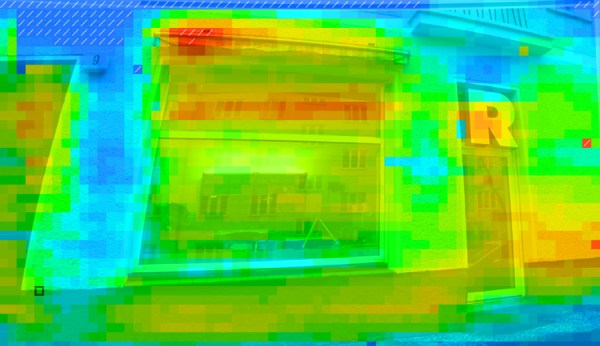
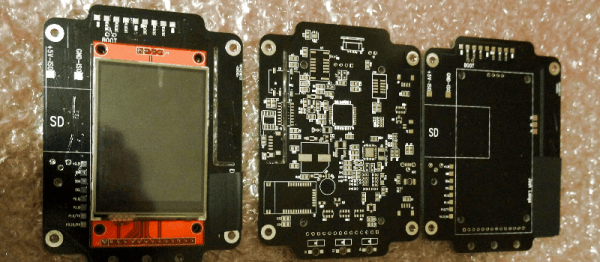
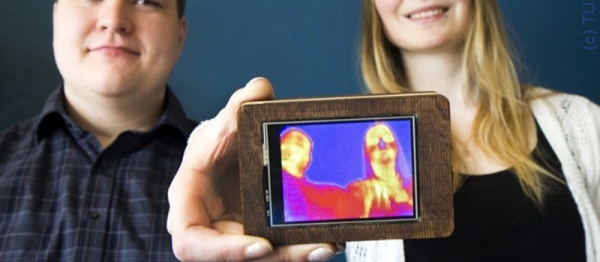
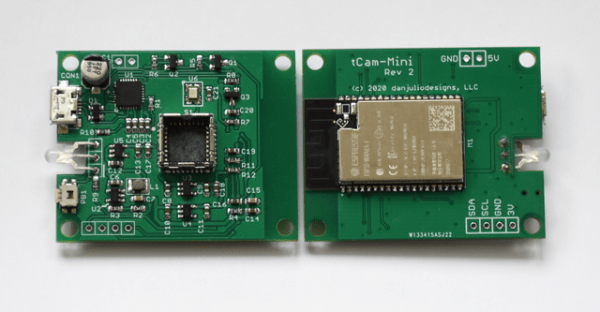
With how expensive thermal cameras are, why not build your own? This is the goal with which [Dan Julio] set out a while ago, covering the project in great detail. While the ultimate goal is to create a stand-alone solution, with its own screen, storage and processing, the TCam-Mini is an interesting platform. Using the 160×120 pixel FLIR Lepton 3.5 thermal sensor, and combining it with a custom PCB and ESP32 module for wireless, he created a wireless thermal camera called the TCam-Mini along with accompanying software that can display the radiometric data.

The project is available on GitHub, as well as as a GroupGets crowd-funding campaign, where $50 gets one a TCam-Mini board, minus the $199 Lepton 3.5 sensor. Not cheap, but quite a steal relative to e.g. the FLIR One Pro camera add-on module. Compared to the aforementioned FLIR One Pro, there’s a definite benefit in having a more portable unit that is not reliant on a smartphone and accompanying FLIR app. Being able to load the radiometric data directly into a desktop application for processing makes it a closer match to the professional thermal cameras which [Dan] states that he’d like to get as close to in terms of features as possible.

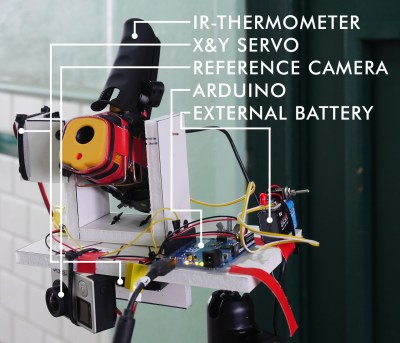
Recently [Dan] has also begun to further characterize these Lepton sensors, in order to see whether their accuracy can be improved from the rated +/- 5-10 °C. For this he repurposed an old in-ear thermometer calibration device. Along with tweaking the ESP32 firmware, there is still a lot that can be done with the TCam-Mini, but it sure looks like a fun project to tinker with if one is into Leptons.

Pinephone Gets Thermal Imaging Backpack

When you buy a mass-market mobile phone, you’re making the decision to trust a long list of companies with your private data. While it’s difficult for any one consumer to fully audit even a single piece of consumer technology, there have been efforts to solve this problem to a degree. The Pinephone is one such example, with a focus on openness and allowing users to have full control over the hardware. [Martijn Braam] is a proud owner of such a device, and took advantage of this attitude to add a thermal imager to the handset.

The build is not a difficult one, thanks to the expansion-friendly nature of the Pinephone hardware. The rear of the phone sports six pogo pins carrying an I2C bus as well as power. [Martin] started by modifying the back cover of the phone with contacts to interface with the pogo pins. With this done, the MLX90640 thermal imager was attached to the case with double-sided tape and wired up to the interface.

While the 32×24 output from the sensor isn’t going to help you build cutting edge heat-seeking missiles, it’s an affordable sensor with good performance for low-end thermal imaging tasks. We’ve featured teardowns of thermal imaging hardware before, too.

DIY thermal imaging heat map

DIY Thermal Imaging Done Low-Tech Style

[Niklas Roy] has always wanted to try out thermal imaging and saw his opportunity when he received one of those handheld IR thermometers as a gift. But not content with just pointing it at different spots and looking at the temperatures on the LCD display, he decided to use it as the basis for a scanning, thermal imaging system that would display a heat map of a chosen location on his laptop.

DIY thermal imaging system

He still wanted to to be able to use the IR thermometer as normal at a later date so cutting it open was not an option. Instead he firmly mounted a webcam to it pointing at the LCD display. He then wrote software on his laptop to process the resulting image and figure out what temperature was being displayed.

Once he got that working, he next put the thermometer on a platform with servos connected to an Arduino for slowly rotating it in the horizontal and vertical directions, also under control of the software on his laptop. Each time the thermometer measures the temperature of a spot, the software decodes the temperature on the LCD display and then tells the Arduino to use the servos to point the thermometer at the next spot to be measured. Each measurement takes a little time, so scanning an entire location as 70×44 spots takes around a half hour. But the end result is a heat map drawn on the laptop, done by a device that is low-tech. [Editor’s Snark: Because attaching a webcam and processing the images is “low-tech” these days.] He can overlay the heat map on a normal photo to see at a glance where the hot spots are.

The software he wrote is available on GitHub and the video below shows it in action. We’ve got to admit, it’s pretty awesome to watch. You can even see the heat map being filled in one measurement at a time.

Continue reading “DIY Thermal Imaging Done Low-Tech Style”

Hackaday Prize Entry: Raspberry Pi Thermal Imaging

High up on the list of desirable technologies that are edging into the realm of the affordable for the experimenter is the thermal camera. Once the exclusive preserve of those with huge budgets, over the last few years we’ve seen the emergence of cameras that are more affordable, and most recently a selection of thermal camera modules that are definitely within the experimenter’s range. They may not yet have high resolution, but they are a huge improvement on nothing, and they are starting to appear in projects featured on sites like this one.

One such device is the Melexis MLX90621, a 16×4 pixel thermal sensor array in a TO39 can with an I2C interface. It’s hardly an impulse purchase in single quantities and nor is it necessarily the cheapest module available, but its price is low enough for [Alpha Charlie] to experiment with interfacing it to a Raspberry Pi for adding a thermal camera overlay to the pictures from its visible light camera.

The wiring for the module is simplicity itself, and he’s created a couple of pieces of software for it that are available on his GitHub repository. mlxd is a driver daemon for the module, and mixview.py is a Python graphical overlay script that places the thermal array output over the camera output. A run-through of the device and its results can be seen in the video below the break.

Continue reading “Hackaday Prize Entry: Raspberry Pi Thermal Imaging”

Hackaday Prize Entry: Low Cost, DIY Thermal Imaging

A few years ago, thermal imaging sensors – cameras that could see heat – became very cheap. FLIR was going all-in with their Lepton module, and there were a number of clip-on cellphone accessories that gave the computer in your pocket the ability to see infrared.

Fast forward a few years, and you can still buy a thermal imaging sensor for your cellphone, and it still costs about the same as it did in 2013. For his Hackaday Prize project, [Josh] is building a more modern lower cost thermal imaging camera. It won’t have the resolution of the fancy $1000 FLIR unit, but it will be very inexpensive with a BOM cost of about $50.

[Josh] is building his low-cost thermal camera around Panasonic’s Grid-EYE module. This thermopile array contains 64 individual infrared sensors, giving this ‘camera’ a resolution of 8×8 pixels. That’s nothing compared to the thousands of pixels found in devices using the FLIR Lepton, but the Grid-EYE is very cheap.

Right now, [Josh]’s build is using an ARM Cortex M0+ and a cheap touch screen LCD he picked up from AliExpress. There’s an optional component to this build in the form of a visible light camera, giving [Josh] the ability to overlay thermal sensor data over a visible light image, just like the fancier, more expensive units.

With a total BOM cost of $44.50, [Josh]’s build is easy on the pocketbook, but still good enough to get some useful information. It’s a great build, and a great entry for The Hackaday Prize.

DIY Thermal Imaging Smartphone

We wish we had [Karri Palovuori] for a professor! As an exciting project to get incoming freshmen stoked on electrical engineering, he designed a DIY thermal-imaging smartphone that they can build themselves. It’s all built to fit into a sleek wooden case that gives the project its name: KAPULA is Finnish for “a block of wood”.

It’s just incredible how far one can push easily-available modules these days. [Karri] mounts a FLIR Lepton thermal camera, an LPC1768 Cortex M3 ARM micro, a GSM phone module, and a whole bunch of other cool stuff on a DIY-friendly two-sided board. The design uses 10 mil (0.25mm) trace and space, which is totally achievable with home etching methods. Copper wire bits fill up the vias. Did we mention he’s making the students do all this themselves? How awesome is that?

[Karri] expects that the students will tweak the software side of things. With additional onboard goodies like an accelerometer, microphone, speaker, SIM card, and USB, it’s not likely that they’ll get bored with the platform. He has a stretch hope that someone will take the hardware and modify it. That’s ambitious for sure, but it’s so cool that someone could.

We’ve seen some sophisticated DIY cellphones before, but this one rises above by being easily DIYable and including awesome extra features. Order parts now, and start etching. You could be sending thermal-photo tweets inside of just a few days.

An Affordable Panasonic Grid-EYE Thermal Imaging Camera

Thermal imaging cameras are objects of desire for hackers and makers everywhere, but sadly for us they can be rather expensive. When your sensor costs more than a laptop it puts a brake on hacking.

Thankfully help is at hand, in the form of an affordable evaluation board for the Panasonic Grid-EYE thermal imaging camera sensor. This sensor has sparked the interest of the Hackaday community before, featuring in a project that made the 2014 Hackaday Prize semifinals, but has proved extremely difficult to obtain.

All that has now changed though with this board. It features the Grid-EYE sensor itself, an Atmel ATSAM-D21G18A microcontroller, and onboard Bluetooth, but has an interesting feature that, as well as being a standalone device, can be used as an Arduino shield. A full range of APIs are provided, and the code is BSD licensed.

This module is not the highest-spec thermal imaging camera on the market by any means, after all it has a resolution of only 64 pixels in an 8×8 grid. But its affordability and easy availability should trigger a fresh crop of thermal camera projects in our community, and we applaud that.

Thermal camera projects have featured quite a few times here on Hackaday. Some have been based on the FLIR Lepton module, like this one that combines its image with a 640×480 visible camera and another that claims to be one of the smallest thermal cameras, while others have harnessed raw ingenuity to create a thermal camera without a sensor array. This pan-and tilt design for example, or this ingenious use of light painting. Please, keep them coming!

[via oomlout]