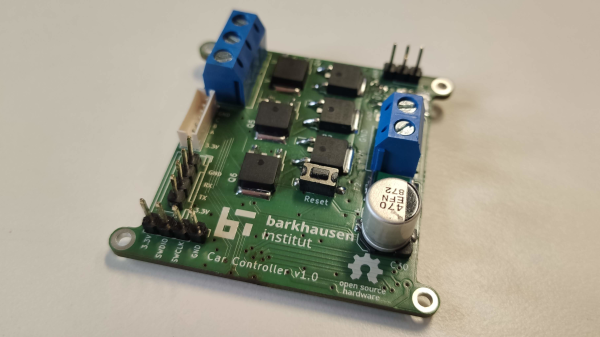
Photograph of a BLDC motor controller circuit board

Take A Ride Through The Development Of A Custom BLDC Motor Controller

The folks over at the [Barkhausen Institut] are doing research into controlling autonomous fleets of RC cars and had been using off the shelf electronic speed controllers (ESCs) to control the car motors. Unfortunately they required more reliable feedback for closed loop control of the motors, so they created their own open source hardware brushless DC (BLDC) controller.
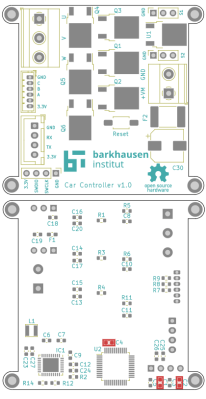
The motor controller they developed uses an STM32 microcontroller that talks to a TMC6140 3 phase MOSFET driver to drive 6 IRLR 2905 MOSFETs. The [Barkhausen Institut] researchers went with the SimpleFOC library as the basis to program the STM32, with installed hall effect sensors indicating motor orientation for their closed loop control.

Designing a functioning BLDC and ESC controllers can be subtle, and their post goes into details about the problems and solutions they came up with to deal with with what was ultimately improper isolation of the MOSFETs interfering with the power rail for the STM32. The source for their BLDC motor controller is available through their GitLab page. For more information on the parent project that uses the BLDC driver, be sure to check out their work on a connected convoy of RC cars.

There’s now a wealth of open source BLDC drivers and projects, many of which we’ve featured in the past, like the Moteus and haptic smart knob, and it’s nice to see other projects explore different options.

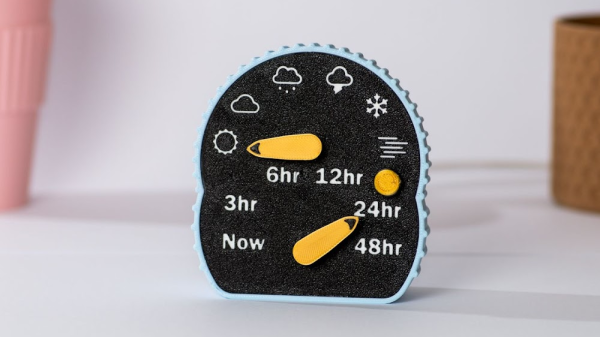
A desktop weather display, with two yellow pointers, one for the time frame (Now, 3hr, 6hr, 12hr, 24hr, 48hr) and the other pointing to an iconographic description of the weather (sunny, cloudy, cloud with rain, cloud with lightning, snowflake and fog)

Let This Minimal Desktop Weather Display Point The Way

Much of the Northern Hemisphere is currently in the middle of winter, so what better way to brighten a potentially gloomy day than to put this charming, minimalist weather display on your desk.

[Joe] has created a weather gauge that uses two servo motors to position mechanical pointers to indicate weather symbols and time ranges. The electronics consists of a push button and two SG90 servos driven by a Raspberry Pi Zero W 2. The case is 3D printed including the pointers attached to the servos and the button brim of the switch. The Raspberry Pi Zero W 2 is programmed to automatically connect to the OpenWeather API to retrieve the latest weather conditions, with the latitude and longitude being configured into the update script during the configuration and assembly stages.

[Joe] has provided extensive documentation about the build and software setup, in addition to releasing the source code and STL files for anyone wanting to make their own. [Joe] even offers kits for those who don’t want to go through the trouble of putting one together themselves — not that we imagine many in this particular audience would fall into that category.

We love to see these delightful weather builds and we’ve featured others in the past, like a converted weather house for weather prediction or a weather reporting diorama.

Continue reading “Let This Minimal Desktop Weather Display Point The Way”

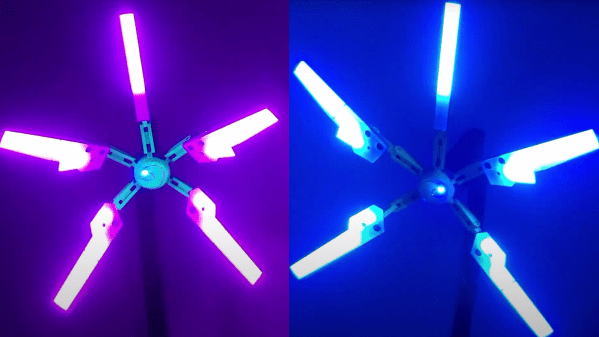
A montage of a "death stranding" lamp in two different color modes, purple on the left and blue on the right

Illuminate Your Benched Things With This Death Stranding Lamp

[Pinkman] creates a smart RGB table lamp based off of the “Odradek device” robot arm from the video game “Death Stranding”.

[Pinkman] adds a XIAO BLE nRF52840 Sense device, with Bluetooth support, microphone and TinyML capability. The nRF52840 is used to push data to the five WS2812 strips, one for each “blade” of the lamp, and also connects to a TTP223 capacitive touch controller to add touch input detection. The TinyML portion of the nRF52840 allows for custom keyword training to turn on the lamp with voice commands ([Pinkman] uses “Bling Bling”). [Pinkman] has also provided Bluetooth control, allowing the color and pattern to be changed from a phone application.

The lamp is 3D printed with the build being based off of [Nils Kal]’s Printables files. Each of the five blades has a white 3D-printed diffusor plate to help ease out the hot spots for the LED strip. The lamp is fully adjustable in addition to having cavities, channels and access points for “invisible” wiring. [Pinkman] has also upgraded the original 3D files to allow for the three wires needed to drive the WS2812, instead of the two wires that [Nils] had allotted in the original.

[Pinkman] has all of the code, STL files and training data available for download, so be sure to check it out. Lamps are a favorite of ours and we’ve featured our fair share, including 3D printed Shoji lamps and RGB wall lamps.

Video after the break!

Continue reading “Illuminate Your Benched Things With This Death Stranding Lamp”

ESP8266 Coaster Keeps Your Drink Warm

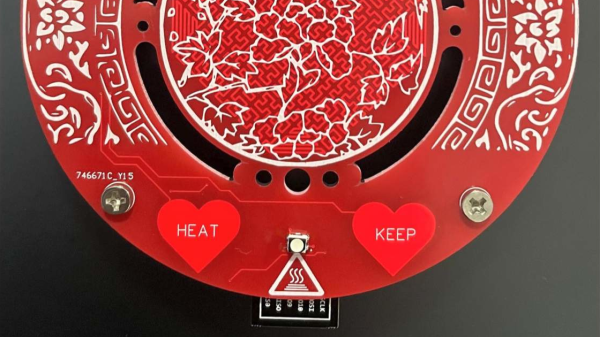
Looking for the perfect winter desk accessory? [Wq] has created a beautiful coaster made out of PCBs  that can keep your drink warm with an internal heater. (Chinese).

An ESP8266 sits as the main controller, with an additional MQTT control option, where the whole unit is powered over a USB-C connection. On board PCB traces, in the shape of a Hilbert curve, create the heating element used to heat beverages placed on the coaster, where [Wq] reports a measured resistance of the PCB trace network at 1.2 ohms. [Wq] writes that an AON6324 MOSFET replaces the D4184 that was previously being used, but might need some testing to get working properly. There are two capacitive touch sensors which has a TTP223E capacitive touch controller attached to detect input, with a multi-colored FM-3528 RGB LED for user feedback.

We love the artistry that went into building the coaster. For adventurous hackers wanting to build their own, the bill of materials (BOM), source code and board files are all available. We’ve seen everything from coasters and to PCB reflow boards, so it’s nice to see experimentation with a combination of these ideas.

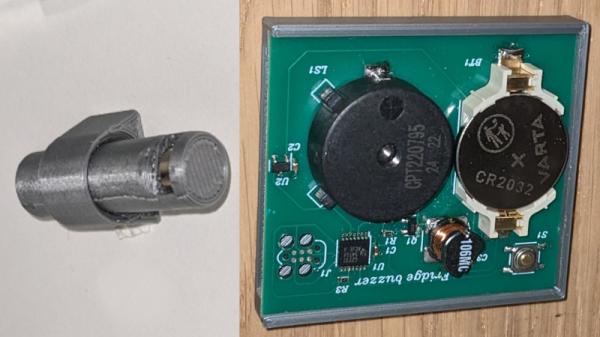
A composite picture with a 3D printed cylinder with a magnet at one end held in a 3D printed housing ring on the left composite picture and a fridge buzzer board with buzzer, CR2032 battery, MCP430 microcontroller and hall effect sensor slid into a 3D printed base on the right part of the composite picture

Don’t Lose Your Cool With This Fridge Buzzer

[CarrotIndustries] wanted to add an audible warning for when the refrigerator door was left open. The result is a fridge buzzer that attaches to the inside of a fridge door and starts buzzing if the door is left ajar for too long.

The main components of the fridge buzzer consist of an MSP430G2232 low-power MCU connected to a SI7201 hall sensor switch, along with a CR2032 battery holder, push button and buzzer. The MSP430’s sleep mode is used here, consuming less than 3 µA of current which [CarrotIndustries] estimates lasting 9 years on a 235 mAh CR2032 battery.

A 3D printed housing is created so that the board slides into a flat bed, which can then be glued onto to the fridge door. The other mechanical component consists of a cylinder with a slot dug out for a magnet, where the cylinder sits in a mounting ring that’s affixed to the side of the fridge wall that the end of the door closes on. The cylinder can be finely positioned so that when the refrigerator is closed, the magnet sits right over the hall sensor of the board, allowing for sensitivity that can detect even a partial close of the fridge door.

All source code is available on [CarrotIndustries] GitHub page, including the Horizon EDA schematics and board files, the Solvespace mechanical files, and source code for the MSP430. We’ve featured an IoT fridge alarm in the past but [CarrotIndustries]’ addition is a nice, self contained, alternative.

Ring In The New Year With This Cute Cat Doorbell

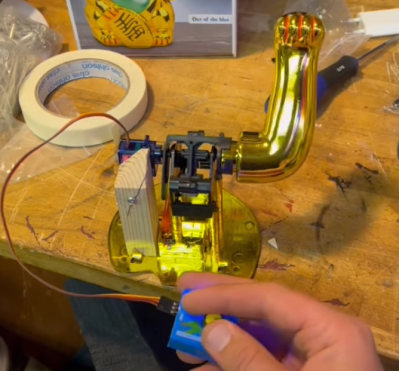
What better way to ring in the new year than with [iSax Laboratories]’ charming little project that replaces a doorbell with a Maneki-Neko cat figurine to ring a physical bell?

A golden maneki-neko cat arm mechanism attached to a servo on a workbench with a hand controlling a servo motor tester that's plugged into the servo attached to the arm.

Details are unfortunately a bit light, but it looks like the Maneki-Neko cat was disassembled to allow for a small SG92R servo motor to attach to the arm pendulum mechanism. [iSax Laboratories] added wooden platform where the Maneki-Neko cat figurine is mounted along with some indicator lights, switches and the physical bell, with a cavity routed out in the base to allow for the Arduino Nano microcontroller.

[iSax Laboratories] has what looks to be an Assa Abloy Svara 23 wired answering machine, which has one of its output lines connected to the Nano to sense when a doorbell signal has come in.

The Maneki-Neko cats are cute, easily hackable figurines and we’ve featured them in the past, using them as everything from hit counters to POV displays.

Be sure to check out the demo video after the break!

Continue reading “Ring In The New Year With This Cute Cat Doorbell”

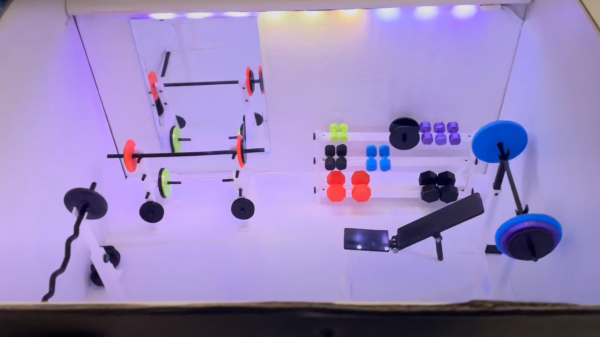
3d printed tiny gym in a box with mirror and led strip lighting

Get Pumped For This Miniature Gym

[Duncan McIntyre] lives in the UK but participated in a secret Santa gift exchange for his Dutch friends’ Sinterklaas celebration. In traditional maker fashion, [Duncan] went overboard and created a miniature gym gift box, complete with flashing lights, music and a motorized lid.

[Duncan] used [TanyaAkinora]’s 3D printed tiny gym to outfit the box with tiny equipment, with a tiny mirror added to round out the tiny room. An ATmega328P was used as the main microcontroller to drive the MP3 player module and A4988 stepper motor controller. The stepper motor was attached to a drawer slide via a GT2 timing belt and pulley to actuate the lid. Power is provided through an 18V, 2A power supply with an LM7805 providing power to the ATmega328P and supporting logical elements. As an extra flourish, [Duncan] added some hardware audio signal peak detection, fed from the speaker output, which was then sampled by the ATmega328P to be able to flash the lights in time with the playing music. A micro switch detects when the front miniature door is opened to begin the sequence of lights, song and lid opening.

[Duncan] provides source on GitHub for those curious about the Arduino code and schematics. We’re fans of miniature pieces of ephemera and we’ve featured projects ranging from tiny 3D printed tiny escalators to tiny arcade cabinets.

Video after the break!

Continue reading “Get Pumped For This Miniature Gym”