FPS Game Engine Built In Ancient Macintosh HyperCard Software

Wolfenstein 3D and Doom are great examples of early FPS games. Back in that era, as Amiga was slowly losing its gaming supremacy to the PC, Apple wasn’t even on the playing field. However, [Chris Tully] has used the 90s HyperCard platform to create an FPS of his own, and it’s charming in what it achieves.

If you’re not familiar with it, HyperCard was a strange combination of database, programming language, and graphical interface system all rolled into one. It made developing GUI apps for the Macintosh platform simpler, with some limitations. It was certainly never intended for making pseudo-3D video games, but that just makes [Chris’s] achievement all the more impressive.

At this stage, [Chris’s] game doesn’t feature any NPCs, weapons, or items yet. It’s thus more of a First Person Walker than First Person Shooter. It features four small rooms with perpendicular, vertical walls, rendered either greyscale or 8-bit color. Now that he’s got the basic engine running, [Chris] is looking to recreate a bit of a Doom RPG experience, rather than copying Doom itself. He hopes to add everything from monsters to weapons, lava, and working HUD elements. If you want to dive in to the code, you can – HyperCard “stacks”, as they’re known, are made up of readily editable scripts.

[Chris] built the project to celebrate the aesthetic and limitations of the original Mac platform. While it could technically run on original hardware, it would run incredibly slowly. It currently takes several seconds to update the viewport on an emulated Mac Plus with 4MB of RAM. Thankfully, emulation on a modern PC can be sped up a lot to help the framerate.

We love seeing HyperCard pushed far beyond its original limits. We’ve seen it before, too, such as when it was used on a forgotten 90s Apple phone prototype. If you’ve been hacking away on retro software yourself, we’d love to see your projects on the tipsline!

A Single-Resistor Radio Transmitter, Thanks To The Power Of Noise

One of the great things about the Hackaday community is how quickly you find out what you don’t know. That’s not a bad thing, of course; after all, everyone is here to get smarter, right? So let’s work together to get our heads around this paper (PDF) by [Zerina Kapetanovic], [Miguel Morales], and [Joshua R. Smith] from the University of Washington, which purports to construct a low-throughput RF transmitter from little more than a resistor.

This witchcraft is made possible thanks to Johnson noise, also known as Johnson-Nyquist noise, which is the white noise generated by charge carriers in a conductor. In effect, the movement of electrons in a material thanks to thermal energy produces noise across the spectrum. Reducing interference from Johnson noise is why telescopes often have their sensors cooled to cryogenic temperatures. Rather than trying to eliminate Johnson noise, these experiments use it to build an RF transmitter, and with easily available and relatively cheap equipment. Continue reading “A Single-Resistor Radio Transmitter, Thanks To The Power Of Noise”

Reverse-Engineering The Conditional Jump Circuitry In The 8086 Processor

The condition PLA evaluates microcode conditionals.

As simple as a processor’s instruction set may seem, especially in a 1978-era one like the Intel 8086, there is quite a bit going on to go from something like a conditional jump instruction to a set of operations that the processor can perform. For the CISC 8086 CPU this is detailed in a recent article by [Ken Shirriff], which covers exactly how the instructions with their parameters are broken down into micro-instructions using microcode, which allows the appropriate registers and flags to be updated.

Where the 8086 is interesting compared to modern x86 CPUs is how the microcode is implemented, using gate logic to reduce the complexity of the microcode by for example generic parameter testing when processing a jump instruction. Considering the limitations of 1970s VLSI manufacturing, this was very much a necessary step, and an acceptable trade-off.

Each jump instruction is broken down into a number of micro-instructions that test a range of flags and updates (temporary) registers as well as the program counter as needed. All in all a fascinating look at the efforts put in by Intel engineers over forty years ago on what would become one of the cornerstones of modern day computing.

Cut Your Own Gears With This DIY Machine

You can buy gears off the shelf, of course, and get accurately machined parts exactly to your chosen specification. However, there’s something rugged and individualist about producing your own rotating components. [Maciej Nowak] demonstrates just how to produce your own gears with a homemade cutting tool.

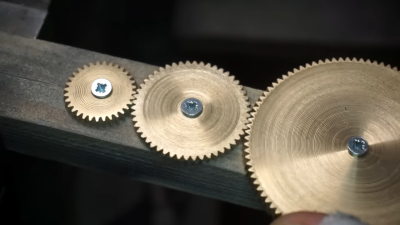
The cutting tool for the job is an M16 machine tap, chosen for the smaller flutes compared to a hand tap. This makes it more suitable for cutting gears. It’s turned by a belt driven pulley, run by a small motor. The workpiece to be cut into a gear is then fed into the cutting tool by sliding on a linear bearing, with its position controlled by a threaded rod. The rod can be slowly turned by hand to adjust the workpiece position, to allow the gear teeth to be cut to an appropriate depth.

The method of action is simple. As the tap turns it not only cuts into the workpiece, but rotates it on a bearing as well. By this method, it cuts regular teeth into the full circumference, creating a gear. Obviously, this method doesn’t create highly-complex tooth shapes for ultimate performance, but it’s more than capable of creating usable brass and steel gears for various purposes. The same tool can be used to cut many different sizes of gear to produce a whole geartrain. As a bonus, the resulting gears can be used with M16 threads serving as worm gears, thanks to the pitch of the tap.

If you find yourself needing to produce tough metal gears on the regular, you might find such a tool very useful. Alternatively, we’ve explored methods of producing your own sprockets too, both in a tidy manner, and in a more haphazard fashion. Video after the break.

Continue reading “Cut Your Own Gears With This DIY Machine”

LED Air Vent Gauges Are A Tasteful Mod For The Mazda Miata

Anyone in the JDM scene can tell you, round air vents are prime real estate for round analog gauges. If you want a gauge but don’t want to block your vent, you could consider building these LED vent gauges from [ktanner] instead.

Tasteful, no?

The design is simple. It relies on 3D printing a replacement bezel for the Mazda Miata’s stock round air vents. This bezel is designed to hold a NeoPixel ring from Adafruit. When built with the optional laser-cut diffuser, the parts have a near-stock look when the LEDs are turned off. It’s a classy, stealthy mod – exactly the sort of thing Miata owners need but never seem to have! (Author Note: don’t be mad, I was once one of you!)

With 24 addressable RGB LEDs, it’s possible to display all kinds of data by turning the LEDs on and off and varying the colors. For example, you could readily build a boost gauge that turns on more LEDs at higher boost pressure. It could then be set up to flash red in the event that you surpass safe thresholds. [ktanner] hasn’t specified any particular microcontroller for the setup — but just about any part you like can be used to drive NeoPixels, after all.

If you’re new to NeoPixels, you might find a simulator useful for developing your projects. Meanwhile, if you’re doing similar work on other cars, be sure to hit us up on the tipsline!

Hackaday Podcast 203: Flashlight Fuel Fails, Weird DMA Machines, And A 3D Printed Prosthetic Hand Flex

This week, Editor-in-Chief Elliot Williams and Managing Editor Tom Nardi meet up virtually to talk about all the hacks that are fit to print. This week’s episode starts off with a discussion about the recently unveiled 2023 Hackaday.io Low-Power Challenge, and how hackers more often than not thrive when forced to work within these sort of narrow parameters. Discussion then continues to adding a virtual core to the RP2040, crowd-sourced device reliability information, and mechanical Soviet space computers. We’ll wrap things up by wondering what could have been had Mattel’s ill-fated ThingMaker 3D printer actually hit the market, and then engage in some wild speculation about the issues plaguing NASA’s latest Moon mission.

Check out the links below if you want to follow along, and as always, tell us what you think about this episode in the comments!

Available in the cloud, or as download!

Continue reading “Hackaday Podcast 203: Flashlight Fuel Fails, Weird DMA Machines, And A 3D Printed Prosthetic Hand Flex”

ESP8266 Coaster Keeps Your Drink Warm

Looking for the perfect winter desk accessory? [Wq] has created a beautiful coaster made out of PCBs  that can keep your drink warm with an internal heater. (Chinese).

An ESP8266 sits as the main controller, with an additional MQTT control option, where the whole unit is powered over a USB-C connection. On board PCB traces, in the shape of a Hilbert curve, create the heating element used to heat beverages placed on the coaster, where [Wq] reports a measured resistance of the PCB trace network at 1.2 ohms. [Wq] writes that an AON6324 MOSFET replaces the D4184 that was previously being used, but might need some testing to get working properly. There are two capacitive touch sensors which has a TTP223E capacitive touch controller attached to detect input, with a multi-colored FM-3528 RGB LED for user feedback.

We love the artistry that went into building the coaster. For adventurous hackers wanting to build their own, the bill of materials (BOM), source code and board files are all available. We’ve seen everything from coasters and to PCB reflow boards, so it’s nice to see experimentation with a combination of these ideas.