Hackaday Prize 2023: Tilting Mechanical Panels Make A Beautiful Display

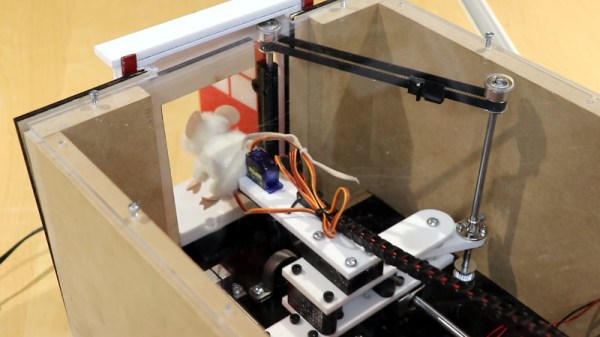
Mechanical displays use a variety of different methods to represent data with physical objects, and [AIRPOCKET]’s Mechanical Display aims to be a platform anyone can use. Each “pixel” in this display is a panel of some kind, and different effects can be had by moving individual panels to different angles. Not only can images be represented, but the patterns of the movements themselves can be beautiful as well.

The panels are an important part of how the display presents, so the design makes them easy to change out.

These sorts of displays are fertile ground for artistic expression (one memorable implementation of this basic idea was the wooden mirror, which used varnished tiles of wood) but anyone looking to use the concept has usually been on their own when it comes to implementation.

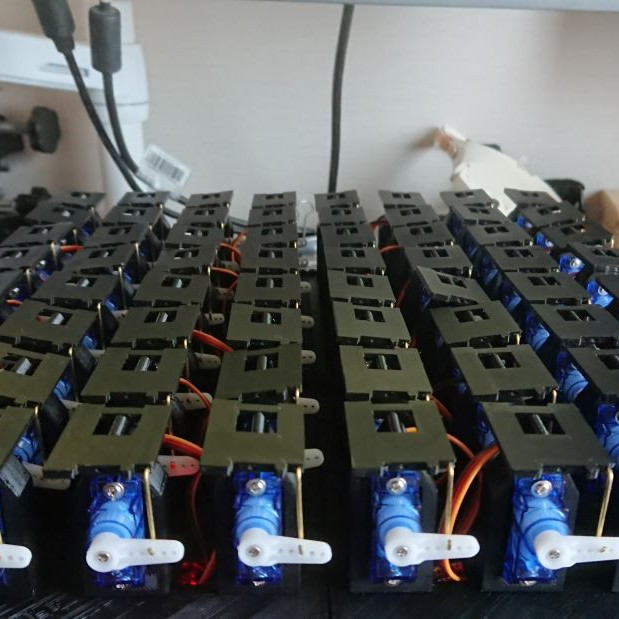
The idea [AIRPOCKET] has is to make this kind of installation easier to implement. This method uses economical mini RC servos and 3D-printed pieces to create modular segments that can be assembled into whatever configuration one may need.

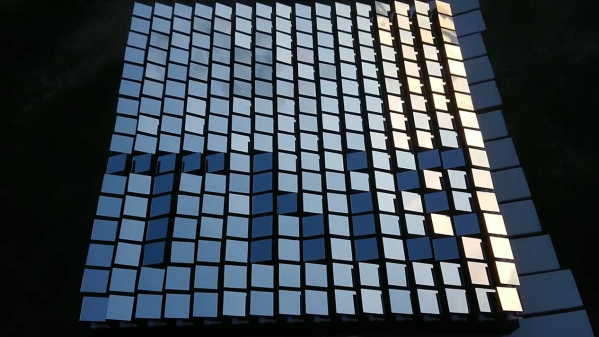
The material of the panels matters, too. Just below the page break, you can see a large unit with each “pixel” consisting of a mirrored square that reflects daylight. There’s also a video of an earlier prototype that uses some ridged two-color pieces to create a simple 4×4 three-level greyscale display.

There are a lot of possibilities if [AIRPOCKET] can make this sort of display more easily accessible, and that makes it a contender in the 2023 Hackaday Prize.

Continue reading “Hackaday Prize 2023: Tilting Mechanical Panels Make A Beautiful Display”

A desktop weather display, with two yellow pointers, one for the time frame (Now, 3hr, 6hr, 12hr, 24hr, 48hr) and the other pointing to an iconographic description of the weather (sunny, cloudy, cloud with rain, cloud with lightning, snowflake and fog)

Let This Minimal Desktop Weather Display Point The Way

Much of the Northern Hemisphere is currently in the middle of winter, so what better way to brighten a potentially gloomy day than to put this charming, minimalist weather display on your desk.

[Joe] has created a weather gauge that uses two servo motors to position mechanical pointers to indicate weather symbols and time ranges. The electronics consists of a push button and two SG90 servos driven by a Raspberry Pi Zero W 2. The case is 3D printed including the pointers attached to the servos and the button brim of the switch. The Raspberry Pi Zero W 2 is programmed to automatically connect to the OpenWeather API to retrieve the latest weather conditions, with the latitude and longitude being configured into the update script during the configuration and assembly stages.

[Joe] has provided extensive documentation about the build and software setup, in addition to releasing the source code and STL files for anyone wanting to make their own. [Joe] even offers kits for those who don’t want to go through the trouble of putting one together themselves — not that we imagine many in this particular audience would fall into that category.

We love to see these delightful weather builds and we’ve featured others in the past, like a converted weather house for weather prediction or a weather reporting diorama.

Continue reading “Let This Minimal Desktop Weather Display Point The Way”

Peek Behind The Curtain Of This Robotic Mouse

At first glance, this little animatronic mouse might seem like a fairly simple affair. A door opens, our rodent friend pops its head out, looks around, and goes back in. But just like in The Wizard of Oz, a strategically placed curtain is hiding the impressive array of gadgetry that makes the trick possible.

Creator [Will Donaldson] has put together a fantastic write-up of just what went into creating this little fellow, and we think you’ll be surprised at just how serious the mechanics involved are. Take for example the rig that provides horizontal motion with a NEMA 17 stepper motor mated to a 200 mm leadscrew and dual 8 mm rail assembly that would like right at home as part of a 3D printer.

The star of the show rides atop a beefy sliding carriage assembly made of printed components and acrylic, which is linked to the door via a GT2 timing belt and pulley in such a way that it automatically opens and closes at the appropriate time. To inject some life into the puppet, [Will] stuffed it with a pair of SG90 servos in a sort of pan-and-tilt arrangement: the rear servo turns the mouse’s body left and right, while the forward one moves the head up and down.

An Arduino Uno controls the servos, as well as the stepper motor by way of a TB6600 controller, and optical limit switches are used to make sure nothing moves out bounds. [Will] is keeping the CAD files and source code to himself for the time being, though we imagine a sufficiently dedicated mouseketeer could recreate the installation based on the available information.

This would appear to be the first animatronic mouse to grace the pages of Hackaday, but we’re certainly no strangers to seeing folks imbue inanimate objects with lifelike motion.

Continue reading “Peek Behind The Curtain Of This Robotic Mouse”

Pulse Visualizer Is A Real Work Of Heart

Some projects are all-around simple, such as the lemon battery or the potato clock. Other projects are rooted in simple ideas, but their design and execution elevates them to another level. [Sharathnaik]’s heart visualizer may not be all that electronically complex, but the execution is pulse-pounding.

The closest that most of us will get to seeing our own heartbeat is watching the skin twitch in our neck or wrist. You know that your heart doing the work of keeping you alive, but it’s hard to appreciate how it exerts itself. With just a few components and printed parts, the heart’s pumping action comes to life as your pulse drives single-x scissor mechanisms to push and pull the plastic plates.

This heart visualizer isn’t nearly as complex as the organ it models, and it’s an easy build for anyone just starting out in electronics. Put your finger on the heart rate sensor in the base, and an Arduino Nano actuates a single servo to your own personal beat. We’d love to see it work overtime while someone gets worked up. For now, there’s an even-tempered demo after the break, followed by an assembly video.

Heartbeat sensing can be romantic, too. Here’s a lovely circuit sculpture that runs at the rate of the receiver.

Continue reading “Pulse Visualizer Is A Real Work Of Heart”

Printed Perching Pals Proliferate

Anansi in African folktale is a trickster and god of stories, usually taking physical form of a spider. Anansi’s adventures through oral tradition have adapted to the situation of people telling those stories, everything ranging from unseasonable weather to living a life in slavery. How might Anansi adapt to the twenty-first century? [odd_jayy] imagined the form of a cyborg spider, and created Asi the robot companion to perch on his shoulder. Anyone who desire their own are invited to visit Asi’s project page.

Asi was inspired by [Alex Glow]’s Archimedes, who also has a project page for anyone to build their own. According to [Alex] at Superconference 2018, she knew of several who have done so, some with their own individual customization. [odd_jayy] loved the idea of a robot companion perched on his shoulder but decided to draw from a different pool of cultural folklore for Asi. Accompanying him to various events like Sparklecon 2019, Asi is always a crowd pleaser wherever they go.

Like every project ever undertaken, there is no shortage of ideas for Asi’s future and [odd_jayy] listed some of them in an interview with [Alex]. (Video after the break.) Adding sound localization components will let Asi face whoever’s speaking nearby. Mechanical articulation for legs would allow more dynamic behaviors while perched, but if the motors are powerful enough, Asi can walk on a surface when not perched. It’s always great to see open source projects inspire even more projects, and watch them as they all evolve in skill and capability. If they all become independently mobile, we’ll need clarification when discussing the average velocity of an unladen folklore robot companion: African or European folklore?

Continue reading “Printed Perching Pals Proliferate”

Laser Cut Cardboard Robot Construction Kit Eases Learning And Play

It has never been easier to put a microcontroller and other electronics into a simple project, and that has tremendous learning potential. But when it comes to mechanical build elements like enclosures, frames, and connectors, things haven’t quite kept the same pace. It’s easier to source economical servos, motors, and microcontroller boards than it is to arrange for other robot parts that allow for cheap and accessible customization and experimentation.

That’s where [Andy Forest] comes in with the Laser Cut Cardboard Robot Construction Kit, which started at STEAMLabs, a non-profit community makerspace in Toronto. The design makes modular frames, enclosures, and basic hardware out of laser-cut corrugated cardboard. It’s an economical and effective method of creating the mechanical elements needed for creating robots and animatronics while still allowing easy customizing. The sheets have punch-out sections for plastic straws, chopstick axles, SG90 servo motors, and of course, anything that’s missing can be easily added with hot glue or cut out with a knife. In addition to the designs being open sourced, there is also an activity guide for educators that gives visual examples of different ways to use everything.

Cardboard makes a great prototyping material, but what makes the whole project sing is the way the designs allow for easy modification and play while being easy to source and produce.

Watch The Snappy, Insect-like Moves Of This DIY Quadruped Robot

Some legged robots end up moving with ponderous deliberation, or wavering in unstable-looking jerks. A few unfortunates manage to do both at once. [MusaW]’s 3D Printed Quadruped Robot, on the other hand, moves in rapid motions that manage to look sharp and insect-like instead of unstable. Based on an earlier design he made for a 3D printable quadruped frame, [MusaW] has now released this step-by-step guide for building your own version. All that’s needed is the STL files and roughly $50 in parts from the usual Chinese resellers to have the makings of a great weekend project.

The robot uses twelve SG90 servos and an Arduino nano with a servo driver board to control them all, but there’s one additional feature: Wi-Fi control is provided thanks to a Wemos D1 Mini (which uses an ESP-8266EX) acting as a wireless access point to serve up a simple web interface through which the robot can be controlled with any web browser.

Embedded below is a brief video. The first half is assembly, and the second half demonstrates the robot’s fast, sharp movements.

Continue reading “Watch The Snappy, Insect-like Moves Of This DIY Quadruped Robot”