Two hands holding a 3d printed alarm clock with an LCD display, snooze button and knob on top

IO Connected Radio Alarm Clock

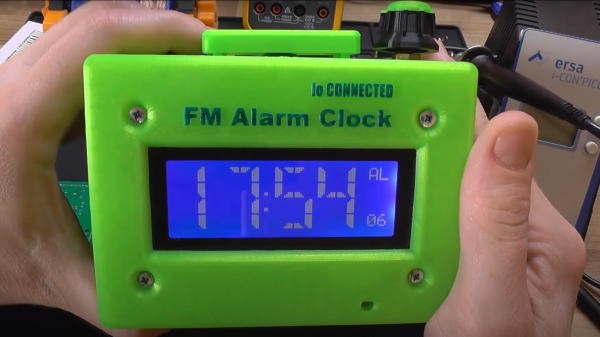
[CoreWeaver] creates an alarm clock that includes features one might expect in such a project, including an FM radio, snooze button inputs and a display, but goes beyond the basic functionality to include temperature sensing and a PC connection, opening the way for customizable functionality.

Block diagram for the IO connected Alarm Clock

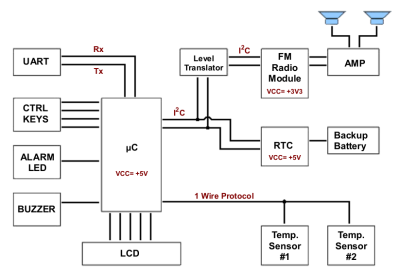
An Atmega328 is used for the main microcontroller which communicates via I2C both to a DS1307 real time clock (RTC) and a TEA5767 FM module. The main power comes from a 9V power source with an LM317 and LM7805 linear regulators providing a 3.3V and 5V power rail, respectively. Most of the electronics are powered using 5V except for the TEA5767, which is powered from the 3.3V rail and has its I2C communication levels shifted from 5V to 3.3V. The audio output of the TEA5767 feeds directly into the TDA7052 audio amplifier to drive the speakers. Since the RTC has an auxiliary coin cell battery for power, the alarm clock can keep accurate time even when not plugged in. Continue reading “IO Connected Radio Alarm Clock”

A persons handing holding a pile of generative, laser cut snowflake ornaments

Laser-Cutting A Flurry Of Generative Snowflakes

It’s the holiday season, and what better way to celebrate than to carve out some generative snowflakes on your laser cutter? [Bleeptrack] has developed a web-based tool that creates generative snowflake ornaments which can be exported to SVG files ready-made for laser or vinyl cutting.

True to their namesake, each generated snowflake ornament is (very likely to be) unique, with multiple layers created that can be stacked on top of each other. [Bleeptrack] has showcased a few realizations, using semitransparent paper sandwiched between two top layer cutouts, made out of wood or cardboard.

The snowflakes are a great balance of minimal design while still being beautiful and rich in detail. They can be easily produced on any laser cutter or vinyl cutter that you might have handy. Source code is available on GitHub for those wanting to dive into the details of the web tool. Cutting one of your own would make a perfect addition to a Neodriver ornament or a tiny DOOM playing ornament. Video after the break!

Continue reading “Laser-Cutting A Flurry Of Generative Snowflakes”

Ply Your Craft With Tubular Origami

Researchers at the University of Pennsylvania have just published a paper on creating modular tubular origami machines which they call “Kinegami”, a portmanteau of “kinematic” and “origami”.

Diagrams of "kinegami" folds for various modules and joint mechanism

The idea behind their work is to create individual modules and joint mechanisms that can then be chained together to create a larger “serial” robot. Some example joints they propose are “prismatic” joints, allowing for linear motion, and “revolute” joints, which allow for rotational motion. One of the more exciting aspects of this process is that the joint mechanisms are origami-like structures which can be constructed from a single piece of flat material which is folded and glued together to make the module. Of particular interest is that the crease pattern for the origami-like folds can be laser cut into a material, cardboard or thin acrylic for example, which can be used as a guide to create the resulting structure. The crease patterns for the supporting structures, such as tubes or joints, can be taken from pre-formatted patterns or customized, so this method is very accessible to the hobbyist and could allow for a rich new method of rapid project prototyping.

The researchers go on to discuss how to create the composition of modules from a specification of joints and links (from a “Denavit-Hartenberg” specification) to attaching the junctures together while respecting curvature constraints (via the “Dubins path”). Their paper offers the gritty details along with the available accompanying source files. Origami hacking is a favorite subject of ours and we’ve featured articles on the use of origami in medical technology to creating inflatable actuators.

Video after the break!

Continue reading “Ply Your Craft With Tubular Origami”

An esp32 weather station with 3d printed anemometer, rain gauge and wind vane mounted on an aluminum frame sitting in an overgrown lawn

A Weather Station For Whether It Rains Or Shines

[Giovanni Aggiustatutto] creates a DIY weather station to measure rain fall, wind direction, humidity and temperature. [Giovanni] has been working on various parts of the weather station, including the rain gauge and anemometer, with the weather station build incorporating all these past projects and adding a few extra features for measurement and access.

An esp32 module connected to three level shifters inside of a grey utility junction box with a USB power connector coming in powering the ESP32 device and an external wifi antenna mounted on the outside of the junction box, all siting on a wooden table

For temperature and humidity, a DHT22 sensor is located in a 3D printed Stevensen screen, giving the sensor steady airflow while protecting the module from direct sunlight and rain. A mostly 3D printed wind vane is printed with the base attached to a ball bearing and magnet so that the four hall sensors positioned in a “plus” configuration at the base can detect direction. The 3D printed anemometer uses a hall sensor to detect the revolution speed of the device. The rain gauge uses a “tipping bucket” mechanism, with a magnet attached to it that triggers the hall sensor affixed to the frame. The rain gauge (or pluviometer if you’re fancy) needs extra calibration to adjust for how much water the buckets take on before tipping.

An ESP32, with additional level shifters and BMP180 atmospheric pressure sensor module, are placed in a junction box. The ESP32 is used to communicate with each of the sensors and allows for an external internet connection to a Home Assistant server to push collected data out.

[Giovanni] has done an excellent job of documenting each piece, including making the 3D STL files available. Weather stations are a favorite of ours with a lot of variety in what gets collected and how, from ultrasonic anemometers to solar powered weather stations, and it’s great to see [Giovanni]’s take.

Video after the break!

Continue reading “A Weather Station For Whether It Rains Or Shines”

A two picture montage of the blackout logger, the left picture being the front e-ink display of the data logger in a black case and the second picture of the back of the data logger, with the raspberry pi pico show attached to an e-ink display, both sitting on a wooden table.

Blackout Logger Keeps Track Of Power Outages

[Dmytro Panin] lives in Kyiv, Ukraine where there have been rolling blackouts to stabilize the power grid. To help keep track of when the blackouts might happen, be they planned or emergency, and to get more information on how long the blackouts last, [Dmytro] has created a blackout logger.

The build consists of a Raspberry Pi Pico that connects to a DS3231 real time clock (RTC) with a Waveshare 3.7 inch eInk display which [Dmytro] puts into a custom 3D printed case. The RTC has it’s own small power supply, often times from a coin cell battery attached to the module, allowing it to keep time when the module and other devices attached to it are powered off.

The Raspberry Pi Pico is programmed to “poll” every 30 seconds, writing the current time to a file. Should the unit lose power, the last time, within a 30 second window, is available when power is restored and the unit wakes up again. Since the RTC has kept the current time, there is enough information to display the duration of the blackout. The eInk screen ensures that the information is readily available, even when there is no power.

War is not the only reason blackouts can occur and we’ve covered some issues with blackouts in Texas and California in the US.

A two picture montage of a boy wearing a sonic the hedgehog costume with LEDs in them. The left picture is at night with the boy wearing sunglasses and a face mask with the sonic costume head piece lit up. The right picture is during the day with the boy wearing a face mask, holding a plastic pu mpkin bucket for candy and wearing a lit up sonic the hedgehog costume in the front yard of a house.

LEDs Put New Spin On A Sonic The Hedgehog Costume

[Wentworthm] couldn’t say no to his son’s plea for a Sonic the Hedgehog costume for Halloween but also couldn’t resist sprucing it up with LEDs either. The end result is a surprisingly cool light up Sonic the Hedgehog costume.

a picture of a breadboard with an Arduino Nano on it, with wires going out to 3d printed tear dropped shapes that have LED strips in them, with some LED strips on.

After some experimentation, [Wentworthm] ordered two costumes and ended up mixing and matching the head piece of one with the body suit of the other. For the head, [Wentworthm] created six 3D printed “quills” that had slots for the WS2812B LED strips to slide into and diffuse out the sides, with each quill sliding into the folds of the Sonic head “spikes”. Sewn strips of cloth were used to house the LED strips that were placed down the sides of the costume. An additional 3D printed switch housing was created to allow for a more robust interface to the two push buttons to activate the LEDs. An Arduino Nano, soldered to a protoboard, was used to drive the LED strips with a USB battery pack powering the whole project.

[Wentworthm] goes into more detail about the trials and errors, so the post is definitely worth checking out for more detail on the build. Halloween is always a great source of cool costumes and we’ve featured some great ones before, like a light up crosswalk costume to making a giant Gameboy colour costume.

Video after the break!

Continue reading “LEDs Put New Spin On A Sonic The Hedgehog Costume”

A 3D printed cat treat dispenser on a table with a laptop in the background and with a treat in it's tray and a cat on the left about to eat the treat.

Local IOT Cat Treat Dispenser

[MostElectronics], like many of us, loves cats, and so wanted to make an internet connected treat dispenser for their most beloved. The result is an ingenious 3D printed mechanism connected to a Raspberry Pi that’s able to serve treats through a locally run web application.

The inside of a 3d printed cat treat dispenser, showing the different compartments, shaft and wires running out the back.

From the software side, the Raspberry Pi uses a RESTful API that one can connect to through a static IP. The API is implemented as a Python Flask application running under a stand alone web server Python script. The web application itself keeps track of the number of treats left and provides a simple interface to dispense treats at the operators leisure. The RpiMotorLib Python library is used to control a 28BYJ-48 stepper motor through its ULN2003 controller module, which is used to rotate the inside shaft of the treat dispenser.

The mechanism to dispense treats is a stacked, compartmentalized drum, with two drum layers for food compartments that turn to drop treats. The bottom drum dispenses treats through a chute connected to the tray for the cat, leaving an empty compartment that the top drum can replenish by dropping its treats into through a staggered opening. Each compartmentalized treat drum layer provides 11 treats, allowing for a total of 22 treats with two layers stacked on top of each other. One could imagine extending the treat dispenser to include more drum layers by adding even more layers.

Source code is available on GitHub and the STL files for the dispenser are available on Thingiverse. We’ve seen cat electronic feeders before, sometimes with escalating consequences that shake us to our core and leave us questioning our superiority.

Video after the break!

Continue reading “Local IOT Cat Treat Dispenser”