Hacklet 52 – Breakout Board Projects

Starting a design with a new part can be hard. What power supply voltage(s) does it need? Are there any support component requirements? What is the footprint? What about the I/O voltage levels? Breakout boards are designed to answer all those questions for you. Breakouts help when you’re designing with a new part – be it a microcontroller, a sensor, a motor driver, or anything else. They also are a huge help when you’re trying to knock out a quick hack, and just need to get something working quick. Fast to integrate, often breadboard friendly, breakouts just make things easier! This week’s Hacklet is about some of the best breakout board projects on Hackaday.io!

32f4We start with [Christoph] and STM32F030F4P6 breakout board. Inspired by the Teensy 3.0, [Christoph] set out to build a simple, easy to use, and small breakout board for an ARM processor. The STM32F030F4P6 is a great starting point. At only 20 pins, it’s one of the smallest ARM based chips around. He added the basic things needed to bring this chip up: decoupling caps, a reset button, headers for ST’s software debugger, and of course an LED for a blinky hello world program. The resulting board is physically tiny, but this lilliputian ARM board packs Coretex M0 powered punch!

drvNext up is [al1] and DRV8836 Breakout. Sooner or later, everyone wants to drive a motor in one of their projects. It’s a rite of passage, just like blinking an LED. Motors pull a lot of current though, so external transistors or driver chips are almost always necessary. TI’s DRV8836 chip packs two full H-bridges into one package. That’s enough to drive two DC motors or one stepper. Handling 1.5 amps of current per driver in a tiny package means that thermal coupling is important. The DRV8836 has a large thermal pad which has to be soldered to keep the magic smoke in. [al1] dropped the chip, along with the correct thermal footprint and decoupling capacitors onto a simple breakout. The result is easy to use motor drivers for the masses.

espHackaday.io power user [davedarko] took cues from his favorite designs to create Ignore this ESP8266 board. In [Dave’s] own words, “I stole from every one. The huzza from Adafruit, [Matt’s] breakout board, [Al1s] board, NodeMCUs DevKit.” Hey [Dave] there’s no stealing in open source hardware! There is  only design reuse with attribution, which is exactly what you’re doing. [Dave’s] breakout can use both popular ESP8266 footprints: the ESP-01 and ESP-12. He’s added power, reset/programming buttons, and the all important serial header to talk to the module. Going serial allows dave to keep costs down by not including an expensive serial to USB chip in the BOM. Most of us have FTDI cables (or clones) bouncing hanging around anyway. We definitely like the logo on this one!

bbbFinally we have [The Big One] with uBBB 32u4. uBBB 32u4 is a bigger brother of µbbb, a Hackaday.io project [Warren] and [The Big One] worked on. µbbb uses an Atmel ATmega32u2 processor. [The Big One] has expanded the faimly to include an ATmega32u4. If you’re wondering, uBBB stands for “Micro Bare Bones Board” At 1.65″ x 0.8″, this is a micro board. It still manages to  include everything you need to get the processor up and running fast. Crystal, buttons, decoupling caps, and LEDs – everything is here. A mini USB connector makes communicating with the ATmega a snap!

If you want to see more breakout boards, check out our new breakout board list! If I’ve forgotten to add you to the list, just drop me a message on Hackaday.io. That’s it for this week’s Hacklet, As always, see you next week. Same hack time, same hack channel, bringing you the best of Hackaday.io!

Caption CERN Contest – Work Until You Drop

Week 19 of the Caption CERN Contest is now in the record books, though we’re sure we’ll be getting “safety update” emails from HR about the incident for the next several weeks. Thanks to everyone who threw caution to the wind and submitted a caption! This definitely is some sort of medical or emergency room at CERN. We’re still not quite clear as to why they need a full-sized skeleton though. We have to wonder how many lab pranks that poor former-human has been part of.

The Funnies:

  • “The second test subject survived a bit better than the first, and if you’re wondering, the first test subject is standing in the corner”- [jakewisher125]
  • “It soon became apparent that it had been a mistake to entrust site security to sharks with lasers.” -[Robb Smith]
  • “What do you mean blink once if it hurts? Are you serious?” – [Rollyn01]

This week’s winner is [Will Frankian] with “Dr. Banks never tried eyeballing the electron beam alignment again”. Congrats [Will]! Enjoy your LightBlue Bean from The Hackaday Store!

Week 20

cern-20-smAnyone who’s worked on a major project, be it professional, personal, or for a contest like The Hackaday Prize, knows about marathon sessions. Those times when you put in your all and just push the project ahead until you drop. This scientist has definitely given his all and then some! He’s catching a few winks right under the blackboard where he presumably has been working. This image has no caption, though it’s attached to an album entitled Linac control room. None of the pictures seem to show much of a control room though. It seems that back in 1966, CERN’s photographer was a bit more interested in the sleeping scientists than the science itself!

What do you think is happening in this image? Can you make anything interesting out from the diagrams on the blackboard? Give it a shot! This week’s prize is a Stickvice from The Hackaday Store.

Add your humorous caption as a comment to this project log. Make sure you’re commenting on the contest log, not on the contest itself. As always, if you actually have information about the image or the people in it, let CERN know on the original image discussion page.

Good Luck!

Phonographs Through The Eye Of An Electron Microscope

Hackaday Prize judge [Ben Krasnow] has been busy lately. He’s put his scanning electron microscope (SEM) to work creating an animation of a phonograph needle playing a record. (YouTube link) This is the same 80’s SEM [Ben] hacked back in November. Unfortunately, [Ben’s]  JSM-T200 isn’t quite large enough to hold an entire 12″ LP, so he had to cut a small section of a record out. The vinyl mods weren’t done there though. SEMs need a conductive surface for imagingphono_anim_1. Vinyl is an insulator. [Ben] dealt with this by using his vacuum chamber to evaporate a thin layer of silver on the vinyl.

Just imaging the record wouldn’t be enough; [Ben] wanted an animation of a needle traveling through the record grove. He tore apart an old phonograph needle and installed it in on a copper wire in the SEM. Thanks to the dual stage setup of the JSM-T200, [Ben] was able to move the record-chip and needle independently. He could then move the record underneath the needle as if it were actually playing. [Ben] used his oscilloscope to record 60 frames, each spaced 50 microns apart. He used octave to process the data, and wound up with the awesome GIF animation you see on the left. 

pits[Ben] wasn’t done though. He checked out a few other recording formats, including CD and DVD optical media, and capacitance electronic disc, an obscure format from RCA which failed miserably in the market. The toughest challenge [Ben] faced was imaging the CD media. The familiar pits of a CD are stored on a thin aluminum layer sandwiched between the lacquer label and the plastic disc. He tried dissolving the plastic with chemicals, but enough plastic was left behind to distort the image. The solution turned out to be double-sided tape. Sticking some tape down on the CD and peeling it off cleanly removed the aluminum, and provided a sturdy substrate with which to mount the sample in the SEM.

We’re curious if stereo audio data can be extracted from the SEM images.  [Oona] managed to do this with a mono recording from a toy robot.  Who’s going to be the first one to break out the image analysis software and capture some audio from [Ben’s] images?

Continue reading “Phonographs Through The Eye Of An Electron Microscope”

Get Up, Stand Up. With A Little Help From The Mindfulness Bracelet

[Becky Stern] has created the mindfulness bracelet, a wearable which looks great and serves an important purpose. The bracelet buzzes every hour to remind you to stand up and take a break from work, soldering, gaming, or whatever it is you may be doing. The bracelet is made up of interlinked figure 8 shapes of leather, though [Becky] says rubber from a bicycle inner tube works great as well. The final shape reminds us of the link belts sometimes found on lathes or other industrial equipment. The links are the perfect size to slip an Arduino Gemma in, along with a battery and vibrating motor. A NPN transistor, diode, and resistor round out the entire bill of materials for this design. This bracelet is a heck of a lot cheaper than the Apple watch feature which inspired it!

The time interval is set in the code to 1 hour, and can be adjusted by the user. Although the times are stored in milliseconds, the design does use the ATtiny85’s Watchdog Timer (WDT) to conserve power. This means the time can drift up to 30 seconds per hour, which is fine in this application.

Click past the break to see the bracelet in action!

Continue reading “Get Up, Stand Up. With A Little Help From The Mindfulness Bracelet”

Hacklet 51 – Crowdfunding Projects

Ah crowdfunding. You might say we have a love/hate relationship with it here at Hackaday. We’ve seen some great projects funded through sites like Kickstarter, IndieGoGo, and the like. We’ve also seen projects where the creators were promising more than they could deliver. While the missed deliveries and outright scams do get a lot of press, we believe that crowdfunding in general is a viable platform for getting a project funded.

Closer to home, Hackaday.io hosts thousands of projects. It’s no surprise that some of these have had crowdfunding campaigns. This week’s Hacklet focuses on those projects which have taken the leap into the crowdfunding arena.

matrixWe start with [Louis Beaudoin] and SmartMatrix. [Louis] has created an awesome Teensy 3.1 based system for displaying images, animated graphics, and random patterns on a 32×32 RGB LED panel. The LED panel is the same type used in commercial LED billboards. SmartMatrix is open source, and includes extra pins for hacking. Our own [Mike Szczys] hacked the SmartMatrix to create a 1-pixel PacMan clone. [Louis’] Kickstarter is almost over, and needs a huge boost for fully-assembled SmartMatrix to make its goal. Even if the campaign isn’t successful, we think its a great project and you can always get a solder-it-yourself kit from The Hackaday Store!

psdrNext up is [Michael R Colton] with PortableSDR. PortableSDR was one of the five finalists in The 2014 Hackaday Prize. This pocket-sized software defined radio transceiver started as a ham radio project: a radio system which would be easy for hams to take with them on backpacking trips. It’s grown into so much more now, with software defined radio reception and transmission, vector network analysis, antenna analysis, GPS, and a host of other features. [Michael] raised a whopping $66,197 in his Kickstarter campaign, and he’s already delivered the hand assembled prototypes to their respective backers! Even the lower level rewards are awesome – [Michael’s] PSDR key chains are actually PCBs which can be turned into maple compatible ARM devboards with just about $10 of additional parts.

chip whisperNext we have The ChipWhisperer, [Colin Flynn’s] embedded security testing system, which won second place in the 2014 Hackaday Prize. We’ve covered both [Colin] and the ChipWhisperer  several times on the Blog. You can always buy the full ChipWhisperer from [Colin’s] company, NewAE Technology Inc. At $1500 USD, the ChipWhisperer is incredibly affordable for a hardware security tool. That price is still a bit high for the average hacker though. [Colin] created a Kickstarter campaign for a light version of the ChipWhisperer. This version is a great platform for learning hardware security, as well as an instrument for testing embedded systems. The campaign was a huge success, raising $72,079.

wingboardNot every crowdfunding project has to be a massive megabuck effort though. [ZeptoBit] just wanted to solve a problem, he needed a WiFi shield for Arduino using an ESP8266 module. ESP8266 WiFi modules have been all the rage for months now, but they can be a bit of a pain to wire up to an Arduino Uno. The dual row .100 headers are not bread board friendly. The ESP8266’s 3.3 V power and interface requirements mean that a regulator and level shifters are needed to get the two boards working together. [ZeptoBit] put all that and more on his wingboard. It worked so well that he launched a Kickstarter campaign for a small run of boards – his initial goal was kr3,500, or $425 USD. He ended up raising kr13,705, or $1665 USD. Not bad at all for a hobby project!

If this isn’t enough crowdfunding goodness for you, check out our Crowdfunding list! That’s it for this week’s Hacklet, As always, see you next week. Same hack time, same hack channel, bringing you the best of Hackaday.io!

Caption CERN Contest – Safe Science Is No Accident

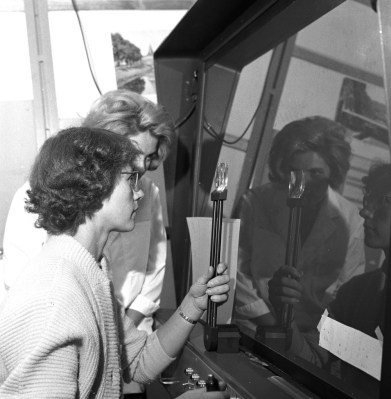
Week 18 has faded into history, but not before you wrote some great captions! A hearty thanks to all the entrants. Astute reader [jlbrian7] has done it again! He’s uncovered the story behind this image. The woman in this photo is manually analyzing photographs of charged particles taken in a bubble chamber. He linked to an article from Fermilab, and to a 1971 film about Gargamelle, CERN’s largest bubble chamber at the time. The film is well worth a watch. It’s aimed at the layman, explaining the design, construction, and operation of bubble chambers. The photo scanning section starts at 14:40. The video has plenty of “1970’s-isms”, such as referring to the women analyzing the photographs as “scanning girls”. The filmmaker even bookend the section with an actual scanned girl – a possibly NSFW (by today’s standards) ASCII art printout of a nude pin-up model, as printed by a Control Data Corporation supercomputer.

The Funnies:

  • “Tabatha, the dungeon master, plots tonight’s dungeon and dragons game inside the exploded atom.”- [LloydTCannonIII]
  • “CERN, the only place you can watch Netflix on the same table that you eat lunch and plot global domination. Muwahahaha!” – [Joshua]
  • “They take Kerbal Space Program very serious at CERN. Here you can see the first interactive real time orbital view display.” – [haxtormoogle]

This week’s winner is [Jarrett] with “Friday night is Missile Command night in the lab. It’s a serious event”

We’re giving away two prizes this week – one to [jlbrian7] for his research on this and other CERN images, and one to [Jarrett] for his winning caption! Congrats to both of you. Enjoy your Logic Pirates From The Hackaday Store!

Week 19

cern-19-smJust about every workplace has to worry about safety. Many companies have a safety team that is trained to handle emergencies and help patients until proper medical technicians arrive. In a typical office environment this training is pretty easy, but what if you’re working on the bleeding edge of science? CERN’s safety team trains for everything, including badly burned hands and partially removed eyeballs. Don’t worry, these are just simulated injuries, which is probably why this CERN scientist is so calm, even smiling for the photo! CERN’s medical room also appears to be well stocked – with a full skeleton, and no less than four different types of fire extinguishers.

So, even though we already have a pretty good idea of what is going on in this photo (and the accompanying album), we’re sure you’ll come up with some great captions. Have at it!

This week’s prize is a Lightblue Bean from The Hackaday Store. Add your humorous caption as a comment to this project log. Make sure you’re commenting on the contest log, not on the contest itself (or on this post).

As always, if you actually have information about the image or the people in it, let CERN know on the original image discussion page.

Good Luck!

Kids Electric Mini Goes Brushless, Pops Wheelies

[ThatHpiGuy] had a problem. He wasn’t impressed with the performance from his kids’ electric-powered Mini. The 6 volt system was anemic at best, and was just begging for an upgrade. Pulling off the seat and checking the undercarriage, [ThatHpiGuy] realized the motor and gearbox were a perfect fit for the Turnigy 2300 Kv motor from his R/C short course truck. A couple of screws later, car-docuand he had the fastest ride-on toy on the block. Since this was a quick hack, [ThatHpiGuy] kept the truck’s R/C receiver, electronic speed control, and 2 cell LiPo power setup intact. The result is a cooperative system where he controls the throttle via R/C, and his kids control the steering.

That steering is still a bit of an issue though. Like many kid toys, the Mini only has one drive wheel, in this case the right rear. If [ThatHpiGuy] pours on the power a bit too quickly, the single wheel either spins or forces the car into a hard left turn. Aside from that, it looks like both [ThatHpiGuy] and his children are having a ball with this hack. The car will even pop a wheelie from a standing start! You’ve got to see it after the break.

Continue reading “Kids Electric Mini Goes Brushless, Pops Wheelies”