Make Your Own Remote Control LED Light

Want to control the colors in your home? Sure, you could just buy a Philips Hue bulb, but where’s the hacking fun in that? [Dario] agrees: he has written a tutorial on building an Arduino-controlled RGB light system that plugs into a standard light socket.

[Dario] is using a bulb from Automethion in Italy, an Arduino, and an ESP8266 shield that sends signals to the bulb. The Arduino and shield are running the Souliss framework that provides smart home features and runs on a number of platforms, so it is a good open platform for creating your own smart home apps, and would be easy to expand. We have also seen a few other projects that use the ESP8266 to control an RGB strip, but this is the first one that uses a bulb that plugs into a standard light socket.

At the moment, Automethion is the only company selling this light, but I hope that others will sell similar products soon.

Continue reading “Make Your Own Remote Control LED Light”

Hackaday Prize Entry: Twitter Goes To The Dogs With Raspberry Pi Hack

Dogs are remarkable creatures. Anybody who has lived with one will know that they are very vocal beasts, with barks that range from noting the presence of a squirrel in the yard to the warning whine that says “I am about to pee on your shoes if you don’t take me outside.” [Henry Conklin] decided to computerize the analysis of these noises, putting his dog [Oliver Twitch] on Twitter so he could hear what he was saying while he was at work. [Henry] that is: [Oliver] stays at home.

He did this using a Raspberry Pi, which is set to record sound above a certain volume. With the system sitting by [Oliver’s] favorite window, this records his barks. The recordings are then analyzed using PyAudioAnalysis, a library that analyzes sounds, compares them to reference ones and classifies them.  The Raspberry Pi then posts the results onto twitter using Python-twitter.

The setup used by [Oliver] to capture the barks: a USB microphone, Raspberry Pi and WiFi USB dongle.
Or rather, it will when [Henry] fixes a few bugs: right now it just posts a random string that is based on the length of the bark, not the type. [Henry] says he is working on the dog translation at the moment. It’s still a neat project that shows you how simple it is to use a few small bits of code to gather info from your environment and share these over the Internet. [Henry] also says that the next step is creating a weekly podcast for [Oliver]. I, for one, will be subscribing to hear his thoughts on how annoying the postman is, and how vexing it is to see a squirrel and not be able to chase them.

The 2015 Hackaday Prize is sponsored by:

You Can’t Call It A Battlestation Without This Overhead Control Panel

Modern computers are rubbish. Why, they barely have a switch or a blinky light on them. What’s the point in having a computer if you don’t have the thrill of throwing a switch or eight and watching lights blink in response? [Smashcuts] obviously agrees because he built a control panel filled with heavy-duty switches and blinking wonderfulness to augment his battlestation. This piece of mechanical wonderment has buttons for useful features such as typing several levels of derisive laughter in chat windows, playing odd sound effects and a large red panic button that… well, I won’t spoil the surprise. The whole thing is hand-wired and fronted with laser-cut panels that make it look really authentic. [smashcuts] built it “because it didn’t exist and I felt like it needed to”, which is a perfect justification for this piece of industrial scale awesomeness.

It does have some more practical uses, though: he has set several of the switches to trigger actions in Photoshop and other programs, so this could be easily adapted for those who have the odd belief that things need a practical use to exist. He used USB controllers from Desktop Aviator, and a Mac program called Controller Mate to set up the sequencing for the blinkies. Unfortunately, [smashcuts] didn’t produce a how-to guide for this panel, claiming that “I don’t really have blueprints or schematics. I REALLY didn’t know what I was doing, so all the notes I do have wouldn’t make sense to anyone. It’d be like reading an owners manual to a car written by a caveman”. Either way, it is an impressive build, and you can find more details from the creator on this reddit thread.

Lessons From The Fablab Masters

I spent some time recently at the Fab11 conference, a gathering of the people behind the Fab Labs that are springing up all over the world, where entrepreneurs, hackers and the curious can learn about making things. So, it was no surprise that this was a great place to pick up some tips on designing, building and hacking things. Here are a few of the lessons I picked up at this fascinating gathering of the fabbers.

Build Quickly

If you can make something in an hour, you’ll make it better in a day

said [Joris Van Tubergen]. He knows something about making unusual things because he 3D printed a full-sized Elephant. To do this, he worked out how to hack the Ultimaker 2 3D printer to print to an unlimited Z height by flipping the printer upside down and moving the Z motor to lift the printer rather than the print head. With a few tweaks to the software, he could then print full-height elephant slices to speed up the process. He is absolutely right: while it is tempting to endlessly fiddle with a concept on paper, you learn more by building a prototype, even if it doesn’t work.

Continue reading “Lessons From The Fablab Masters”

Hackaday Prize Entry: Project Dekoboko 凸凹 Maps Bumpy Roads On A Bike

If you live in New England (like me) you know that the roads take a pounding in the winter. Combine this with haphazard maintenance and you get a recipe for biking disaster: bumpy, potholed roads that can send you flying over the handlebars. Project Dekoboko 凸凹 aims to help a little with this, by helping you map and avoid the bumpiest roads and could be a godsend in this area.

The 2015 Hackaday Prize entry from [Benjamin Shih], [Daniel Rojas], and [Maxim Lapis] is a device that clips onto your bike and maps how bumpy the ride is as you pedal around. It does this by measuring the vibration of the bike frame with an accelerometer. Combine this with a GPS log and you get a map of the quality of the roads that helps you plan a smooth ride, or which could help the city figure out which roads need fixing the most.

bike-measures-bumpy-roads-thumb
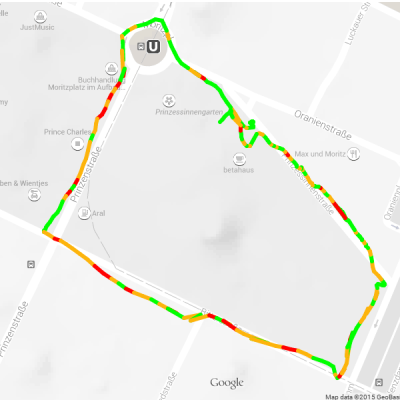
The project is currently on its  third version, built around an Arduino, Adafruit Ultimate GPS Logger shield, and a protoboard that holds the accelerometer (an Analog ADXL345). The team has also set up a first version of their web site, which contains live data from a few trips around Berlin. This does show one of the issues they will need to figure out, though: the GPS data has them widely veering off the road, which means that the data was slightly off, or they were cycling through buildings on the Prinzenstrasse, including a house music club. I’ll assume that it was the GPS being inaccurate and not them stopping for a rave, but they will need to figure out ways to tie this data down to a specific street before they can start really analyzing it. Google Maps does offer a way to do this, but it is not always accurate, especially on city streets. Still, the project has made good progress and could be useful for those who are looking for a smooth ride around town.

Continue reading “Hackaday Prize Entry: Project Dekoboko 凸凹 Maps Bumpy Roads On A Bike”

Tiny Robot Shakes Head At You In Disapproval

If you don’t have enough things staring at you and shaking their head in frustration, [Sheerforce] has a neat project for you. It’s a small Arduino-powered robot that uses an ultrasonic distance finder to keep pointing towards the closest thing it can find. Generally, that would be you.

When it finds something, it tries to track it by constantly rotating the distance finder slightly and retesting the distance, giving the impression of constantly shaking its head at you in disappointment. This ensures that you will either unplug it or smash it with a hammer after a very short time, but you should read [Sheerforce]’s code first: it’s a great example of documenting this for experimenters who want to build something that offers more affirmations of your life choices.

Continue reading “Tiny Robot Shakes Head At You In Disapproval”

Covert Cricket Score Tracker Gets Around Office Rules

[Rohit Gupta] was looking for a stealthy way to keep up with the scores for his favorite game: cricket. Unfortunately, his office blocked access to most sites where he could watch the game, so he came up with a covert way to track the score on a small LCD screen. Using a Raspberry Pi and the web scraping program BeautifulSoup, he wrote a program that grabbed the score once a minute, and displayed it on a screen salvaged from a Nokia 5510 cell phone, driven through the Adafruit 5510 Python display library. Web scraping is a technique where a program grabs a web page, scrapes all of the content off it and processes it so only the data that is needed remains.

[Rohit] doesn’t name the web site that he scraped the score from, but there are two good reasons for that. Firstly, this hack relies on his office not blocking it, and secondly, many web sites frown on web scraping like this, as doing it too often can overload their servers, and you obviously don’t see the ads that the site is running. So, it is a technique that should be used with some caution. That aside, this is  a great example of a stealthy way to display information that you want to track, but without obnoxious (and obvious) alerts popping up on screen. And, given that cricket games can often go on for several days, that’s a good way to keep track of the game you love and keep your job.

Need a little primer on web scraping? Check out this guide.