Me Casa Es Techno Casa

“Jarvis, make me a sandwich” is not a reality yet. Though there exist a lot of home automation products out there today, commercial solutions just don’t make the cut for the self-respecting geek. So [Matias] took the DIY route with his La CasaC Home Automation project and achieved the functionality he was after.

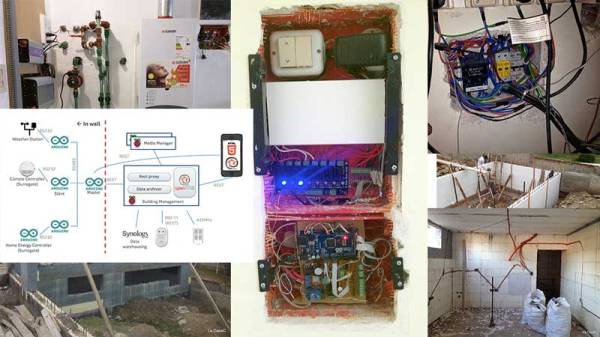
[Matias’] project is one of the most elaborate and large-scale DIY home automation projects we have seen in recent years. With over 200 nodes, this project took a number of years of planning and execution. The core of the design is the ever popular Raspberry Pi running OpenHAB to ease the pain of customization and integration with various protocols. To further simplify the ginormous task, the design uses RS485 to communicate between master and slave devices.

Each wall node is managed by a nearby Arduino which in turn talks to a central Arduino Mega. OpenHab takes care of the higher functions such as UI, integration with existing hardware such as the solar heater, media center control,  and RFID and keypad control. Sensor data aggregation and building management is done centrally with data funneled to a separate NAS system as long-term storage.

What makes this project awesome is that [Matias] did not integrate a Raspberry Pi into his house, no! He actually integrated his entire house around the system because this build includes the construction of the house as well. Take a look at this Google Photos Gallery to see the photographic progress of the build. That is amazing!

The code and snippets are available on GitHub for your viewing pleasure though that seems the easy part. If this inspired you, then also take a look at the Raspberry Pi Home Automation of a Gingerbread House if you’d like to try it out before fully committing.

Control Thy LED

In a previous article, I discussed LEDs in general and their properties. In this write-up, I want to give some examples of driving LEDs and comparing a few of the most commonly used methods. There is no “one size fits all” but I will try and generalize as much as possible. The idea is to be able to effectively control the brightness of the LED and prolong their life while doing it. An efficient driver can make all the difference if you plan to deploy them for the long-haul. Let’s take a look at the problem and then discuss the solutions. Continue reading “Control Thy LED”

DIY Mocha Cooker

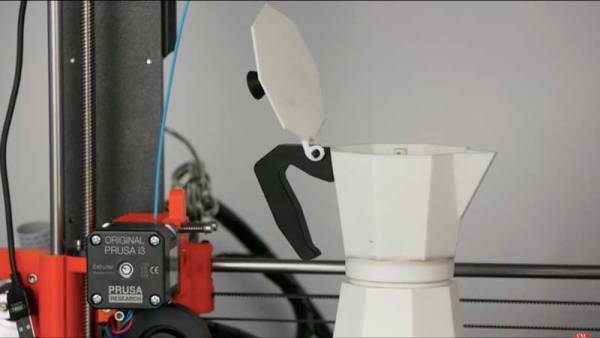
Food-grade 3D printing filament is on the rise and it is nice to have a custom coffee mug in the office to instill a little envy in the locals. [Stefan] took it upon himself to create a Mocha Machine that he would 3D print and test the boundaries of his filament.

[Stefan] used Fusion 360 to replicate the famous Bialetti Moka Express pot in it true octagonal shape. Since the pot brews coffee under pressure, he tested tolerances in Fusion 360 to make sure all the thicknesses were right. While the design was being printed, a steel washer was added to facilitate induction heating since you can’t really put a plastic pot over a flame. The print uses Formfutura Volcano PLA which is annealed for an hour at 110 degrees Celsius.

Below is a video of the whole process and though the material may not be food grade, the project is definitely a step in the right direction. Since the printed parts can withstand temperatures of up to 160 degrees Celsius, projects that involve boiling water or experiments with crystallization can benefit from a custom design.

We really hope to see more projects that use this technique, however, for those looking at their coffee machine right now, take a look at more coffee machine hacks as well as alarm clock hacks to get the coffee brewing in the morning.

Thanks for the tip [Nils Hitze] Continue reading “DIY Mocha Cooker”

Finishing A Mini PS One: SLA Vs Extruded

One of the biggest lessons learned by first time 3D printer users is that not everything can be replicated and a printer is a machine and not a miracle worker. It has limitations in terms of what it can print as well as the quality of the output. For teeny tiny objects, the 0.8 mm nozzle will just not do and with resin printers on the rise, the question is, ‘are extruder printers obsolete?’

[Dorison Hugo] has made a mini version of the PS One using a Raspberry Pi which you can play games one. The kicker is that in his video, he does a comparison of an SLA printer and a cheaper extruder one for his enclosure. He goes through a laundry-list of steps to print, file, fill, repair, sand paint, sand, paint etc to try to get a good model replica of the original PS One. He then proceeds to print one with an SLA printer and finishes it to compare with the first model. The decals are printed on an inkjet for those who are wondering, and there is a custom cut heatsink in there as well that was salvaged from an old PC.

Spoiler alert! The SLA wins but in our view, just slightly. The idea is that with enough elbow grease and patience, you can get pretty close to making mini models with a cheaper machine. The SLA print needs work too but it is relatively less and for detailed models, it is a much better choice. We really enjoyed watching the process from start to finish including the Dremel work, since it is something that is forgotten when we see a 3D print. Creating something of beauty takes time and effort which stems from a passion to make.

Take a look at the video below of the time lapse and for  SLA printer fans, have a look at the DIY SLA printer which is a Hackaday Prize Entry this year. Continue reading “Finishing A Mini PS One: SLA Vs Extruded”

Horizontal Magnetic Levitation Experiments

Levitating chairs from the Jetsons still have a few years of becoming a commercial product though they are fun to think about. One such curious inventor, [Conor Patrick], took a deep dive into the world of maglev and came up with a plan to create a clock with levitating hands. He shares the first part of his journey to horizontal levitational control.

[Conor Patrick] bought an off-the-shelf levitation product that was capable of horizontal levitation. Upon dissecting it he found a large magnet, four electromagnet coils, and a hall effect sensor. These parts collectively form a closed-loop control to hold an object at a specific distance. He soon discovered that in fact, there were just two coils energized by H-bridges. His first attempt at replicating the circuit, he employed a breadboard which worked fine for a single axis model. Unfortunately, it did not work as expected with multiple coils.

After a few iteration and experiments with the PID control loop, he was able to remove unwanted sensor feedback as well as overshoot in control current. He finally moved to a Teensy with a digital PD loop. The system works, but only marginally. [Conor Patrick] is seeking help from the control loop experts out there and that is the essence of the OSHW world. The best part of this project is that it is a journey that involves solving one problem at a time. We hope to see some unique results in the future.

We have covered Acoustic Levitation in the past and the Levitating Clock on a similar beat. We’re certain a more refined approach is on the horizon since many of us are now looking at making one to experiment with on our workbench.

Analysing 3D Printer Songs For Hacks

3D printers have become indispensable in industry sectors such as biomedical and manufacturing, and are deployed as what is termed as a 3D print farm. They help reduce production costs as well as time-to-market. However, a hacker with access to these manufacturing banks can introduce defects such as microfractures and holes that are intended to compromise the quality of the printed component.

Researchers at the Rutgers University-New Brunswick and Georgia Institute of Technology have published a study on cyber physical attacks and their detection techniques. By monitoring the movement of the extruder using sensors, monitored sounds made by the printer via microphones and finally using structural imaging, they were able to audit the printing process.

A lot of studies have popped up in the last year or so including papers discussing remote data exfiltration on Makerbots that talk about the type of defects introduced. In a paper by [Belikovetsky, S. et al] titled ‘dr0wned‘, such an attack was documented which allowed a compromised 3D printed propeller to crash a UAV. In a follow-up paper, they demonstrated Digital Audio Signing to thwart Cyber-physical attacks. Check out the video below.

In this new study, the attack is identified by using not only the sound of the stepper motors but also the movement of the extruder. After the part has been manufactured, a CT scan ensures the integrity of the part thereby completing the audit.

Disconnected printers and private networks may be the way to go however automation requires connectivity and is the foundation for a lot of online 3D printing services. The universe of Skynet and Terminators may not be far-fetched either if you consider ambitious projects such as this 3D printed BLDC motor. For now, learn to listen to your 3D printer’s song. She may be telling you a story you should hear.

Thanks for the tip [Qes] Continue reading “Analysing 3D Printer Songs For Hacks”

Bringing A 50 Watt Laser Cutter To Life

This is the future and we live in a world of 3D printers and laser cutters. Have you ever pondered the question of getting yourself a laser cutter? Well [Erich Styger] just landed a 50 Watt Laser Cutter from AliExpress and has written up a detailed guide to his experience.

[Erich] had been wrestling with the idea of buying one for himself for some time but was put off by the difficulty in their operation. This changed when [Scorch] published the K40 Whisperer control software which allows for better control over these machines. With the hopes of an interesting weekend project, [Erich Styger] took a leap of faith and spent $900 on a model 4040 laser cutter.

In his blog, he goes through the steps in setting up the machine as well as calibrating the laser. With a plethora of images and a detailed look at each aspect of the leveling and testing, [Erich Styger] had a weekend well spent and a working K40 laser cutter for his workshop. But perhaps the more valuable part of the stories is the overall experience.

It was not a “what you see is what you get” order, but it did turn out to be a hacker’s “what you want is what you get” adventure. The machine didn’t look the same as the picture, it came with a burned CD-R with a box full of small parts (in addition to separate shipment of a USB thumb drive and silicone sealant), and there were some mechanical touchups plus a stuck switch requiring reassembly. He has done an excellent job of documenting from order to test-runs and the photos alone are worth taking a look.

Adding value to inexpensive laser cutters in an often-featured project around here. If you are looking for more details on these wonderful machines, be sure to check out more tales of Cheap Laser Cutters and our coverage of the K40 Whisperer software launch from last month.