This BeagleBone’s Got AI

There are a lot of BeagleBones, from Blue, to White, Green, Black, and we think there’s a purple one in there for some reason. The diversity of BeagleBones is due to the openness of the design, and is the biggest advantage over the ‘bone’s main competitor, the Raspberry Pi.

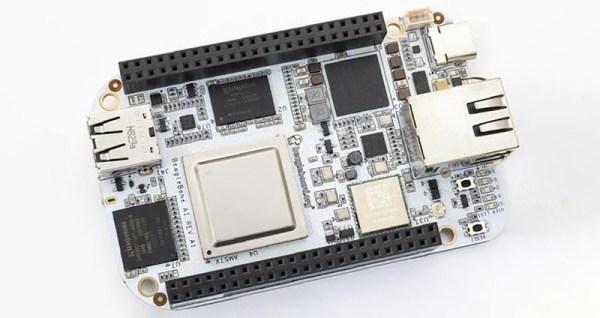
Now, there’s a new BeagleBone, and this time the color is AI. The BeagleBoard foundation has just unveiled the BeagleBone AI, and it is going to be the most powerful BeagleBone ever developed.

Unlike the BeagleBone Blue, Black, or the PocketBeagle, the BeagleBone AI uses the TI AM5729 processor, a dual-core ARM Cortex-A15 running at 1.5 GHz. It’s not a BeagleBone unless it has those nifty real-time programmable units, and yes, this one has four. This is the BeagleBone AI, so something else has to be different, and it comes with four Embedded Vision Engines (EVEs), a TIC66x DSP, and support for machine learning with pre-installed tools.

Of especially interesting note, this board features USB C connectors, Gigabit Ethernet, onboard WiFi, 1 GB of RAM, and 16 GB of eMMC Flash. The massive block of pin headers remains the same.

If this feature set sounds somewhat familiar to the Beagle family, you’re right. The BeagleBoard X-15 — the alpha wolf of the BeagleBone family — also comes with DSP, and Cortex-A15 cores running at 1.5 GHz. The use case for the X-15 was a little puzzling, as it was too big to really be a portable or embeddable system, but didn’t have the power of the likes of an Nvidia Jetson or what have you. The BeagleBone AI is essentially a minified version of the X-15, albeit slightly less capable in terms of RAM and Flash.

Google Launches AI Platform That Looks Remarkably Like A Raspberry Pi

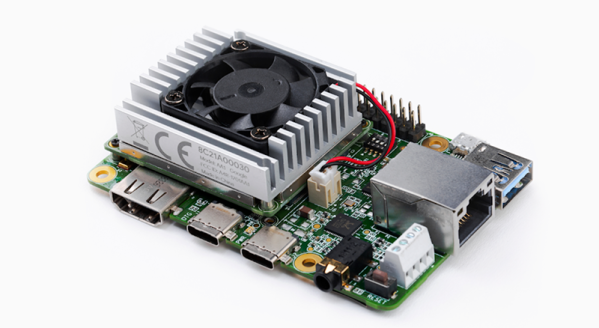
Google has promised us new hardware products for machine learning at the edge, and now it’s finally out. The thing you’re going to take away from this is that Google built a Raspberry Pi with machine learning. This is Google’s Coral, with an Edge TPU platform, a custom-made ASIC that is designed to run machine learning algorithms ‘at the edge’. Here is the link to the board that looks like a Raspberry Pi.

This new hardware was launched ahead of the TensorFlow Dev Summit, revolving around machine learning and ‘AI’ in embedded applications, specifically power- and computationally-limited environments. This is ‘the edge’ in marketing speak, and already we’ve seen a few products designed from the ground up to run ML algorithms and inference in embedded applications. There are RISC-V microcontrollers with machine learning accelerators available now, and Nvidia has been working on this for years. Now Google is throwing their hat into the ring with a custom-designed ASIC that accelerates TensorFlow. It just so happens that the board looks like a Raspberry Pi.

Continue reading “Google Launches AI Platform That Looks Remarkably Like A Raspberry Pi”

Adding Real Lenses To An Instant Camera

The Instax SQ6 and Fujifilm’s entire range of instant cameras are fun little boxes that produce instant photos. It’s a polaroid that’s not Polaroid, and like most instant cameras, the lenses are just one or two pieces of plastic. A lens transplant is in order, and that’s exactly what [Kevin] did to his Instax camera.

The key to this lens transplant project is to make it not look like a complete hack job. For this, [Kevin] is keeping the number of custom mechanical parts to a minimum, with just two pieces. There’s a lens shroud that screws down to the current flange on the camera’s plastic chassis, and should blend in perfectly with the rest of the camera. This demanded a significant amount of 3D modeling to get perfect. The other mechanical part is just a plastic disc with a hole in it. These parts were ordered from Shapeways and bolted to the camera with only a few problems regarding spacing and clearances. This didn’t prevent the camera from coming back together, which is when the documentation becomes fast and loose. Who could blame him: the idea of putting real lenses on an instant camera is something few can resist, and the pictures that come out of this modified camera look great.

The current state of the project with a single lens leads the camera to have an inaccurate and tunnel-like viewfinder, but a huge modification brings this project into twin-lens reflex territory. There are more modifications than camera here, but all the printed parts are documented, there are part numbers for McMaster-Carr, and the camera has full control over focusing and framing.

Hackaday Links Column Banner

Hackaday Links: March 3, 2019

In this week’s edition of, ‘why you should care that Behringer is cloning a bunch of vintage synths’, I present to you this amazing monstrosity. Yes, it’s a vertical video of a synthesizer without any sound. Never change, Reddit. A bit of explanation: this is four Behringer Model Ds (effectively clones of the Moog Minimoog, the Behringer version is called the ‘Boog’) stacked in a wooden case. They are connected to a MIDI keyboard ‘with Arduinos’ that split up the notes to each individual Boog. This is going to sound amazing and it’s one gigantic wall of twelve oscillators and it only cost $800 this is nuts.

Tuesday is Fastnacht day. Fill your face with fried dough.

The biggest news this week is the release of a ‘folding’ phone. This phone is expensive at about $3000 list, but keep in mind this is a flagship phone, one that defines fashion, and an obvious feature that will eventually be adopted by lower-cost models. Who knows what they’ll think of next.

It’s a new Project Binky! This time, we’re looking at cutting holes in the oil sump, patching those holes, cutting more holes in an oil sump, patching those holes, wiring up a dashcam, and putting in what is probably the third or fourth radiator so far.

Here’s a Kickstarter for new Nixie tubes. It’s a ZIN18, which I guess means an IN18, a tube with a 40mm tall set of numbers. This is the king of Nixie clocks, and one tube will run you about $100. Nah, you can also get new Nixies here.

The Sipeed K210 is a RISC-V chip with built-in neural networks. Why should you care? Because it’s RISC-V. It’s also pretty fast, reportedly 5 times as fast as the ESP32. This is a 3D rendering test of the K210, with all the relevant code on the Github.

I’m not sure if everyone is aware of this, but here’s the best way to desolder through-hole parts. Heat the solder joint up and whack it against a table. It never fails. Hitting things is the best way to make them do what you want.

Designing Custom LCDs To Repair Retrocomputers

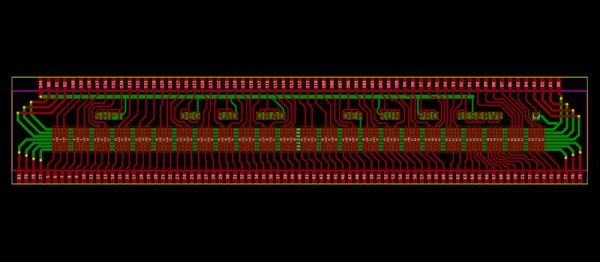
China, we’re told, can make anything. If you need some PCBs in a few weeks, there are a few factories in China that will do it. If you need a nuclear reactor, yep, there’s probably a factory in China that’ll do it because nuclear reactors are listed as one of the items facing new tariffs when imported into the United States. No, I am not kidding. What about LCDs? What about old-school character LCDs? Is it possible to find a factory in China that will make you the LCD you want? That’s what [Robert Baruch] will find out, because he’s repairing an old computer with new parts.

The object of this repair and restomod is a TRS-80 Pocket Computer (PC-1), otherwise known as the Sharp PC-1211. It looks like a calculator, but no, it’s a legitimate computer you can program in BASIC. [Robert] bought this computer for a bit more than $5 on eBay ‘for repair’, which means the zinc-air battery was dead, and unfortunately, the LCD was shot. The LCD technically works, but it just doesn’t look good. Sometime in the last thirty years, moisture got in between the layers of glass, polarizing film, and liquid crystal. This is not unique to [Robert]’s unit — a lot of these PC-1s have the same problem, many of these broken seals rendering the computers themselves useless.

This is an ancient computer, and replacements for this LCD are impossible to find, but because the Sharp PC-1211 is well documented, it is possible to find the datasheet for the original display. With that, it’s just a question of finding an LCD manufacturer that will do it. So far, the costs look good — $800 USD ($300 for tooling and 10 samples, $500 for another 200 LCDs) is what it’ll take to get a few units. [Robert] already has a few people interested in repairing their own Pocket Computers. You can follow the eevblog thread here, or check out the video below.

Continue reading “Designing Custom LCDs To Repair Retrocomputers”

The 8-Bit Guy Builds A 16-Bit Computer

One of the better retro historians out there on YouTube is the 8-Bit Guy, and after years of wanting to do something like this, it’s finally happening. The 8-Bit Guy is building his dream computer, heavily inspired by the Commodore 64.

Before we go into what this computer will do and what capabilities it will have, it’s important to note the 8-Bit Guy is actually doing a bit of market and user research before dedicating a year or more to this project. He’s asked other famous retrocomputing YouTubers for their input on what their ‘dream’ retrocomputer should do, and they’ve come up with a basic list of requirements. The Dream Computer will be like working on a 1957 Chevy, in that all the registers are immediately available for peeking and poking. The computer will be completely comprehensible, in so far that one person can completely understand everything, from the individual logic gates inside the CPU to the architecture of the kernel. It’ll run BASIC.

In the age of the Raspberry Pi, one might ask, ‘why not go with a Raspberry Pi?’. To the 8-Bit Guy, the Pi is just a Linux computer. Other retrocomputing projects of a similar scope to this dream computer also fail: The Mega65, a project to resurrect the Commodore 65, will be too expensive. The BASIC Engine fails because it only does composite out, and it runs on an ESP anyway, so you’re shielded from the real hardware. The same problem exists with the Maximite in that the hardware is one layer of abstraction away from the interface. The C256 Foenix is probably the closest to meeting the design goals, but it’s far too expensive, and even without the MIDI ports, SID chips, and other interesting hardware, it would still be above the desired price point.

The ‘requirement’ for this dream computer is to use only modern parts, have VGA or HDMI video out, a real CPU, preferably a 6502, use no FPGA or microcontrollers, and can run Commodore Basic. Also, this computer would cost about $50, with $100 as the absolute, maximum limit (implying a BOM cost of around $15-$25). This is absolutely, completely, astonishingly impossible. I would be deceiving you if I did not mention the impossibility of this project happening with the stated goals. This project will not meet the goal of selling for less than one hundred dollars.

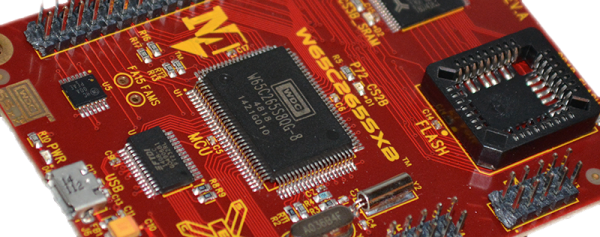
That said, there’s no harm in trying, so The 8-Bit Guy is currently working with a few dev boards, specifically one designed around the 65816 CPU. The 65816 is an interesting chip, in that it is a 6502 until you flip a bit in a register. It has a larger address space than the 6502, and everything from the World of Commodore should be (relatively) easily ported to the 65816. Why was this CPU never used in Commodore hardware? Because a Western Design Center sales guy told a Commodore engineer that Apple was using it in their next computer (the Apple IIgs). The option of Commodore ever using the ‘816 died then and there.

If you’d like to help out on this computer, there is a Facebook group for organizing the build. This Facebook group is a closed group, meaning you need a Facebook account to login. Unfortunate, but we’re looking forward to a year of updates around this dream computer. Building a computer that meets the specs is impossible, but we’re more than eager to see the community try.

Continue reading “The 8-Bit Guy Builds A 16-Bit Computer”

Live Hacking And A MIDI Keytar

We can’t think of where you’d buy a new, cheap, MIDI keytar that’s just a keyboard and a handle with some pitch and mod wheels or ribbon controllers. This is a format that died in the 90s or thereabouts. Yes, the Rock Band controller exists, but my point stands. In fact, the closest you can get to a cheap, simple MIDI keytar is the Alesis Vortex Wireless 2 Keytar, but the buttons on the handle don’t make any sense. [marcan] of Wii and Kinect hacking fame took note. (YouTube, embedded below.)

Reverse engineering is a research project, and all research projects begin with looking at the docs. When it comes to consumer electronics, the best resource is the documents a company is required to submit to the FCC (shout out to FCC.io), which gave [marcan] the user manual, and photos of the guts of the keytar. The ‘system update download’ files are living on the Alesis servers, and that’s really all you need to reverse engineer a keytar.

The first step is extracting the actual device firmware from whatever software package appears on the desktop when you download the software update. This is a simple job for 7zip, and after looking at a binary dump of the firmware, [marcan] discovered this was for an STM chip. With the datasheet of the chip, [marcan] got the entry point for the firmware, some values, and the real hardware hacking began. All of this was done with IDA.

This is a five-hour hacking session of cross-referencing the MIDI spec and a microcontroller built thirty years after this spec was developed. It’s an amazing bit of work just to find the bit of code than handled the buttons on the keytar grip, and it gets even better when the patched firmware is uploaded. If you want to ‘learn hacking’, as so many submitters on our tip line want to do, this is what you need to watch. Thanks [hmn] for the tip.

Continue reading “Live Hacking And A MIDI Keytar”