The Un-Digital Robotic Arm

556When you think of a robotic arm, you’re probably thinking about digital control, microcontrollers, motor drivers, and possibly a feedback loop. Anyone who was lucky enough to have an Armatron knows this isn’t the case, but you’d still be surprised at how minimal a robotic arm can be.

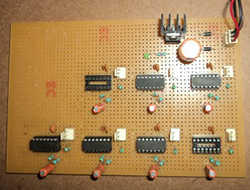
[viswesh713] built a servo-powered robotic arm without a microcontroller, and with some interpretations, no digital control at all. Servos are controlled by PWM signals, with a 1 ms pulse rotating the shaft one way and a 2 ms pulse rotating the shaft the other way. What’s a cheap, popular chip that can easily be configured as a timer? Yep, the venerable 555.

The robotic arm is actually configured more like a Waldo with a master slave configuration. [viswesh] built a second arm with pots at the hinges, with the resistance of the pots controlling the signal output from a 556 dual timer chip. It’s extremely clever, at least until you realize this is how very early robotic actuators were controlled. Still, an impressive display of what can be done with a simple 555. Videos below.

Continue reading “The Un-Digital Robotic Arm”

Controlling RC Toys With The Raspi

signal

An interesting trick you can do with a a fast CPU and a GPIO pin mapped directly to memory is an FM transmitter. Just toggle a pin on and off fast enough, and you have a crude and kludgy transmitter. [Brandon] saw a few builds that turned a Raspberry Pi into an FM radio transmitter and realized a lot of toy remote control cars use a frequency in the same range a Pi can transmit at. It’s not much of a leap to realize the Pi can control these remote control cars using only a length of wire attached to a GPIO pin.

The original hack that turned a Pi GPIO pin into an FM transmitter mapped a GPIO pin to memory, cycled through that memory at about 100 MHz, and added a fractional divider to slightly adjust the frequency, turning it into an FM transmitter. Cheap RC cars usually listen for radio signals at 27 and 49 MHz. It doesn’t take much to realize commanding RC cars with a Pi is possible.

The only problem with this idea is that most RC cars use pulse modulation. For an RC transmitter to send the command for ‘forward’, a synchronization pulse is sent, then a series of pulses and pauses. The frequency doesn’t change at all, something the originally FM code doesn’t do. [Brandon] realized that if he just moved the frequency up to something the RC car wasn’t listening to, that would register as a zero.

All that was left was to figure out the command codes for his RC truck. For this, [Brandon] decided brute force would be the best option. Armed with a script and a webcam, he cycled through all possible combinations until the webcam detected a moving truck. Subtlety brilliant, if you ask us. Of course more complex commands required an oscilloscope, but now [Brandon] has a git full of all the code to control a cheap RC car with a Pi.

The Race Is On To Build A Raspi Kinect 3D Scanner

pinect

The old gen 1 Kinect has seen a fair bit of use in the field of making 3D scans out of real world scenes. Now that Xbox 360 Kinects are winding up at yard sales and your local Goodwill, you might even have a chance to pick one up for pocket change. Until now, though, scanning objects in 3D has only been practical in a studio or workshop setting; for a mobile, portable scanner, you’d need to lug around a computer, a power supply, and it’s not really something you can fit in a back pack.

Now, finally, that may be changing. [xxorde] can now get depth data from a Kinect sensor with a Raspberry Pi. And with just about every other ARM board out there as well. It’s a kernel driver that’s small, fast, and does just one thing: turns the Kinect into a webcam that displays depth data.

Of course, a portabalized Kinect 3D scanner has been done before, but that was with an absurdly expensive Gumstix board. With a Raspi or BeagleBone Black, this driver has the beginnings of a very cheap 3D scanner that would be much more useful than the current commercial or DIY desktop scanners.

The Laser Cutter Attachment For A 3D Printer

cheapo If you already have a 3D printer, you already have a machine that will trace out gears, cogs, and enclosures over an XY plane. How about strapping a laser to your extruder and turning your printer into a laser cutter? That’s what [Spiritplumber] did, and he’s actually cutting 3/16″ wood and 1/4″ acrylic with his 3D printer.

[Spiritplumber] is using a 445nm laser diode attached directly to his extruder mount to turn his 3D printer into a laser cutter. The great thing about putting a laser diode on an extruder is that no additional power supplies are needed; after installing a few connectors near the hot end, [Spiritplumber] is able to switch from extruding to lasing by just swapping a few wires. The software isn’t a problem either: it’s all just Gcode and DXFs, anyway.

There’s an Indiegogo for this, with the laser available for $200. Compare that to the Chinese laser cutters on eBay, and you can see why this is called the L-CHEAPO laser cutter.

Turning A Laser Cutter Into A 3D Printer With OpenSLS

STL

[Andreas Bastian] has been working on a device that turns an off-the-shelf laser cutter into something capable of selective laser sintering of powdered plastics into 3D objects. He’s put in a lot of work, but now he gets to see the fruits of his labor: he’s successfully printed a few objects out of wax and powdered nylon.

Unlike just about every other inexpensive 3D printer, [Andreas]’ design doesn’t rely on either squirting plastic onto a bed or curing liquid resin with UV light. Instead, a fine layer of powder is spread over a build platform and melted with a laser. The melted layer drops down, another layer of powder is applied, and the cycle repeats until the part is finished. It’s a challenge to build one of these machines, but [Andreas] had the great idea of retrofitting an off-the-shelf laser cutter, allowing him to focus on the difficult task of designing the powder and piston system.

It’s an extremely interesting project, and most of the custom parts are made from laser cut acrylic: easily cut to size on whatever laser cutter you’re retrofitting with 3D printing capability. There’s a lot of info over on the Wiki, and a few videos showing the sintering process and powder distribution below.

Oh. One last note. [Andreas] developed this while at [Jordan Miller]’s amazing lab at Rice University. There’s a lot of interesting things happening at this Advanced Manufacturing Research Institute, including bioprinting, DLP resin printers, and using inkjets for cell cultures. Check out this post for a great talk at the Midwest RepRap Festival.

Continue reading “Turning A Laser Cutter Into A 3D Printer With OpenSLS”

The Hackaday Prize: A Ternary Computer

Bender: Ahhh, what an awful dream. Ones and zeroes everywhere… and I thought I saw a two.
Fry: It was just a dream, Bender. There’s no such thing as two.

– Futurama: A Head In The Polls, S02E07

The computer you’re using right now is simply just a highly organized state of electrons, commonly expressed in states of zero and one. Two? What is two? A ternary, or base-3, computer would be odd, disturbing, but nevertheless extremely interesting, making it a great candidate for The Hackaday Prize.

A base-3 computer isn’t a new thing, despite how odd it sounds. Moscow State University built a few dozen ternary computers named Setun back in the late 50s, and some research is being done using quantum computers and ternary arithmetic. Still, building a ternary computer from first principles – gates, truth tables, and transistors – isn’t something that’s done nowadays.

[ThunderSqueak] has been hard at work over the last few months working out the basic building blocks of her ternary computer project. She’s already figured out the basic NAND, NOR, and inverter structure that could be easily translated into assemblies made of discrete components or an IC mask.

A iDevice app, iCircuit, is being used to test out some larger circuits, using +5, -5, and 0 Volts to represent 1, -1, and 0. Going further, there are a few academic resources for constructing a ternary ALU and even ternary SRAM. While a homebrew ternary computer has little practical use, it’s an awesome example of the, ‘because it’s there’ engineering we’re looking for in a great Hackaday Prize entry.


SpaceWrencherThe project featured in this post is an entry in The Hackaday Prize. Build something awesome and win a trip to space or hundreds of other prizes.

Firing Blanks With Laser Tag

glock
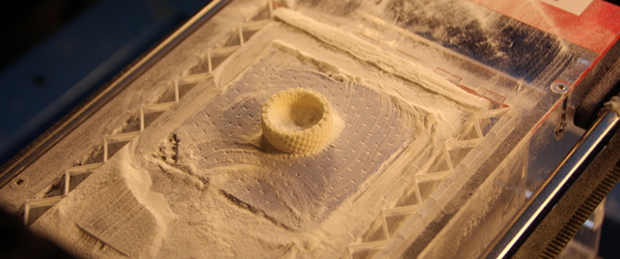
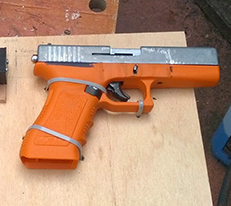
Last year, [Tony] was asked to develop a lasertag system with ultimate realism. This meant a system that used a blank firing replica gun, and a system to detect blank rounds being fired. Very cool, and the way he went about it includes some interesting electronics.

Because the system requires a blank to be fired before shooting a laser at a target, the entire system must be able to detect a blank being fired. [Tony]’s first attempt used a piezo sensor to detect the shock from being fired. This system had a lot of noise and was ditched for a much better solution: a magnet mounted to the slide, and a hall effect sensor mounted to a 3D printed frame that turns this replica into a carbine.

A little bit of tweaking in software was required to inhibit the laser when the operator cocks the gun, but it looks – and sounds – really good. It’s also very, very realistic: the only way to shoot an opponent is to physically reload. Video below.

Continue reading “Firing Blanks With Laser Tag”