Heavy Lifting Copters Can Apparently Lift People

Online RC store Hobby King is once again encouraging people to push the limits of what quadcopters and other multirotor remote control vehicles can do. They call it the beerlift and the goal is simple: build a multirotor craft capable of carrying the greatest amount of beer (or water, everything is measured by weight).

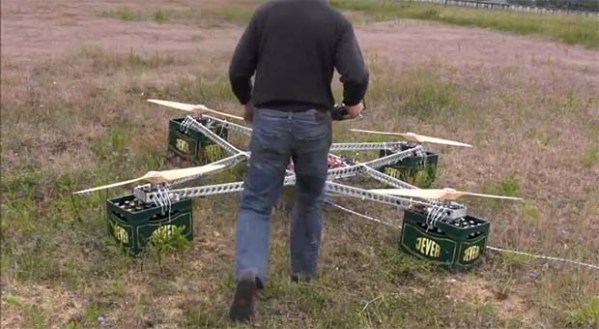
The competition is over, but the results were spectacular. The vehicle with the largest lift capacity – pictured above – was built by [Olaf Frommann] and carried 58.7 kilograms, or nearly 128 pounds to a hover a few feet off the ground. Last year the biggest lift was a mere 47 kg with an eight-rotor craft.

It was still an impressive showing all around. The biggest lift in the 700 class – 700 mm from rotor to rotor – was done by [David Ditch] with 19.6 kg. You can check out some of the best entries below, including an amazing aerobatic quadcopter that can successfully loop carrying a cup of beer,

Continue reading “Heavy Lifting Copters Can Apparently Lift People”

DIY Ultrasonic Acoustic Levitation

[Mike] saw a few videos of ultrasonic acoustic levitation rigs put together by student researchers. Figuring it couldn’t be that hard to replicate, he set out and built his own using surplus parts and whatever was sitting around his parts drawer.

The build began with a huge ultrasonic transducer from an old ultrasonic cleaning tank [Mike] picked up on eBay for $20 £20. He didn’t pick up the standard driver board, as those don’t have a very clean output – something desperately needed if you’re setting up a standing wave. He did manage to put a simple supply together with a 555 timer, a MOSFET and a 12 V transformer connected backwards, though.

The test rig is pretty simple – just the transducer sitting on a table with an aluminum plate sitting above it on threaded rods. By adjusting the distance between the transducer to the aluminum plate, [Mike] managed to set up some standing waves he was able to suspend small Styrofoam balls in. It’s not quite precise enough to levitate small chunks of sodium and water, but it makes for an excellent science fair-type project.

Continue reading “DIY Ultrasonic Acoustic Levitation”

Desoldering Chips With Fire

Salvaging components is a staple of any electronic enthusiast, but many times those interesting chips – old 8-bit microcontrollers, memories, and CPUs found in everything from game consoles to old computers – are rather difficult to remove from a board. [Ryan] over on Instructables has a rather interesting method of removing old SMD packages using nothing more than a little fire and a pair of tweezers.

Obviously the best way to go about salvaging SMD components is with a heat gun, but lacking the requisite equipment, [Ryan] managed to remove a few SMD chips using rubbing alcohol as a heat source. In a properly controlled environment, [Ryan] filled a small metal dish with alcohol, set it on fire, and used the heat generated to remove a few components. Alcohol lamps are a common bench tool in a range of repair disciplines because the fuel is cheap and burns relatively cleanly (not leaving an unwanted residue on the thing you’re heating).

It’s an interesting kludge, and given [Ryan]’s display of desoldered components, we’re going to call it a success. It might also work for through-hole components, allowing for easy removal of old SRAM, ROM, and other awesome chips.

3D Printering: Alternative Filaments

printering

ABS and PLA are the backbones of the 3D printing world. They’re both easy to obtain and are good enough for most applications. They are not, however, the be-all, end-all filaments for all your 3D printing needs. Depending on your design, you may need something that is much tougher, much more flexible, or simply has a different appearance or texture. Here are a few alternative plastics for your RepRap, Makerbot, or other 3D printer:

Continue reading “3D Printering: Alternative Filaments”

Automatic Tool Changing On A 3D Printer

tool

[Luis] has a pretty interesting project on his hands. He’s using a delta 3D printer to plate a few edibles – yogurt, chocolate, and other thick liquids. Because he intends to use actual plates as the build surface, calibration is key. One solution to this problem would be to use identical, pre-measured plates for everything this printer makes. [Luis]’ solution is much more ingenious than that, however. He’s programmed his printer to automatically swap out two tools – one for probing the build surface, and another to extrude liquids.

The two tools are suspended from the body of the printer, and with a little bit of software it’s possible for them to be picked up by the head of the printer and held in place with a few magnets. After auto leveling the build surface in software, a G Code command switches the tools over to a paste extruder for all those delicious edibles.

If an automated tool changer isn’t enough, [Luis] has also completed a very nice 3D printed peristaltic pump to squirt out foodstuffs. You can check out a video of this printer in action below.

Continue reading “Automatic Tool Changing On A 3D Printer”

Robotic Tentacles For A Disturbing Haunted House

testicles

[ivorjawa] is putting on a haunted house this Halloween that we really don’t want to go to. His robot tentacle is already supremely creepy, and we’re assuming it will only be more frightening once it’s covered in fabric and foam rubber.

Each tentacle can move on two axes thanks to four steel cables running through this strange Geiger-esque contraption. In the base of the tentacle are two stepper-motor driven cylinders that take up slack on one cable and draw out another cable. Two of these control boxes, driven by a stepper motor and an Arduino motor shield, allow the tentacle to reach out and grab in any direction. You can check out the mechanics of the build on [ivorjava]’s flickr

On a semi-related note, even though we’re more than a month out from Halloween, we should have more Halloween builds in our tip line by now. If you’re working on one, don’t be afraid to send it in, even if you’re just showing off a work in progress.

Continue reading “Robotic Tentacles For A Disturbing Haunted House”

Giant Video Walls Powered By A Raspberry Pi

There’s no denying that giant video walls are awesome, but creating one usually means a fairly complex setup with either multiple computers or very expensive video cards. Now, with Pi Wall, you can make a video wall as large as your wallet will allow with only one Raspi per monitor, and a single master pi to control the whole shebang.

As long as you have a few displays with an HDMI input, it’s easy to turn them into a giant monitor. Just plug one Pi per monitor into a network switch, have a Pi (or other Linux box) transmit a video to all the video tiles, and sit back and enjoy the show.

Right now there is an installation guide for creating a Pi Wall, but there are a few limitations; this software only works with the video player provided with the Raspberry Pi, omxplayer. If you’re looking to create an enormous display for a flight simulator or what have you, you might need to do a bit of tinkering under the hood.