Dual Extruders In The Space Of One Stepper Motor

The new hotness in 3D printers is – and has been for a while – dual extrusion. With two extruders and the requisite filament supply, it’s possible to print objects in two colors or two different materials. There’s a problem with this setup, though: each extruder requires a separate motor, greatly reducing the print area should you want to print in two or more colors. [Carl] and [Brian] think they have the solution to this with their dual extruder that is powered by one stepper motor.

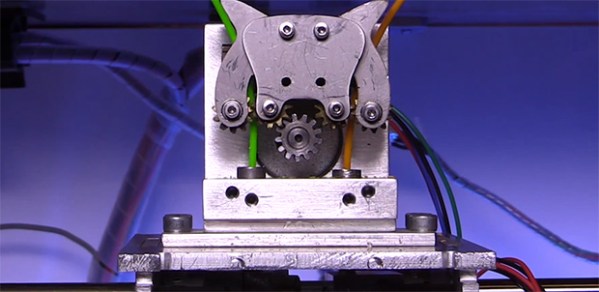
As you can see from the pic above, the idea is relatively simple. Two strands of filament are fed past one gear attached to a stepper motor. Each strand is moved into the hot end through two idler gears and side of the extruder feeds into the hot end is determined by the rotation of the motor. It’s really one of those, “why didn’t I think of that” ideas.

[Carl] and [Brian] are also offering a quad extruder, a dual-sized extruder able to pump four different filaments onto a printer bed. With this, we expect some people to experiment with CMYK (or CMYW) prints, truly turning any 3D printer into a machine that prints full color parts.

Continue reading “Dual Extruders In The Space Of One Stepper Motor”

Tiny WiFi Modules, Again

The CC3000 is a tiny, single-chip component that adds all the necessary hardware (save for a chip antenna) and software to get even the most minimal microcontrollers onto a WiFi network. It was announced early this year but making proper breakout boards takes time, you know? This time has finally arrived with CC3000 modules from Adafruit, and evaluation modules and booster packs from TI themselves.

Unlike other microcontroller-compatible WiFi modules out there, the CC3000 takes care of just about everything – the TCP/IP stack, security stuff, and even the configuration with TI’s SmartConfig app for desktop, laptop, or mobile devices. Realistically, you can get an ATtiny, an exceedingly sparse microcontroller, or even a Commodore 64 or Apple II on the Internet with this. It’s very, very cool.

While these breakout boards and modules are priced very well for what they do, they’re still fairly expensive to stick in a project permanently. Where the CC3000 really shines is including it in your next fabbed board. There are already Altium parts and an Eagle library that includes this part should you need help with that, and blatant advertising for our overlords at SupplyFrame if you’re looking for a source.

What The Inside Of A Pneumatic Transport System Looks Like

While most of us are familiar with pneumatic transport systems by their use at drive-up bank windows, these systems are also commonly found in hospitals ferrying samples around. When [Aidan] was in the hospital, he asked how this series of tubes routed samples from many different floors to the lab and back again. Well, give him an old tube to play around with and he’ll eventually come up with a way to record the inside of one of these pneumatic tubes, giving some insight into how this system actually works.

When asked, a tech that uses this system on a daily basis described it as a very basic physical Ethernet that sucks and blows through rotary junctions and physical hubs to route packets to different areas of the building. [Aidan] wanted to record a tube’s travels, so he wired up a small HD camera, a bunch of LEDs, and a few batteries. Sending this recording sample container revealed some of how this pneumatic system works; the containers will travel forward and stop before reversing through one of the rotary switches. You can check out the flight of the container in the video below.

Of course there are other glimpses of how stuff travels through the unseen world of getting from point A to point B. Here’s a time lapse camera going on a trip via DHL just for kicks.

Continue reading “What The Inside Of A Pneumatic Transport System Looks Like”

Custom Made MIDI Recorder For An 8 Year Old Girl

recorder

[KDM] over at The Controller Project forums let us know about a cool project he’s been working on: a MIDI recorder for an 8-year-old girl born with two digits per hand.

The recorder – a simple woodwind instrument usually made of plastic – is a staple of grade school music classes the world over. It’s an excellent introduction to the performing arts, but for those with two fingers per hand, the fingering is a little difficult.

[KDM] contacted a manufacturer of these instruments and they were kind enough to send over a half-dozen for his experimentations. He drilled out these recorders on a lathe and started work on a simple circuit to turn this recorder into a MIDI instrument. A simple PIC micro and a few buttons were used, with a DIN 5 port on the horn of the instrument.

The build works, but we’re thinking with a small electronic wind sensor, this instrument could easily become a full-fledged MIDI wind controller that could be easily and cheaply reproduced for other budding musicians with special needs.

Oh, one more thing. We’d like to give a big shout out to the giant dork who started The Controller Project. A lot of Hackaday readers know how to work a microcontroller and a soldering iron, so how about heading over to their forums and doing some good with your skills?

Repairing A Mill That Cost As Much As A Car

miters

Years ago, someone at the bio-instrumentation lab at MIT needed to change a CMOS battery in the controller for a three axis mill. This reset the machine’s BIOS and was widely regarded as a bad move. The mill sat in the lab for a few years before  Prof. [Ian Hunter] donated it to MITERS – the student shop at MIT. And so the task of repairing a machine that cost as much as a car fell upon a plucky group of students.

The machine – a  Dyna-Myte 1007 has a 10″x7″x10″ work area, pneumatic tool changers and carousel, and the working for a fourth axis. It is. however, driven by an ancient Pentium computer running DOS with all the fun of ISA slots and IRQs that entails.

The MITERS began their repair by digging around in the software configuration, finding the axis drive is controlled via IRQ 3, which was currently occupied by COM 2. Changing that in the BIOS let the computer control the axes and, with a few solenoids and an air compressor, the tool carousel also worked.

With a bit of digging around, the MITERS also got the spindle working, giving them a very awesome and very expensive CNC milling machine for free. Even though the computer could be replaced with a $35 Raspberry Pi, we really have to admire the MITERS for fixing what they already had; it’s a cheaper and much, much faster way to get their new toy up and running.

Continue reading “Repairing A Mill That Cost As Much As A Car”

Six Years, A Giant Robot, And A Kickstarter

robot

Since 2007, [Jamie Mantzel] has been building a huge remote-controlled walking robot. If you’ve been following him on his YouTube channel and blog, you’ve seen the very beginnings of him building a lumber mill to create a workshop, making the legs for his robot, and improving his welding rig. This week, though, has been very special. [Jamie] has finally finished his giant robot project, bidding closed the fevered dream of a madman who awakes to a 10 foot robot in his yard.

The giant robot is constructed nearly entirely out of scrap aluminum. In the interest of simplicity, [Jamie] has come up with some interesting techniques to scale up conventional RC gear to power huge motors swinging giant legs: the steering motors are powered by manual switches, but these switches are activated by servos. A brilliantly simple solution to driving high-current loads if we do say so ourselves.

[Jamie]’s robot has garnered a lot of attention over the years, so much so that toy companies have licensed his designs for a line of battling combat spiderbots. [Jamie] believes his robots should be more educational, so he’s launched a Kickstarter for his own version as a kit. With this kit, getting the bug tank robot up and running isn’t simply a matter of pulling it out of the box and installing batteries; [Jamie]’s version is an actual kit with linkages that must be assembled. We know which version we’d want.

It’s an amazingly impressive project, and we’re glad to see such an awesome cat has finally realized his dream of a walking aluminum arachnid of death.

3D Printering: Remote Control Of 3D Printers

extrude

With new owners comes new editorial direction. You’re looking at the first evidence of that right now. We’re going to be doing some weekly columns dedicated to certain subjects, and with our fascination of all things three dimensional, it only made sense our first weekly column was dedicated to 3D printers. And using 3D printers, stuff made with 3D printers. Also, things that can be used with 3D printers. Great wordsmiths we are, we’re calling this column ‘3D Printering.’ If you have a better name (or a title pic) send it in and we’ll probably use it.

With that out of the way…

This week we’re taking a look at remote printing. With anything from an Android tablet to a Raspberry Pi, it’s possible to have a networked 3D printer, the perfect thing for hackerspaces or anyone who wants to print objects from multiple computers. One of the most-used tools for this is OctoPrint, a printer host designed to be run on small embedded devices such as a Raspi.

We’ve seen OctoPrint before. but since then it’s matured a whole lot. with a ton of reports of successes running on everything from a Raspberry Pi, BeagleBone Black, and even an OUYA. All the major electronics boards – RAMPS, RAMBo, Sanguinololu – and firmwares should work with OctoPrint, making an Internet-connected 3D printer simply a matter of connecting a Raspberry Pi.

Of course OctoPrint isn’t the only networking solution for a 3D printer. PrintToPeer is deep into development and should be released sometime this fall. It’s a much more sophisticated way of networking a printer that includes an iPad app and ‘enterprise class’ functionality.

The PrintToPeer team is offering private beta invitations, but with a catch: you need to print out a piece of a sculpture and send it to them. These pieces will be unveiled in September as the largest 3D printed sculpture, and the word’s first collaborative 3D sculpture.