The Raspberry Pi 4 was just released. This is the newest version of the Raspberry Pi and offers a better CPU and more memory than the Raspberry Pi 3, dual HDMI outputs, better USB and Ethernet performance, and will remain in production until January, 2026.
The CPU on the new and improved Raspberry Pi 4 is a significant upgrade. While the Raspberry Pi 3 featured a Broadcom BCM2837 SoC (4× ARM Cortex-A53 running at 1.2GHz) the new board has a Broadcom BCM2711 SoC (a quad-core Cortex-A72 running at 1.5GHz). The press literature says this provides desktop performance comparable to entry-level x86 systems.
Of note, the new Raspberry Pi 4 features not one but two HDMI ports, albeit in a micro HDMI format. This allows for dual-display support at up to 4k60p. Graphics power includes H.265 4k60 decode, H.264 1080p60 decode, 1080p30 encode, with support for OpenGL ES, 3.0 graphics. As with all Raspberry Pis, there’s a component composite video port as well tucked inside the audio port. The 2-lane MIPI DSI display port and 2-lane MIPI CSI camera port remain from the Raspberry Pi 3.
OpenSCAD has been updated. The latest release of what is probably the best 3D modeling tool has been in the works for years now, and we’ve got some interesting features now. Of note, there’s a customizer, for allowing parametrizing designs with a GUI. There’s 3D mouse support, so drag out that weird ball mouse from the 90s. You can export in SVG, 3MF, and AMF. Update your install of OpenSCAD now.
New Hampshire is the home of BASIC, and now there’s a sign on the side of the road saying so. This is a New Hampshire state historical marker honoring BASIC, invented at Dartmouth College in 1964. Interestingly, there are 255 historical markers in New Hampshire, usually honoring bridges and historical figures, which means there’s an off-by-one error depending on implementation.
Because robots a great way to get kids into technology — someone has to repair the future robot workers of the world — DJI has release the RoboMaster S1. It’s a robot with four Mecanum wheels, something like a Nerf turret, a camera, and WiFi. The best part? It’s programmable, either through Scratch or Python. Yes, it’s drag-and-drop programming for line following robots.
If you have a C by GE Smart Light Bulb and connect a new router to your home network, you will need to disassociate your C By GE Smart Light Bulb with your old network. To do this, you first need to turn your bulb on for eight seconds, then turn off for two seconds, then turn on for eight seconds, then turn off for two seconds. Then turn the bulb on for eight seconds, and finally turn the bulb off for two seconds. Finally, turn the bulb on for eight seconds, then turn the bulb off for two seconds. Your bulb should blink three times, indicating it has dissociated with the WiFi network. If this procedure does not work, your light bulb is running an older version of firmware. This is why you put a physical reset button on your stuff, people.
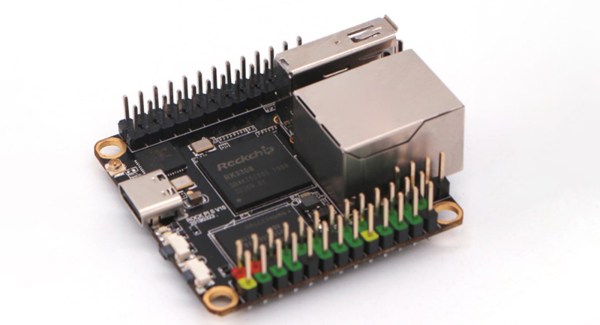
Single board computers are great, but what we really need are cheap single board computers. Running Linux on anything isn’t as good as running Linux on everything, and all that. To that end, here is the Rock Pi S, a $10 single board computer with Ethernet, WiFi, and it costs $10.
This one comes from the boffins at Radxa, already behind the footnote-worthy Rock Pi 4, a single board computer that appears to be heavily derived from the Raspberry Pi but with a 4 in the name so it’s obviously better. It also has 4 GeeBees of RAM, so it’s got that going for it too. Their latest product is the Rock Pi S, a board that seems as though it’s taking inspiration from the C.H.I.P.. The biggest selling point is of course the price: $10 for the version with 256MB of RAM and without WiFi or Bluetooth. Various other incarnations exist with permutations of 256MB or 512MB of RAM, and with or without WiFi and Bluetooth. The highest spec variant costs $16, but is sold out at the moment.
This tiny little single board computer fills a need in the marketplace; the Raspberry Pi Zero is cheap and small when it’s available, but sometimes you need Ethernet for various reasons and a real USB A port is great to have. We’re looking forward to the builds this tiny board enables and all the fantastic creations that will come from a community so very interested in single board computers.
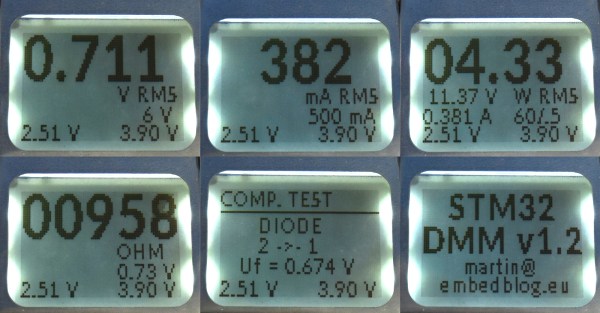
The features for this multimeter consist of voltage mode with a range of +/-6V and +/-60V. There’s a current mode, basically the same as voltage, with a range of +/-60 mA and +/-500mA. Unlike our bright yellow Fluke, there’s also a power mode that measures voltage and current at the same time, with all four combinations of ranges available. There’s a continuity test that sounds a buzzer when the resistance is below 50 Ω, and a component test mode that measures resistors, caps, and diodes. There’s a fully isolated USB interface capable of receiving commands and transmitting data, a real-time clock, and in the future there might be frequency measurement.
This build is based on the STM32F103 microcontroller, uses an old Nokia phone screen, and unlike so many other multimeters, this thing is small. It’s very small. More than small enough to fit in your pocket and forget about it, unlike nearly every other multimeter available. There’s one thing about multimeters, and it’s that the best multimeter is the one that you have in your hands when you need it, and this one certainly fits the bill.
The entire project is being written up on hackaday.io, there’s a GitHub repo for all the hardware and software, and there’s also a video demo covering all the features (available below). This is a stand-out project, and something we desperately want to get our hands on.
In the hacker and DIY community, there are people who have exceptional knowledge and fantastic tools. These people are able to do what others could only dream about, and that others can only browse eBay looking for that one tool they need to do the job. One of these such people is [John McMaster]. He is the resident expert on looking inside integrated circuits. He drops acid on a chip, and he can tell you exactly how it works on the inside.
At the hardwear.io conference, [John] shared one of his techniques for reverse-engineering intgrated circuits. He’s doing this by simply looking at the transistors, and looking at the light they give off. He’s also looking at the wrong side of the die.
The technique [John] is using is properly called backside analysis, or looking at the infrared emissions of electron recombinations. This happens at the junction of every transistor when it’s active, and these photons are emitted at the bandgap of silicon, or about 1088 nm, far into the infrared. This sort of thing has been done before by [nedos] at CCC in 2013, but rarely have we seen a deep dive into the tools and techniques needed to look at the reverse side of an IC and see the photons coming off.
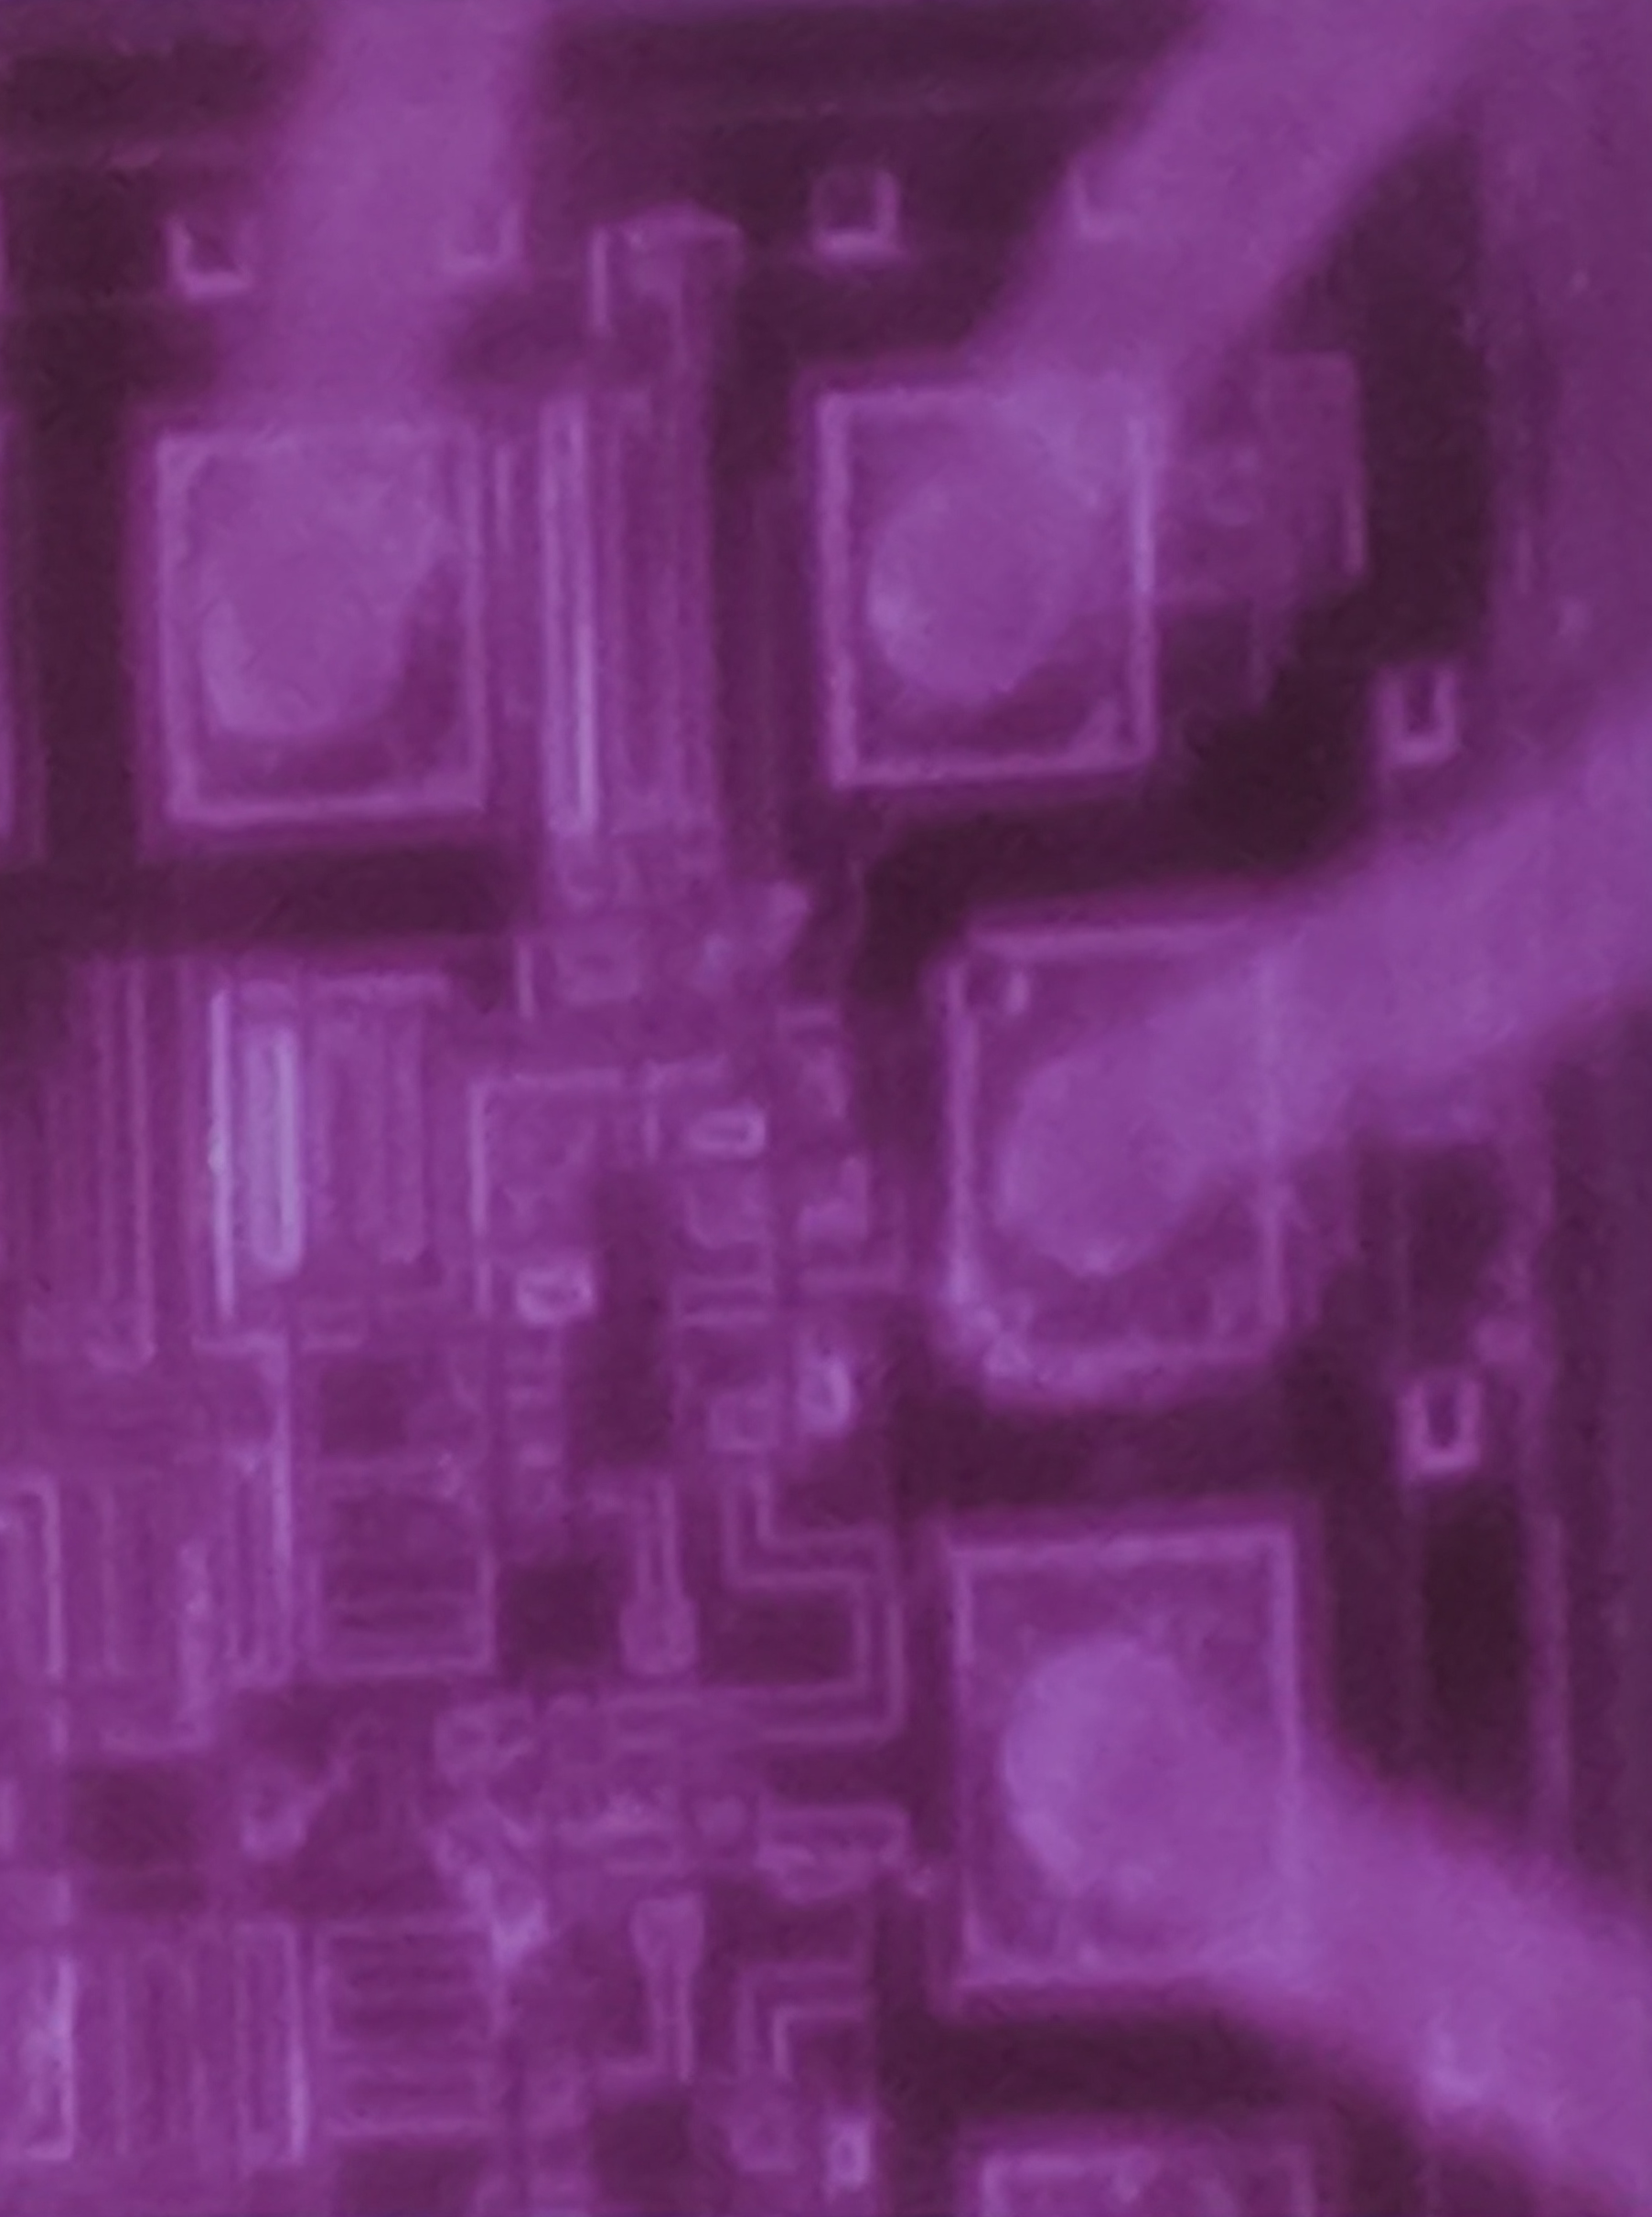
An IC, seen in infrared
There are several tools [John] used for this work, and he actually did a good comparison of different camera technologies used to image infrared photon emissions from integrated circuits. InGaAs cameras are expensive, but they offer high sensitivity. New back-illuminated CMOS cameras and cooled CCDs normally reserved for astrophotography were also tested, and as always, you get what you pay for; the most expensive cameras worked best, but there were ways you could make the cheap ones work.
As with any camera work, preparing the lighting is of utmost importance. This includes an IR pass filter, and using only LED lighting in the lab with no sunlight, incandescent, or halogen light bulbs in the room — you don’t want any IR, after all. A NIR objective in the microscope was sourced from eBay, for about 1/10th the normal cost, because the objective had a small, insignificant scratch. Using this NIR objective made the image twice as bright as any other method. You can successfully image a chip with this, and [John] tested the setup on a resistor inside a CD4050 chip; the resistor glowed a slight purple, the color you would expect with infrared sensors. But can it work with I/O levels in a more modern chip? Also, yes. It needs some Photoshop to process, and stretching the 12-bit or 16-bit color space into an 8-bit color space, but it does work.
Finally, the supreme achievement of doing backside IR analysis. Is that possible with even this minimal setup? This requires some preparation; the silicon substrate in an IC is transparent in IR, but there is attenuation and this is especially important when the substrate is 300 um thick. This needs to be shaved down to about 25 um thick, which surprisingly is best done with fine sandpaper and a finger.
While few IR emissions were observed via backside emissions, the original plan wasn’t to completely analyze the chip, but merely to do some floor planning. For this, it worked. It’s a remarkable amount of work to see the inside of a silicon chip.
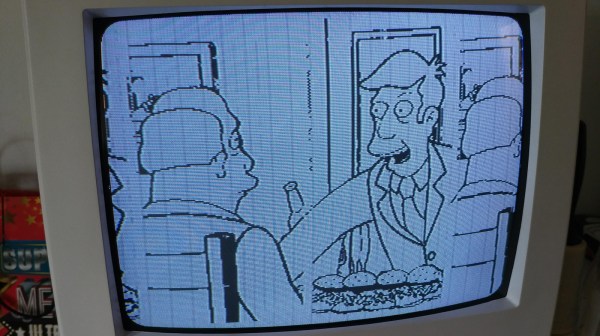
Maybe you’ve heard of a TV show called The Simpsons. Steamed Hams make a one-gag appearance in an unforgettable luncheon where Principal Skinner poker-faces his way out of a disaster with Superintendent Chalmers. Meanwhile, over on imgur, [Agumander] has put a black and white screencap from Steamed Hams in a printed circuit board.
The memory for this chip is an AT28C64, a 64 kilobit or 8 kilobyte steamed RAM. You call it a steamed RAM despite the fact that it is obviously a ROM. There is no microcontroller on this board or really anything resembling programmable logic. Everything is just logic chips. This board displays a 256×256 1 bit per pixel image over composite video. The sync is generated with the help of a 14MHz crystal and some circuitry taken from the original PONG board. Other than that, it’s just a bunch of NANDs and ORs that roll through the address space of the ROM and spit values out over a composite video port.
The build began by breadboarding everything save for a nifty solderless breadboard power adapter. Three ROM chips were programmed with different images — a cat, something to do with vaporwave, and some guy that looks like the poster from Eraserhead. Everything worked on the breadboard — yes, even at 14 MHz — so the build moved on to a printed circuit board.
The result is fantastic, and should work well on anything with a composite video port. We’re awarding bonus points for putting a socket on the ROM, simply so [Agumander] can change the image without whipping out the desoldering braid. If you need a refresher on Steamed Hams, it’s from the 7th season Simpsons episode ’22 Short Films About Springfield’.
For the last several years, we’ve hosted a series of meetups for the Bay Area. This week is no different and we’re pleased to announce the fortieth Hardware Developers Didactic Galactic. It’s this Thursday, June 20th, in downtown San Francisco.
The Hardware Developers Didactic Galactic is our monthly IRL meetup, where we ask hardware developers what makes their thing tick. We’ve done dozens of these things, and for those of you in Internet-land, all the talks are available online. Even if you’re not in the Bay Area, all the talks are live streamed. Yes, you too can participate in the event, even if you’re not going to physically attend! It’s an amazing technology called ‘the Internet’ that combines real life with virtual being! It’s like [William Gibson] created some sort of virtual/hyperspace interface.
For this month’s talks, we’ll be joined by Embedded Ninja Shaun Meehan. Shaun has previously given talks that answer the question, what happens when the majority of your work blows up on the Antares space accident? You turn around and get some of your second string units on the next SpaceX launch (9 days later)! Shaun will be talking about his two 300kg robotic arms, FRED & LEFTY, and the project of replacing their 1987 era controllers. This talk includes high power electronics, FPGAs, fixed point algorithms, galvanic isolation, transistor matching, splitting transistors in half, strange position sensors, homemade 3-phase 480 in a garage, and freight LTL shipping.