Reverse Engineering The Sound Blaster

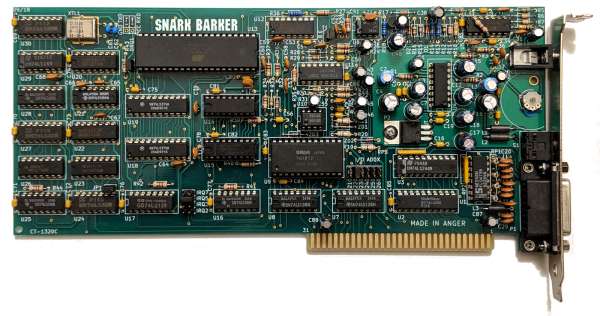
The first sound card to output PCM audio — the kind you need for audio samples — wasn’t the Sound Blaster. The AdLib Music Synthesizer Card could output PCM audio over software. The AdLib card also cost $200 at the time of its release. This was too much for some, and in time the Creative Labs Sound Blaster was released for the rock-bottom price of $125. This was a more capable card, and in the years since prices on the used market have gone through the roof. In 1990, you could buy a Sound Blaster for a Benjamin and a half, in 2019, prices on eBay are reaching and exceeding $400.

With the prices of used cards so high, we start to get into the territory where it starts to make sense to reverse engineer and re-manufacture the entire card. This hasn’t been done before, but that’s no matter for [Eric Schlaepfer], or [@TubeTimeUS]; he’s done crazier projects before, and this one is no different.

In reverse-engineering the Sound Blaster, there are a few necessary components. The Sound Blaster had an OPL2 chip for sound synthesis, which you can get through various vendors. The trick, though, is the microcontroller. This is really just an 8051 with a custom mask ROM.

The goal of this project is actually just to dump the ROM on the Intel 8051-alike microcontroller. This is something that’s relatively commonly done in high-tech labs, and luckily the Bay Area has [John McMaster], the guy who will take you into his lab and strip a die from its epoxy. Looking at the chip under the microscope, it was discovered the mask ROM on this chip was an implant ROM, with the ones and zeros represented by invisible ions in the substrate itself. There was no hope of reverse-engineering this chip from a purely visual inspection, but there was a sense amplifier on one of the data lines. By probing this sense amplifier while running through the address space, [Eric] was able to dump all the bytes of the ROM one bit at a time.

However, and there’s always a however, there are clone Sound Blasters out there, usually from China, and you can dump these chips if you’re lucky enough to get your hands on one. [Eric] reached out to the community and found these clone microcontrollers didn’t have the code protect bit set; dumping these was easy. This ROM was compared to the work [Eric] did with the sense amplifier, and after figuring out the order of the bits, it was found the code matched. The code was successfully cloned, and now new Sound Blasters can be made. Don’t tell eBay that, because someone is trying to sell one of [Eric]’s clone cards for $180.

All the code, files, materials, and everything needed to clone a Sound Blaster can be found in [Eric]’s GitHub, although there are a few open questions as to what’s going on in the Sound Blaster’s microcontroller. There’s a ‘secret’ 512-byte ROM on the die, and no one outside of an Intel NDA knows what it does. This could be used for a manufacturing test, but who knows. Other than that, there are a few features in the code that weren’t used, like previously unknown DSP commands, an ADPCM lookup table, and a routine that plays from SRAM without using DMA. It’s a deep dive into the inner workings of the most popular sound card of all time, and it’s quite simply amazing.

Manufacturing New Connectors For The Apollo Guidance Computer

The fiftieth anniversary of the Apollo 11 mission – the flight that first took man to the surface of the moon — is coming up. By the time this post is published, some YouTube channel will invariably be running a real-time-but-delayed-fifty-years live stream of all the mission events, culminating on the wee hours of July 20th where we wait hours for someone to figure out how to open the door.

[CuriousMarc] and space hardware collector [Jimmie Loocke] have a different type of anniversary in mind. They have an Apollo Guidance Computer sitting on a bed in a motel room, and they’re going to get it up and running by July 20th. That’s the plan, at least. This is no easy feat: the Apollo Guidance Computer looks like two 19-inch, 1U rack units, with no standardized connectors to talk to any other hardware. They’ve just figured out the hardest part of this build by making their own NASA-spec contacts. They can now connect external hardware to the AGC, probably for the first time in decades.

As it stands now, there are external ports on the gigantic bricks of aluminum enclosure that comprise the two AGC modules. These ports are just female pin headers, completely unlike any standard that can be found today. However, the folks at Samtec managed to build the male versions of these pin headers for this project. These pins fit the female sockets on one end, and are standard, square-shaped wire wrapped headers on the other. They are mounted in a milled plastic block, and after everything is wired up, [Marc] and [Jimmie] had a direct electrical connection to the Apollo Guidance Computer. The machine lives again.

There’s still a lot of work to do to get these bricks of computer up and running for the 20th, but this is fantastic progress. Already they’re single-stepping the AGC and running the P63 program that landed on the moon. Check out the video below.

Continue reading “Manufacturing New Connectors For The Apollo Guidance Computer”

Tiny Tank Inspects Your Crawlspace

If you’ve got some drone or FPV part lying around, this is the build for you. It’s a remote controlled tank, with a camera and video transmitter, that’s only 65 mm x 40 mm x 30 mm in size. Why on Earth would you ever build something so small? You can look around in your crawlspace, I guess. Any way you look at, this thing is tiny.

The tank has traditional tank skid steering through two brushless motors. The battery is one cell, as that’s just about the largest battery you can put in a vehicle so small, and the camera is just off-the-shelf quadcopter stuff set into a 3D printed enclosure. There are a few LEDs for lights. Other than that, it’s just so tiny and so cute.

The builder behind this tank, [honnnest], put up a video going through the build and demonstrating what kind of video you can expect from a tank this small. It’s a bit fast for a tank, and that’s not even considering the scale effects, but if the chassis is 3D printed, you can always print a few reduction gears, too.

Continue reading “Tiny Tank Inspects Your Crawlspace”

The Pianist Octopus

MIDI has been around for nearly forty years, but what do you do if you have an old ‘toy’ keyboard without MIDI? Or really any way to make it sound good? You could turn it into a player piano, and that’s exactly what [Alessandro] did with an old toy keyboard. It’s The Pianist Octopus, and it is perhaps the coolest, neatest pianist you’ve ever seen.

This build uses 24 individual 9 gram hobby servos, which of course means you need to drive those servos somehow. There are plenty of ways to attach a few servos to an Arduino board, but when you need to drive 24 servos, your options become somewhat limited. The electronics consist mostly of a Fishino Octopus, an Arduino shield that can drive sixteen individual servos. Slap two of these shields on an Arduino and you have something that will drive twenty four servos.

The mechanical part of the build consists of a 3D printed frame that allows the servos to be mounted across an arc, something like a harp. Metal rods connect the servos to tentacle-shaped actuators. These were designed in Google SketchUp and printed in PLA.

Attached to these servos and Arduino is a character LCD and a few buttons that allow the user to cycle through a few functions. The play button plays the current melody (based on old Nokia ringtones, by the way), a few more buttons adjust the position of the individual servos, and there’s another button to stop playing. Since this is a complete electronic-to-mechanical interface for a toy piano, a MIDI-in port isn’t out of the question; all a MIDI implementation would need to do is move a servo down on a note on event and move it back up on the note off event.

Hackaday Links Column Banner

Hackaday Links: June 9, 2019

The Chicago Pile led to the Manhattan Project, which led to the atomic bomb. In Germany, there were similar efforts with less success, and now we have physical evidence from the first attempted nuclear reactor in Germany. In Physics Today, there’s a lovely historical retrospective of one of the ‘fuel cubes’ that went into one of Germany’s unsuccessful reactor experiments. This is a five-centimeter cube that recently showed up in the hands of a uranium collector. In the test reactor, six hundred of these cubes were strung along strings and suspended like a chandelier. This chandelier was then set inside a tub surrounded by graphite. This reactor never reached criticality — spectroscopy tells us the cube does not contain fission products — but it was the best attempt Germany made at a self-sustaining nuclear reaction.

The biggest failing of the Arduino is the pinout. Those header pins aren’t all on 0.1″ centers, and the board itself is too wide to fit on a single solderless breadboard. Here’s the solution to that problem. It’s the BreadShield, an Arduino Uno-to-Breadboard adapter. Plug an Uno on one end, and you get all the pins on the other.

There’s a new listing on AirBnB. this time from NASA. They’re planning on opening the space station up to tourism, starting at $35,000 USD per night. That’s a cool quarter mil per week, launch not included. The plan appears to allow other commercial companies (SpaceX and whoever buys a Boeing Starliner) to accept space tourists, the $35k/night is just for the stop at the ISS. Costs for launch and landing are expected to be somewhere between $20 and $60 Million per flight. Other space tourists have paid as much: [Dennis Tito], the first ‘fee-paying’ space tourist, paid $20M for a trip to the ISS in 2001. [Mark Shuttleworth] also paid $20M a year later. Earlier space ‘tourists’ paid a similar amount; Japanese journalist [Toyohiro Akiyama] flew to Mir at a cost of between $12M and $37M. Yes, the space station is now an AirBnB, but it’s going to cost twenty million dollars for the ride up there.

We’re getting into conference season, and there are two hardware cons coming up you should be aware of. The first is Hardwear.io, keynoted by [Christopher Tarnovsky], famous for DirecTV hacks. There will be other talks by [@TubeTimeUS] on cloning the Sound Blaster and [John McMaster] on dropping acid. All of this is going down this week at The Biltmore in Santa Clara, CA. The second upcoming conference of note is Teardown, the hardware conference put on by Crowd Supply. That’s in Portland, June 21-23, with a presence from the Church of Robotron.

Tap ‘N Ghost: A Novel Attack Against Smartphone Touchscreens

Researchers have demonstrated a new vulnerability in NFC, a feature built-in to many smartphones sold today. The vulnerability allows the attacker to to generate ‘ghost taps’ against a device, effectively allowing an attacker to tap your phone without you looking.

The 18-page paper released by a team of three researchers based out of Waseda University in Japan consists of two techniques: an attack against NFC-enabled smartphones and an attack against capacitive touchscreens. It should be noted that nearly all phones have NFC, and nearly every phone released in the last decade has a capacitive touchscreen. Vunlnerable devices include, but are not limited to the Xperia Z4, the Galaxy S6 Edge, the Galaxy S4, Aquos Zeta SH-04F, Nexus 9, and Nexus 7.

The experimental setup consists of a signal generator, high-speed bipolar amplifier, a small transformer (taken from a toy plasma ball), a copper sheet, oscilloscope with high-voltage probe, and an NFC card emulator. No other special equipment is required. When the victim places their smartphone on a table top, the phone is fingerprinted, giving the attacker the make and model of phone. A dialog box then pops up and the phone connects to a network.

This attack can be replicated by anyone, and the tools required are simple and readily available. The mitigation is to disable NFC on your phone.

Continue reading “Tap ‘N Ghost: A Novel Attack Against Smartphone Touchscreens”

The Finest Linux Tablet You Can Build

For the last few years now, we’ve all had access to tiny, affordable Systems on a Module. These wunderchips are complete Linux systems with WiFi, a halfway decent GPU, and enough memory to run a real system. This is the perfect platform to base a tablet build on, the only problem is that someone has to actually do it. The DLT One is the ‘Damn Linux Tablet’ from [Prof. Fartsparkle]. It’s the answer to the question of when someone is going to build a tablet computer around one of these cheap Systems on a Chip that are floating around.

With many modules to choose from, the first task is actually choosing one of these Linux modules. [Fartsparkle] ended up with the Nvidia Jetson Nano, an impressive little board that has one distinct advantage: it’s drop-in compatable with the Raspberry Pi Compute Module, the Raspberry Pi-on-an-SODIMM. Given a single chassis, [Prof. Fartsparkle] can simply upgrade his tablet by getting a newer version of the Jetson Nano (or the Compute Module).

The current state of the board is basically an SODIMM socket on a board, with breakouts for Ethernet, a power jack, USB, and HDMI. That’s all there is to it, and design on the tablet chassis is ongoing.

Future updates for this tablet build will include USB-C PD, an mPCI-E connector that would allow for M.2 storage, LTE in some form or another and a dock that would allow you to turn this into a Surface-like laptop. It’s an amazing build, and one of the best entries we’ve seen in this year’s Hackaday Prize.