Retro-uC, Your Favorite Instruction Sets On Custom Silicon

A few months ago, we caught wind of an interesting project in Big-O Open silicon. It’s a chip, loaded up with the great CPU cores of yore. Now, it’s finally a project on Crowd Supply. The Retro-uC project is an Open Source microcontroller for the retro geek, with a Zilog Z80, MOS 6502, and Motorola 68000 buried in the epoxy of a single QFP package. Oh yes, custom silicon and retro goodness, what more could you want?

The Retro-uC project is part of the Chips4Makers project to develop an Open Source chip for the community. Of course, this has been done before with projects like the HiFive1 and other RISC-V implementations, but really — this is a Z80, 6502 and 68k on a single chip. Let’s not bury the lede here.

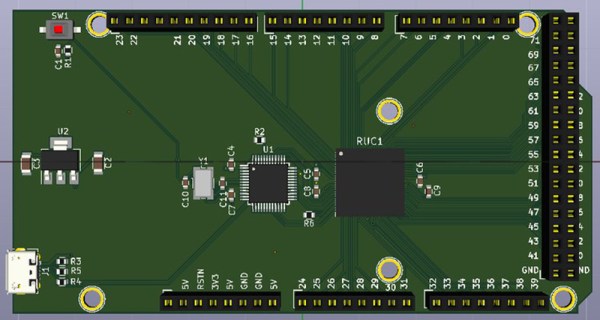
As far as the architecture and implementation of these cores go, the ‘active’ core is externally selected on reset, or can be changed through the JTAG interface. There are 72 GPIO pins that can handle 5V, with each pin mapped to the address space of the cores. So far, so good. We can make this work for some really cool stuff.

The JTAG interface is used for testing and programming, although programs can be stored on an external I2C Flash chip and booted from there. There is 4kB of on-chip RAM, and while the peripheral configuration is still being determined, there will at least be UART, I2C, and PWM peripherals. How many of each is anyone’s guess.

The Retro-uC is now a Crowd Supply project, with rewards/orders/whatever ranging from a bare Retro-uC chip for $42 USD to an Arduino Mega-ish development platform for $89, a breadboard version of the chip for $59, and a chip mounted to a Perf2+ prototyping board for $65.

While this chip hasn’t even gotten to tape-out, all the cores work on an FPGA, and there is precedent for doing Open Source, crowdfunded silicon. We’re looking at this one closely and are excited to see what everyone is going to make.

This project has been a long time in the making, with the project lead giving a talk at FOSDEM earlier this year. Now it’s finally time for the hard part of any silicon project — getting the money — and we’re looking forward to see what comes of it.

Listening To Mains Power

There’s a lot you can tell by looking at the waveform of your mains power. There are harmonics, transient changes, and periodic fluctuations that are correlated to the demand on the grid itself. Frequency shifts will tell you how fast or slow your clocks are running, and someone probably has a poorly isolated power line communication thing somewhere in your neighborhood. There’s a lot you can learn by looking at the waveform coming out of your outlets, but how do you tap into that? [David] is doing it with a PC sound card and some really interesting hardware.

The Grid 2 Audio module is [David]’s entry to this year’s Hackaday Prize, and it consists of three main parts. The first is the mechanical part of the design. This comes in the form of an IEC power socket with a built-in switch, fuse, and illumination. Of course, you could simply buy one of these, but [David] is teaching himself Autodesk Inventor, and you have to start somewhere. The second part of this build is the PCB power supply and mains input. This is basically a pair of transformers, a PCB, and a whole lot of isolation to make this a safe board. The third part is a signal conditioning board that sends the waveform to a 3.5mm jack, for easy processing with any audio capture hardware.

The hardest part of this board is, by far, the PCB design, and for that [David] went all out. There are some big, meaty traces on this thing and real separation between the high voltage and low voltage portions of the board. The end result is something that sends the mains waveform to an audio card for easy processing with MATLAB, and all the goodies that come from that.

Better Ways To Drive Nixie Tubes

Ah, Nixie tubes. You’re not cool unless you have a few Nixie tubes sitting around, and you’re not awesome unless you’ve built your own Nixie tube clock. That’s what [Thomas] is doing for his entry into the Hackaday Prize, and he’s come up with a very low-cost way of doing it.

For the high voltage supply of this build, [Thomas] is turning to one of the standard circuits based on the MC34063 that’s simple enough and good enough to make everything work. There are really no surprises with the power supply here. This is all a project about turning on different digits inside the Nixie, though, and for that [Thomas] spun his own board capable of driving a pair of IN-1 Nixies with a single ATMega8.

These two-Nixie boards are daisy chained together through a UART connection, where each board passes digits down the line. For example, the first board receives, 12, 30, and 59, displays 59, and passes 12 and 30 down to the next boards. The second board then displays 30 and passes 12 to the last board.

Of course, if you’ve designed a Nixie driver, the next thing to do is to build a clock. [Thomas] had the rather clever idea of making an enclosure for this clock out of concrete, using a 3D printed interior mold. Everything seemed to be going well until it was time to pull the interior mold out, and a few light taps resulted in some fairly large cracks. That’s disappointing, but with a slight redesign and some more fibers in the concrete mix, this is going to turn out to be a weighty win.

Friday Hack Chat: Hacking For Mental Health

Quite often we see applications of hacking and DIY in the medical field. From 3D printed prosthetics to hacked insulin pumps, there’s a wide variety of stuff you can do, but what about psychology? That’s what our Hack Chat this Friday is all about.

Our guest for this week’s Hack Chat is Curt White. He’s been building medical devices for years, and when he’s not doing that he’s creating interactive installation art and costumes. At work he’s a device and sensor developer at the Child mind Institute MATTER Lab where he designs and researches wearable medical devices for children with mental health issues. He’s currently working on gesture detection using wearables, machine learning optimized for microcontrollers, and building and fixing prototypes.

For this hack chat, we’ll talk about how mental health can be addressed by building things with a focus on wearable devices and sensor data. How are wearables challenging the outdated and arbitrary classification of psychiatric disorders, and what is the potential for audio, EEG, and fMRI to help us progress beyond checklist diagnosis? We’ll also talk about:

  • Hacking for mental health
  • Addressing the intangible with the tangible
  • Working with medical researchers
  • The fact that you don’t need an IRB if you don’t accept federal funding, or are working in Belize.

You are, of course, encouraged to add your own questions to the discussion. You can do that by leaving a comment on the Hacking For Mental Health Event Page and we’ll put that in the queue for the Hack Chat discussion.join-hack-chat

Our Hack Chats are live community events on the Hackaday.io Hack Chat group messaging. This week is just like any other, and we’ll be gathering ’round our video terminals at noon, Pacific, on Friday, August 24th. Need a countdown timer? Go go go

Click that speech bubble to the right, and you’ll be taken directly to the Hack Chat group on Hackaday.io.

You don’t have to wait until Friday; join whenever you want and you can see what the community is talking about.

Plasma Etching In A Microwave

Deep inside your smartphone are a handful of interesting miniature electromechanical devices. The accelerometer is a MEMS device, and was produced with some of the most impressive industrial processes on the planet. Sometimes, these nanoscale devices are produced with plasma etching, which sounds about as cool as it actually is. Once the domain of impossibly expensive industrial processes, you can now plasma etch materials in a microwave.

Of course, making plasma in this way is nothing new. If you cut a grape in half and plop it in a microwave, some really cool stuff happens. This is just the 6th grade science class demonstration of what a plasma is, and really it’s only a few dissociated water, oxygen, and nitrogen molecules poofing in a microwave. To do something useful with this plasma, you need a slightly more controlled environment.

The researchers behind this paper used a small flask with an evacuated atmosphere (about 300 mTorr) placed into a microwave for a few seconds. The experiments consisted of reducing graphene oxide to graphene, with the successful production of small squares of graphene bonded to PET film. Other experiments changed the optical properties of a zinc oxide film deposited onto a glass microscope slide and changing a PDMS film from being hydroscopic to hydrophobic.

While the results speak for themselves — you can use a microwave to generate plasma, and that plasma can change the properties of any exposed material — this is far from a real industrial process. That said, it’s good enough for an experiment and another neat technique in the home lab’s bag of tricks.

Turning Everything Into A Tap Controller

Our entire life is staring at glowing rectangles, and all our surroundings are hard, flat surfaces. [Ben] had the idea to turn those flat surfaces into a generic tap interface controller, and his project for the Hackaday Prize might just do that.

Some of the prior art that went into this project includes Ping Pong Plus Plus, an augmented-reality-ish implementation of ping pong that puts projected light wherever a ping pong ball hits the table. The game does this by mounting piezos to the bottom of a table and just a slight bit of math to determine where on the table the ball hit. There’s also MicLoc, a door lock that responds to knocking.

With this prior art, it’s all about microcontrollers and peripherals, and for that, [Ben] turned to the STM32F303RE, which sports four very fast ADCs and op-amps. There’s a lot of DMA usage on there, and the code is using a ton of signal processing. The important bit here is finding the difference between whatever the tabletop equivalent to an earthquake’s P-waves and S-waves are — [Ben] only wants the first bit of a waveform that travels through the table longitudinally, not the much louder vibrations of the entire table.

If [Ben] manages to put this together, an entire wall could be a light switch or a dimmer. You could add a secret knock to your door, and your desk could control your computer. It’s a promising idea, and the engineering that’s going into this project is just fantastic.

Blink A Pi, Win A Prize

You can plug in a Raspberry Pi, and you can blink a LED. You can visualize data, and now there’s a contest on Hackaday.io to show off your skills. Right now, we’re opening up the Visualize It With Pi contest on Hackaday.io. The challenge? Visualize data with LED strips and panels. Is that ‘data’ actually just a video of Never Gonna Give You Up? We’ll find out soon enough.

The goal of this contest is to combine a Raspberry Pi and its immense processing power and the blinky goodness of LED strips and panels to visualize and interpret data in novel and artistic ways. We’re looking for animation. clarity, and flamboyant flickering. Want some ideas? Check out the World of Light or the American Constitution Candle. We’re looking for the most blinky you can do with a Pi, and yes, there will be prizes.

Prizes

BlinkyTile Explorers Kit

Prizes for the best blinky include, of course, more blinky. The best visualizations from a directly connected sensor, data from an Internet Source, and data from an esoteric data source will each receive some Blinkytape. This is a strip of WS2812b LEDs with an ATMega32u4 embedded on the end. Plug a USB power supply into the Blinkytape, and you get a strip of LEDs in whatever color you want with the ability to push animation frames to the chip on the strip. The Grand Prize winner for this contest will also receive Blinkytile Explorers Kit, a Serpentine LED strip, a LED ring, and two meters of ultra thin LED strip.

Let’s Do This!

The requirements for the contest are simple: just use a Raspberry Pi to drive LED strips or panels, post it as a new project on Hackaday.io, and submit the project to the contest. We’re looking for a full description, source, schematics, and photos and videos of the finished version of the project — do everything you can to show off your work! The contest is open right now, and ends at 08:00 Pacific on October 1st. We know you like to blink those LEDs, so get crackin’.