Musical [Blinky] Candy Tin

Since it’s the holidays and pine trees are being cut down and installed in living rooms all around the world, [Jarv] though it would be a good idea to make a musical Christmas ornament. He needed to keep some of his geek cred, so [Jarv] decided to build a musical [Blinky] ghost from Pacman.

A few weeks ago, [Jarv] sent in his musical greeting card that uses a minimal amount of parts to play a short 8-bit tune. His project was based around an ATtiny85 and sounded pretty good. For his [Blinky] ornament, [Jarv] used a similar circuit along with some old-school Pacman songs that sound great.

[Jarv] found a [Blinky] candy tin and after dispensing with all that pressed sugar began work on his build. In keeping with his greeting card, everything is very minimal. Just a speaker, ATtiny85, and button make up the build. Pressing the button cycles through three songs from Ms. Pacman. The result sounds uncannily like a vintage arcade game, so be sure to check out the video after the break.

Continue reading “Musical [Blinky] Candy Tin”

Ethernet Controlled Garage Door

[Thomas]’ garage door opener is a big old industrial unit, so he doesn’t have the convenience of a remote-controlled garage door opener.  Obviously, this would get annoying after a while, so [Thomas] decided to build an Ethernet enabled relay board so he can open his door with his iPhone.

The build is based around an ATMega328 and a neat little Ethernet controller from Microchip. There are two relays on the board that connect to the Up and Down buttons on the door opener. The board receives UDP packets with instructions like, ‘RELAY 2 ON’ and the door responds accordingly.

Building just one of his boards cost [Thomas] the meager sum of $43. Considering the new Arduino Ethernet board costs around $60, we’re thinking he did a good job here. From the video after the break, we’re seeing that [Thomas] has to hold the button on his iPhone down for the door to go up. We see a few more pins on his AVR, so perhaps v.2 of his board could contain a few headers to attach sensors. Still, it’s a very nice build.

Continue reading “Ethernet Controlled Garage Door”

An Iambic Keyer In 5 Minutes

When most people think about a telegraph key, a piece of 1890s tech with a lever that moves up and down comes to mind. These ‘straight keys’ were terrible for telegraphers and led to repetitive stress injuries like carpel tunnel syndrome..Iambic keys came along and move the contacts to a horizontal position. If you ever see a HAM playing with his CW rig, chances are they’re using an iambic key. It’s great, then, that you can build your own iambic key in five minutes using parts you have lying around.

The build [Dimitris] put up is dead simple – just two metal contacts with a pair of 470K pullup resistors. All this connects to three pins on an Arduino. All the micocontroller needs to do is measure the rise time a touch sensor pin when a voltage is applied. If there’s a finger on the pin, the capacitance increases and the rise time is longer. After that, just assign one sensor as ‘dit’ and the other as ‘dah’ and you’ve got an iambic key.

[Dimitris] put all the code for his project up on his blog. His iambic key seems like the perfect project after a tiny Morse trainer. Check out the video of the key in action after the break

Continue reading “An Iambic Keyer In 5 Minutes”

A Keyboard For Your FIGnition

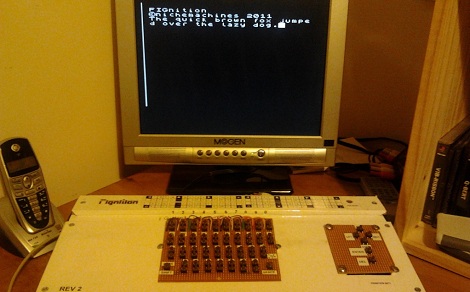
[Carl] sent in his keyboard he made for his FIGnition microcomputer. At least now he has more than 8 buttons.

The FIGnition is a tiny little microcomputer that harkens back to the 8-bit days of yore. Designed to be an educational computer like the Altair or Heathkit (sans blinkenlights), the FIGnition gives its students ‘bare metal’ access to everything in the system. It’s powered by an ATMega168, a 4 Kb SRAM and an 8Mb Flash chip for storage. Unfortunately, the FIGnition only has 8 buttons to program Forth with, so [Carl]’s project is very much desired in the community.

To expand 8 buttons into an alpha-numeric keyboard, [Carl] came up with the solution of using two tact switches per character. The switches are of different button heights, so pressing a pair of buttons actuates the two buttons in order, which is natively interpreted by the FIGnition. It’s a perfect match for the chord-keys of the FIGnition.

Check out the video of [Carl]’s bundle of wires after the break.

Continue reading “A Keyboard For Your FIGnition”

Pick Up That Can, [Jeri]

We all need an excuse to play Half-Life 2 sometimes. [Jeri Ellsworth] put together a My First Crowbar controller to throw a few headcrabs across the room. It’s pretty much Half-Life 2 for the Wii.

The build is very simple – just a tilt switch hot glued to the underside of a childs-size crowbar. Two leads go from the tilt switch to the contacts on a (PS3?) controller. All you need to do to attack is swing the crowbar wildly.

[Jeri] has us wondering what other awesome game controllers could be made. Of course we’ve been wanting a real-life Gravity Gun or Portal Gun for years now, but right now we’re thinking about a real Katamari. We might need more hot glue.

As far as building our own, we’re thinking about using one of the Cheap DIY tilt switches we saw the other day. It’s a simple build, and sure looks like a lot of fun.

Continue reading “Pick Up That Can, [Jeri]”

Building A ’60s Guerilla Homebrew Square Wave Generator

What do you do when you’ve got three broken function generators? Build your own, obviously. Since your workshop has already gone through three of these bad boys, you might find yourself repairing your build. Better not use any fancy ICs and go with a transistor only build.

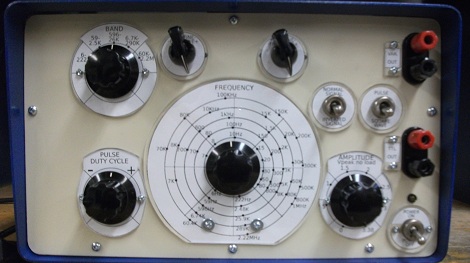
When [Miroslav] sent in his ‘guerilla homebrew’ square wave generator, we were really impressed. With a relatively simple schematic that uses parts that could be salvaged from old radios, this is a real MacGyver build.

The generator is based around a simple astable multivibrator. It doesn’t provide sine waves, but it’s the easiest circuit to get working. The build started off with a quartet of 2N4401 transistors, but according to the datasheet and the venerable Tektronix 502A, these had a very bad rise time compared to 2N3904s.

[Miroslav]’s project generates square waves up to 2.22 MHz and pulses with a variable duty cycle from 1-49% and 51-99%. Output is either 5 Volt TTL levels or an adjustable 0-3.38 level. The generator is exactly what [Miroslav] needed, so that makes it a great tool in our book.

Reverse Engineering A Korg Monotribe

Yesterday, Korg released a firmware update to their ribbon controller synth, the Monotribe. The firmware is just an audio file that needs to be played to the sync input of the box. [gravitronic] thought this was rather interesting, so he decided to decode the monotribe firmware. It’s the first step to custom Monotribe firmware, and on the path towards reverse engineering this neat box.

After converting the firmware update to a .wav, [gravitronic] looked at the file with a hex editor and found that each sample is two bytes, and the left and right channels are the same. That made enough sense, so after getting rid of one channel, he sent it through Python to take a look at the patterns of ones and zeros.

Of course, [gravitronic] arbitrarily chose high = 1, low = 0, and little-endianness. The first result didn’t produce a nice “KORG SYSTEM FILE” in the header, so he tried other combinations until the output file looked reasonable. The result is the actual .bin file that’s going to serve as the basis for a nice homebrew firmware. You can grab [gravitronic]’s Python script here and decode your own firmware.