Modding An Inkjet For PCB Production

Like all of us, [Ryan] is tired of waiting for board production houses. To reduce some of that turnaround time, he modded an Epson inkjet into a PCB printer. The Instructable of his build is extremely thorough and it looks like he’s getting some quality boards out of his project

The build started off by disassembling an Epson C86 printer he had lying around the house. Going with an Epson printer is important – Epsons have a piezo print head accepts ink that would clog other printers. After tearing all the plastic off his printer, [Ryan] set to work raising the printer (or lowering the bed, whatever) and was off to the races.

The cartridges were filled with etch-resistant yellow ink and a piece of copper clad put onto the printer. After printing, [Ryan] etched his board in ferric chloride. Sadly, he’s getting small pinholes in his traces where a bit of the ink was eaten during etching. He’s tried HCl and Peroxide, but those turn his boards into green junk.

If you’ve got any tips to help [Ryan] out, leave them in the comments. Before that, check out the printing demo [Ryan] put up.

Continue reading “Modding An Inkjet For PCB Production”

We Want This LED Ball

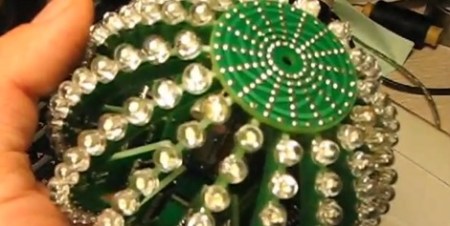
[Nikolai] has a friend who is into fire and light shows. Her birthday was coming up, so [Nikolai] decided to build something to compliment her performances. He came up with a 10 cm LED ball (Russian, Google translation) that has a matrix of 256 LEDs wrapped around its surface.

The ball’s structural support is its own PCBs. The bottom of the ball is a simple bus – no components needed. The processor module fits into the bus along with the side arcs with LEDs on the edge. The top holds two AA batteries and a MAX1674 step up converter. The view from the inside looks like some sort of bizarre alien device. Very cool.

The central processor module is based around an ATmega88. The microprocessor controls two ‘595 for each of the 16 side panels. So far, four modes of operation have been programmed – a sine graph wrapped around a sphere, a random function, two oscillating circles, and plain old lines. The code for the LED ball is available (offsite link), and thankfully the variables are in English. An impressive piece of engineering and board layout skills.

Check out the video of the LED ball after the break.

Continue reading “We Want This LED Ball”

Over Engineering A Game Of Lights Out

[Bertho] might have outdone himself this time. He built a Lights Out clone for the 7400 logic competition.

Lights Out is an electronic toy sold by Tiger in the mid 90s. The goal of the game is to turn a 5 by 5 grid of light up buttons off. There’s a catch, though – pressing a button toggles the state of the four surrounding buttons. Check out this Flash game that’s faithful to the original.

[Bertho] read a few Lights Out fan pages and set out to design the circuit. Most of the build is made up of shift registers: the ‘game state’ is saved in five 74hc164 shift registers and a 4557 programmable register. The board is set with a random number generator that toggles bits in the game register until a solvable puzzle is found. A truly spectacular build.

For the light-up buttons themselves, [Bertho] found an old Hack A Day post that describes putting tact switches underneath a LED. The project was put into a nice Plexiglas enclosure after 15 hours of soldering. [Bertho] was kind enough to put a video up of the game in action. Check it out after the break.

Continue reading “Over Engineering A Game Of Lights Out”

Join The Pen15 Club With A Vibrator Shield

For all you teledildonics enthusiasts, there’s a new Vibrator shield for the Arduino. It gets better: you can use the Pen15 shield with a Kinect for wholesome and natural fun at home.

Decency and a ‘safe for work’ style prevents us from putting everything we know on the front page, so keep reading after the break.

Continue reading “Join The Pen15 Club With A Vibrator Shield”

Christmasqualizer Is The Next Light Switch Rave

[youtube=http://www.youtube.com/watch?v=la1OuczS_wM&w=470]

[Kyle] was looking for a way to spice up his boring brick-wall dorm room. The Christmasqualizer he came up with brightens up his room and would make an awesome place for a rave.

The strings of lights in [Kyle]’s Christmasqualizer are off-the-shelf Christmas lights. A simple circuit for the 7-band equalizer was built following this article. The build uses an MSGEQ7 equalizer chip takes audio from any source. The volume level of the seven EQ bands are output to an Arduino over a serial connection.

After the EQ chip was connected to the Arduino, [Kyle] needed a way to switch the strings of Christmas lights on and off. A few solid state relays later, and he was in business.

All the code for the Christmasqualizer is up on github. The sketch is pretty simple – connect the EQ chip as per the article, then connect the relays to the output pins on the Arduino. It’s a fun and easy project that really livens up a dorm room.

Improving Sports Performance With A Kinect

As a recent Mech E grad, [Alessandro Timmi] knows a lot about moving bodies. His thesis, Virtual Sensei, aims to quantify those movements for better coaching and training in martial arts.

Virtual Sensei uses a Kinect for motion capture during training. From there, the skeleton recorded by the Kinect has a little bit of processing applied and the speed of the fists is calculated. Check out the demo vid for a much better explanation of what Virtual Sensei can do.

Considering the number of sports that require precise alignment of the skeleton and timing of certain movements, we’re thinking this could be the breakout (non-video game) app to get the Kinect into the wild. Golf pros would love to record the swings of their students to make sure their shoulders are aligned.

Most of the Kinect hacks we’ve seen are either robot builds with a few 3D scanners and virtual wardrobes thrown into the mix. Virtual Sensei is a pretty impressive piece of software and with a few additional sports could make a killing.

Check out the freakin awesome animated FAQ and a demo video below.

Continue reading “Improving Sports Performance With A Kinect”

Solar Charger For Occupy Boston

As soon as the team at Revolt Labs heard Occupy Wall Street was coming to Boston, they decided to pick up their soldering irons in support of the throngs of protestors. They came up with a Solar charging USB box to keep those cell phones and digital cameras charged.

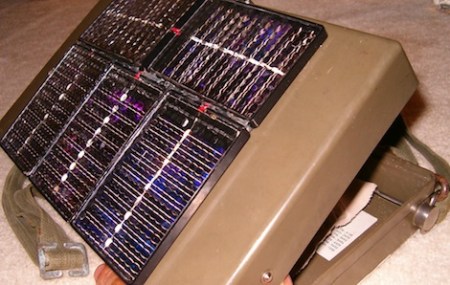
The case came direct from an Army surplus store. Originally, the box was used by the Dutch military to test the air for poison gas and signal when it was safe to remove a gas mask – hopefully not a portent of things to come.

On top of the box is five solar panels that output two watts each. A bit of breadboard holds a 7805 voltage regulator, a few caps and a diode. This regulated output goes to a USB hub and provides power for recharging.

For a cheap and easy project for our brothers without arms, we couldn’t think of a better project for the Occupy Boston tent city. Of course heating units will be needed at the Occupy protests this winter, but at least now the protesters have the means to power their communications equipment.


update: Once again, this has devolved into political argument and name calling. We, as hackaday, really couldn’t care less which party you are for or what your political beliefs are. We want to talk about the project, in this case a portable solar charger. We go to other sites to argue politics. Maybe you should try here.