Robotic Farming Means More Corn For Everyone

You know we’re all going to starve, right? If the world’s population keeps growing exponentially and food production grows linearly, we’re eventually going to find out what Soylent Green is made of. This is where [David Dorhout]’s Prospero robot farmer comes in. [David] has come up with the idea of using small autonomous robots to plant, tend and harvest fields. Right now, he’s working on stage 1: planting seeds.

A swarm of six-legged Prospero robots are dispatched to a field. There, each member of the swarm plants seeds one at a time. The robots keep in contact with each other over a wireless connection to ensure the optimal planting pattern for an entire field.

The Prospero prototype is based on the Parallax Propeller with a Ping ultrasonic sensor used to avoid obstacles. Each hexapod is equipped with a bunch of seeds, a small auger, and a supply of fertilizer for the future corn plant. The next step in the plan is to build a ‘tending’ robot that will monitor and apply nutrients if needed. Check out the Prospero video after the break.

Continue reading “Robotic Farming Means More Corn For Everyone”

Halloween Hacks: Diorama-rama

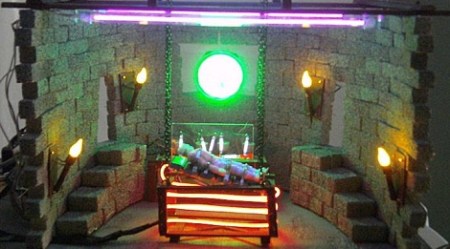
The folks down at LVL1, the Louisville hackerspace, are throwing a Halloween party. To showcase his building skills, LVL1 member [JAC_101] put together a Halloween diorama featuring the inner workings of Doctor Frankenstein’s laboratory.

There’s a bunch of really neat pieces that make this build great. First up is the LVL1 plasma sign. This sign is four circuits pumping a high voltage charge through Xenon flash tubes. Instead of a bright flash, a very Halloweeny Xenon plasma shoots though the tubes. The sign is constructed from four disposable camera flash circuits.

A few flickering-LED torches light Dr. Franenstein’s lair while the monster is a McDonalds happy meal toy wrapped in surgical tape and painted with UV reactive paint.

In the interests of repurposing existing materials, a plasma disc belt buckle was taken from [Seven of Nine]’s regeneration chamber LVL1’s rave supply cabinet and provides a suitable ‘mad scientist’ aesthetic. A bit of EL wire was thrown in for good measure along with some black lights to activate the UV paint.

While Frankenstein’s lab is missing a hilariously oversize knife switch on the wall, [JAC_101] still pulled off a great build.

Detecting DTMF Tones From Scratch

If you’ve ever wondered about the best way to detect dial and DTMF tones from a phone line, [Debraj] is your man.

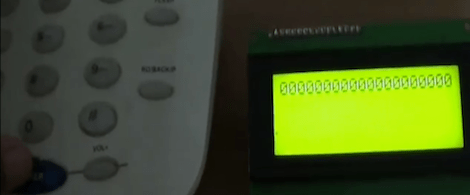
[Debraj] built a DTMF detector using the Goertzel algorithm. Normally, when we think about detecting tones, we pull FFT out of our bag of tricks. The Goertzel algorithm isn’t as computationally complex as FFT and can be implemented on even the smallest microcontrollers.

For the build, the first thing to solder is a nice audio transformer and some protection diodes. The ring tone from a phone line goes from +35 V to -35 V – a bit more than a microcontroller could handle. A PIC18F4520 dev board was used as the brain of the system with all the code is available on [Debraj]’s site.

Although implementations of the Goertzel algorithm are a little uncommon, [Debraj] has seen a few interesting projects using this technique. [Debraj]’s build could easily be modified into a guitar tuner with a few changes in the code, for example.

This project was built as the command and control for a home automation system and from the video after the break, we can’t wait for [Debraj] to get annoyed at the phrase, “To turn on the kitchen lights, please press 1…”

Continue reading “Detecting DTMF Tones From Scratch”

Multicolor 3D Prints The Hard Way

After drooling over the Makerbot dual-head extruder, [Brett] decided to get off his duff and make a proper multi-color print.

[Brett] has been making a few bottle openers for friends and has been successfully experimenting with switching filaments in the middle of a print. For his “Saturday Killer” bottle opener, he decided to push multicolored prints to the limit. For the “Saturday Killer,” [Brett] decided to print an abridged version of the classic Simpsons quote, “Beer, the cause of, and solution to, all of life’s problems” on the side of a bottle opener in 4 different colors.

The files necessary to print the Saturday Killer were generated in OpenSCAD. The general principle behind the design is to generate separate .STL files for the bottle opener and the sides, split those files into 2-layer chunks, and print those files while constantly adjusting the z-height. It’s not called the Saturday Killer for nothing, so [Brett] had to change the color of his filament 25 times.

A much simpler version of a complex multi-color print is [Brett]’s Shepard Fairey inspired self-portrait. Still, we’re thinking a dual head extruder is somewhere in [Brett]’s future. At least he’s got the technique down.

Halloween Hacks: Scaring Small Children With Huffman Coding

The team over at NerdKits decided they needed to do something for Halloween. Only on Halloween is scaring small children is an admirable goal, so they demoed a way to play creepy sounds after a door has been opened.

To trigger the sound, a magnetic reed switch from an alarm system is attached to a front door. This triggers the microcontroller and with a bit of delay, some creepy audio can be played on a pair of speakers. The team decided to store all the audio data on the flash memory of their ATmega328p, but that wouldn’t allow for a very long scream. To extend the length of the wails of the damned, the NerdKits team decided to use Huffman coded audio.

Because Huffman coding relies on the most common value being assigned the shortest code, the team used a bit of Python and C magic to figure out the optimal encoding for their audio file. After the evil laugh was sufficiently compressed, the microcontroller was programmed to decode the audio and send it to a pair of speakers. The team made all the software for their project available here for your perusal.

Although this project could be thrown together in an hour with an Arduino and an MP3 shield, the NerdKits team wants to get kids to learn how things work, also an admirable goal. [Humberto] from NerdKits put a video up explaining the theory of the project. Check it out after the break.

Continue reading “Halloween Hacks: Scaring Small Children With Huffman Coding”

Building The Second Tiniest Tetris

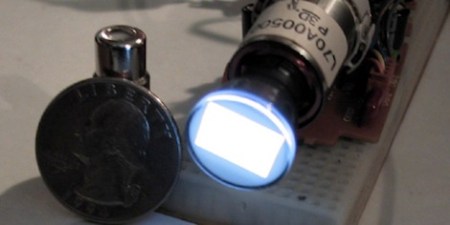
A few years ago, [Richard] pulled a crushed camcorder out of a junk box at a hamfest. After pulling the half-inch CRT out of the viewfinder, he needed to find a project. [Richard] ended up building the second tiniest game of Tetris we’ve ever seen.

After futzing around with the CRT, [Richard] discovered that one of the pins would accept an NTSC input. He also found a similar project that used a dime-sized CRT to play Tetris. With ready to go code, [Richard] started assembling his project into a handsome wooden box.

There are two PCBs for the build – a CRT driver circuit, and a small custom board that handles the game and controller code. The circuit for the game board was found on this site, but the featured boards there were too large for the project. A stripped-down board was fabricated by BatchPCB and put into the box.

There aren’t any controls on the console itself, for that a standard DB-9 connector was installed so a vintage Atari joystick could be used. For a more ergonomic Tetris experience, a Sega Genesis controller could be used. For something that looks like it comes out a steampunk laboratory, playing Tetris is a bit unexpected. Check out the demo video of the screen at 20x magnification after the break.

Continue reading “Building The Second Tiniest Tetris”

Tactile 4-bit Maze

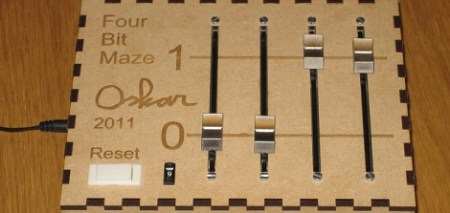
[Oskar] has been making puzzles for some time now. In 2000, he made a small electromechanical 4-bit maze that’s really fun to play. Lately though, he’s been working on an improved version that could be the beginnings of a commercial product.

The earlier electromechanical maze (you can play it in an applet on that page) is just a microcontroller hooked up to electromagnets and switches. To complete the maze, find the patterns of bits that move everything from 0 to 1. It’s a little bit like the Fox Chicken Grain puzzle, only a bit more complicated.

[Oskar]’s latest version uses motorized faders to represent the 0 and 1 states of the bits. The same logic in the electromechanical version is in the newest version. An Ardunio takes care of the motor control and game logic.

As a tiny logic game toy, it’s a great idea; everybody needs to get some hands-on action with Karnaugh maps sometime in their life. Check out the video below for the demo of the 4-bit maze in action.

Continue reading “Tactile 4-bit Maze”