A Guard Bot For Your Home Assistant

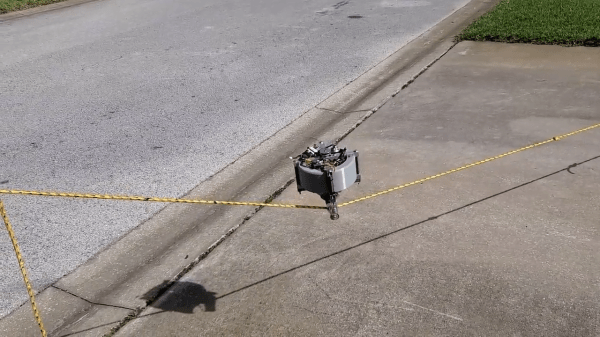
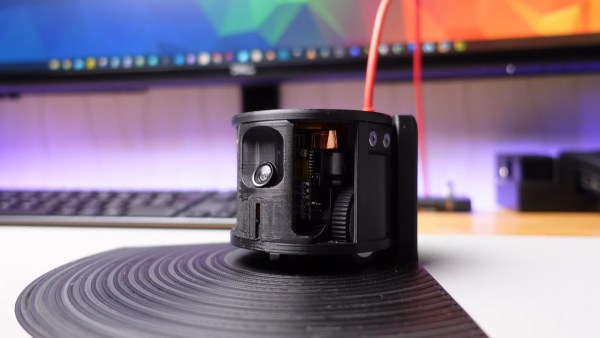
While fixed sensors, relays, and cameras can be helpful in monitoring your home, there are still common scenarios you need to physically go and check something. Unfortunately, this is often the case when you’re away from home. To address this challenge, [PriceLessToolkit] created a guardian bot that can be controlled through Home Assistant.

The robot’s body is made from 3D printed components designed to house the various modules neatly. The ESP32 camera module provides WiFi and video capabilities, while the Arduino Pro Mini serves as the bot’s controller. Other peripherals include a light and radar sensor, an LED ring for status display, and a speaker for issuing warnings to potential intruders. The motor controllers are salvaged from two 9-gram servos. The onboard LiPo battery can be charged wirelessly with an integrated charging coil and controller by driving the bot onto a 3D printed dock.

This build is impressive in its design and execution, especially considering how messy it can get when multiple discrete modules are wired together. The rotating caster wheels made from bearings add an elegant touch.

If you’re interested in building your own guard bot, you can find the software, CAD models, and schematics on GitHub. If you’re looking to add other gadgets to your Home Assistant setup, we’ve seen it connect to boilers, blinds, beds and 433 MHz sensors.

Continue reading “A Guard Bot For Your Home Assistant”

3-DOF Robot Arm Wrist Without The Motor Weight

A major challenge of robotic arms is the weight of the actuators, especially closer to the end of the arm. The long lever arm means more torque is required from the other actuators, and everything flexes a bit more. To get around this, [RoTechnic] moved the wrist stepper motors off the arms entirely.

He built a push-pull mechanism that uses braided fishing line to transfer motion to the robot arm’s wrist using Bowden tubes. The motors are mounted on the arm’s base, with a drum and two lengths of fishing line on the shafts. The lines pass through an adjustable tensioner before entering the Bowden tubes. This drum mechanism is also present on each of the three rotating axes of the wrist.

[RoTechnic] used an Arduino-powered RAMPS board as a controller, which is programmed to accept over the serial interface. He created a simple GUI and scripting interface in Jupyter Labs to generate and send command, which seems like an excellent solution for testing.

We can see this mechanism being a useful for a variety of motion applications, and definitely something to add to the idea toolbox. It is somewhat similar to some other cable-operated joints we’ve seen in humanoid robots and other 3D printed arms.

Continue reading “3-DOF Robot Arm Wrist Without The Motor Weight”

3D Printed ROV Is The Result Of Many Lessons Learned

Building an underwater remotely operated vehicle (ROV) is always a challenge, and making it waterproof is often a major hurdle. [Filip Buława] and [Piotr Domanowski] have spent four years and 14 prototypes iterating to create the CPS 5, a 3D printed ROV that can potentially reach a depth of 85 m.

FDM 3D prints are notoriously difficult to waterproof, thanks to all the microscopic holes between the layers. There are ways to mitigate this, but they all have limits. Instead of trying to make the printed exterior of the CPS 5 waterproof, the electronics and camera are housed in a pair of sealed acrylic tubes. The end caps are still 3D printed, but are effectively just thin-walled containers filled with epoxy resin. Passages for wiring are also sealed with epoxy, but [Filip] and [Piotr] learned the hard way that insulated wire can also act as a tube for water to ingress. They solved the problem by adding an open solder joint for each wire in the epoxy-filled passages.

For propulsion, attitude, and depth control, the CPS 5 has five brushless drone motors with 3D printed propellers, which are inherently unaffected by water as long as you seal the connectors. The control electronics consist of a PixHawk flight controller and a Raspberry Pi 4 for handling communication and the video stream to a laptop. An IMU and water pressure sensor also enable auto-leveling and depth hold underwater. Like most ROVs, it uses a tether for communication, which in this case is an Ethernet cable with waterproof connectors.

Acrylic tubing is a popular electronics container for ROVs, as we’ve seen with an RC Subnautica sub, LEGO submarine, and the Hackaday Prize-winning Underwater Glider.

Continue reading “3D Printed ROV Is The Result Of Many Lessons Learned”

Exploring Piston Engine Design With LEGO

When learning about the design of a machine or mechanism, reading and watching videos is certainly effective, but it’s hard to beat hands-on experimentation. In the video after the break, [Brick Technology] uses LEGO to gain some practical insight into the world of piston engine design, from single-cylinder all the way up to radial twelve-cylinder engines.

Using pneumatic cylinders from the LEGO Technic series, [Brick Technology] starts by getting the basics working with a single-cylinder design. Besides the fact that there are no fuel-air explosions involved, these pistons are also double-acting thanks to a valve mechanism that switches the pressurized side of the piston as it reaches the end of its stroke. After a couple of experiments, he settles on using a bank of six two liter soda bottles as a source of pressurized air.

He also increased the performance of the LEGO cylinders by drilling out the ports and adding silicon oil for lubrication. In the initial prototypes, the cylinders also acted as connecting rods, tilting back and forth as the crankshaft rotates. After some testing, he discovered he could increase efficiency by constraining the cylinder with a slider mechanism and adding a separate connecting rod.

With the basics done, [Brick Technology] could start experimenting with engine arrangements and geometry. Inline two, three, and four cylinders and V2, V6, V8, and even R12 were all on the menu. He could also change crankshaft geometry to trade torque for RPM and vice versa, and build a starter motor, and torque generator.

Just like [Brick Technology]’s LEGO electronic drums and vortex machine, this video gives us a itch that can only be scratched by a few hundred LEGO pieces. For rapid prototyping of course.

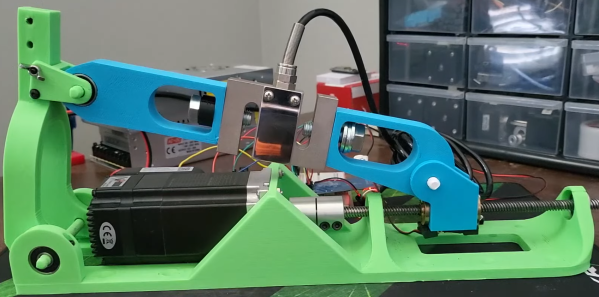
The Best Threaded Holes For Resin Parts

Threaded inserts are great for melting into FDM prints with a soldering iron. The process isn’t so simple for resin prints, since they don’t generally soften with heat. Off course, you can also print the threads directly, screw a bolt into an un-threaded hole, or tap a hole. Following his usual rigorous testing process, [Stefan] from CNC Kitchen investigated various ways of adding threaded holes to resin prints.

After establishing a pull-out force on PLA using threaded inserts (205 kg) and tapped holes (163 kg), [Stefan] tested parts printed with Prusament Tough Anthracite resin. Un-threaded and tapped holes failed at 44 kg and 55 kg respectively, while printed threads were almost twice as strong, reaching 106 kg before breaking. Stephan also tried gluing inserts into the parts using resin and CA glue. The resin didn’t cure properly in the opaque parts (6 kg) while CA was comparable to plastic threads, failing at 52 kg.

Chart of results
TLDR: Print your threads for best results

[Stefan] also tested regular ELEGOO Translucent resin. The higher hardness of the cured resin allowed the parts to hold on to around 100 kg for un-threaded and tapped holes, while printed threads reached 120 kg. Threaded insert glued with resin did better on the transparent parts thanks to improved UV penetration, but were very inconsistent. Inserts glued with CA performed about the same as on the Prusament parts, failing at 56 kg.

In an attempt to improve the performance of the inserts [Stefan] printed some parts with stepped holes to match the geometry of the inserts, which had the advantage of preventing the insert from falling through during gluing. It only made a marginal difference on the Prusament parts but boosted the strength of CA-glued inserts on the ELEGOO resin to 82 kg. Two-part epoxy was also tried, which matched the un-threaded holes in strength.

So for resin parts you’ll probably be best served by just modeling the threads in CAD and printing them directly. If you need to be able to repeatedly screw and unscrew fasteners in a hole without stripping, threaded holes with CA or epoxy might be a better solution.

Continue reading “The Best Threaded Holes For Resin Parts”

Infinitely Scrolling E-Ink Landscape Never Repeats

Traditional Chinese landscape scrolls can be a few dozen feet long and require the viewer to move along its length to view all the intricate detail in each section. [Dheera Venkatraman] replicated this effect with an E-Ink picture frame that displays an infinitely scrolling, Shan Shui-style landscape that never repeats.

E-ink picture frame with infinitely scrolling landscape
A new landscape every time you look

The landscape never repeats and is procedurally generated using a script created by [Lingdong Huang]. It consists of a single HTML file with embedded JavaScript, so you can run it locally with minimal resources, or view the online demo. It is inspired by historical artworks such as A Thousand Li of Rivers and Mountains and Dwelling in the Fuchun Mountains.

[Dheera]’s implementation uses a 10.3″ E-ink mounted in an off-the-shelf picture frame connected to a Raspberry Pi Zero running a forked version of [Lingdong]’s script. It does a decent job of avoiding the self-illuminated electronic look and creates a piece of decor that you could easily just stand and stare at for a long time.

Computer-generated art is making a lot of waves with the advent of AI models like Dall-E and Stable Diffusion. The ability to bring original art into existence with a simple phrase will have an undeniably profound long-term effect on the art world.

Lighting Up Glue Stick Bicycle Tyres With RGB

Being visible to motorists is a constant concern for cyclists, but we doubt [The Q] will have this problem with his RGB LED illuminated tires made from glue sticks.

The project started with a set of 3D-printed tire molds that bolt to the standard wheels. A bot of melted glue sticks is poured into the mold, allowed to cool, and the mold sections are removed with the help of a heat gun after cooling. We doubt the weight and hardness make the tires particularly practical, but you can’t make normal tires glow from the inside. 

The idea to illuminate the tires probably came after molding, because they had to be cut off to fit the LEDs. [The Q] built a simple hot wire jig with a piece of nichrome wire between two screws and used it to cut a few millimeters from the inside of the tire and fit a sleeved RGB LED strip in the wheel. Power come from a set of three 18650 batteries housed with a wireless controller in a 3D printed hub-mounted enclosure.

Like [The Q]’s hubless and partial wheel bicycles, it’s a definite head-turner, with function following form. 

Continue reading “Lighting Up Glue Stick Bicycle Tyres With RGB”