Eliminate Vertical Stabiliser With ArduPlane

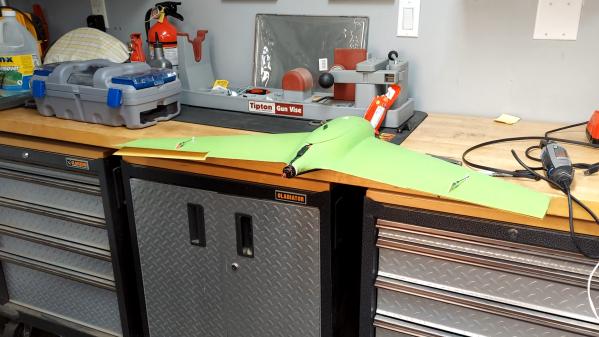
Flying wings are popular options for fixed-wing FPV flying, but they have one rather annoying characteristic: yaw wag. The flying wing will wobble on the yaw axis while flying, and this side-to-side movement is visible on the pilot’s FPV video feed. With a combination of split rudders and ArduPilot, [Think Flight] eliminated wing wag without using any vertical stabilizers.

Yaw wag usually occurs on flying wings that use a pair of small winglets instead of a large vertical stabilizer on the centerline. Split rudders, also known as differential spoilers, can be used for active yaw control by increasing drag on either wing independently. However, this requires very rapid corrections that are very difficult to do manually, so this is where ArduPilot comes in. [Think Flight] used its yaw dampening feature in combination with differential spoilers to completely eliminate vertical stabilizers and yaw wag. This is the same technique used on the B-2 stealth bomber to avoid radar reflecting vertical stabilizers. [Think Flight] also used these clamshells spoilers as elevons.

Using XFLR5 airfoil analysis software, [Think Flight] designed built a pair of flying wings to use these features. The first was successful in eliminating yaw wag, but exhibited some instability on the roll axis. After taking a closer look at the design with XFLR5, he found air it predicted that airflow would separate from the bottom surface of the wing at low angles of attack. After fixing this issue, he built a V2 to closely match the looks of the B2 bomber. Both aircraft were cut from EPP foam with an interesting-looking CNC hot wire cutter and laminated with Kevlar for strength. Continue reading “Eliminate Vertical Stabiliser With ArduPlane”

Recognising Bird Sounds With A Microcontroller

Machine learning is an incredible tool for conservation research, especially for scenarios like long term observation, and sifting through massive amounts of data. While the average Hackaday reader might not be able to take part in data gathering in an isolated wilderness somewhere, we are all surrounded by bird life. Using an Arduino Nano 33 BLE Sense and an online machine learning tool, a team made up of [Errol Joshua], [Ajith KJ], [Mahesh Nayak], and [Supriya Nickam] demonstrate how to set up an automated bird call classifier.

The Arduino Nano 33 BLE Sense  is a fully featured little dev board that features the very capable NRF52840 microcontroller with Bluetooth Low Energy, and a variety of onboard sensors, including a microphone. Training a machine learning model might seem daunting to many people, but online services like Edge Impulse makes the process very beginner-friendly. Once you start training your own models for specific applications, you quickly learn that building and maintaining a high quality dataset is often the most time-consuming part of machine learning. Fortunately for this use case, a massive online library of bird calls from all over the world is available on Xeno-Canto. This can be augmented with background noise from the area where the device will be deployed to reduce false-positives. Edge Impulse will train the model using the provided dataset, and generate a library that can be used on the Arduino with one of the provided sample sketches to log and send the collected data to a server. Then comes the never ending process of iteratively testing and improving the recognition model. Edge Impulse is also compatible with more powerful devices such as the Raspberry Pi and Jetson Nano if you want more intensive machine learning models.

We’ve also seen the exact same setup get used for smart baby monitor. If you want to learn more, be sure to watch at [Shawn Hymel]’s talk from the 2020 Remoticon about machine learning on microcontrollers. Continue reading “Recognising Bird Sounds With A Microcontroller”

See-Through Carburetor Gives A Clear Demonstration

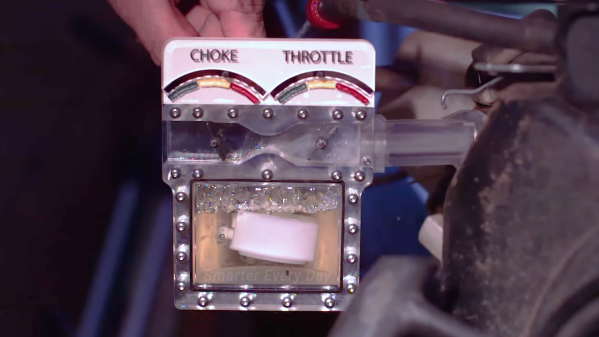
Carburetors have been largely phased out on most automobiles, but for a century they were the standard, and still are on many smaller engines. Armed with a high-speed camera and with the help of his father, [Smarter Every Day] investigates these devices by experimenting with a DIY see-through carburetor connected to a real engine.

The purpose of a carburetor is to mix gasoline and oxygen to the correct ratio for combustion inside the engine. Gasoline flow from the tank to the bowl, from where gets sucked into the venturi. The choke valve adjusts the amount of air entering the carb, while the throttle controls the amount of air-fuel mixture entering the engine. It appears that the carburetor was made from a resin 3D printed body and manifold, with an acrylic cover and PLA throttle and choke valves. It was attached to a single-cylinder engine.

The high-speed footage is incredible, and clearly shows the operation of the carburetor and makes it incredibly easy to understand. If you’re interested, he also uploaded a second video with almost 80 minutes of detailed footage.

[Smarter Every Day]’s infectious curiosity has led to numerous fascinating projects, including a supersonic baseball canon and the backward bicycle.

Continue reading “See-Through Carburetor Gives A Clear Demonstration”

Open Source Ultrasonic Anemometer

Weather stations are a popular project for experimenting with various environmental sensors, and for wind speed and direction the choice is usually a simple cup anemometer and wind vane. For [Jianjia Ma]’s QingStation, he decided to build another type of wind sensor: An ultrasonic anemometer.

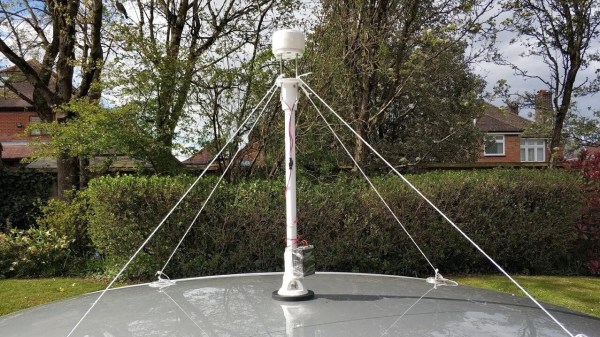
Ultrasonic anemometers have no moving parts but come at the cost of significantly more electronic complexity. They work by measuring the time it takes for an ultrasonic audio pulse to be reflected the receiver across a known distance. Wind direction can be calculated by taking velocity readings from two ultrasonic sensor pairs perpendicular to each other and using a bit of simple trigonometry. For an ultrasonic anemometer to work properly, it requires a carefully designed analog amplifier on the receive side and a lot of signal processing to extract the correct signal from all the noise caused by secondary echoes, multi-pathing, and the environment. The design and experimentation process is well-documented. Since [Jianjia] does not have access to a wind tunnel for testing and calibration, he improvised by mounting the anemometer on his car’s roof and going for a drive. This yielded readings that were proportional to the car’s GPS speed, but a bit higher. This might due to a calculation error, or external factors like wind, or disturbed airflow from the test car or other traffic.

Other sensors include an optical rain sensor, light sensor, lighting sensor, and a BME280 for air pressure, humidity, and temperature. [Jianjia] plans to use the QingStation on an autonomous boat, so he also included an IMU, compass, GPS, and a microphone for environmental sounds. The fact that none of the sensors have moving parts is a major advantage for this use case, and we look forward to seeing the boat project. All the hardware and software are open-source and available on GitHub.

Continue reading “Open Source Ultrasonic Anemometer”

Bellow-Cooled PC Is A Well Engineered Display Piece

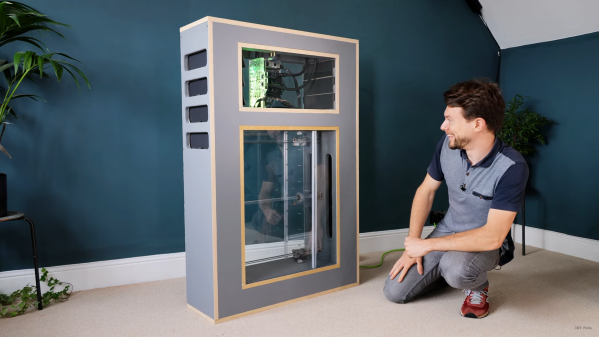
The cooling systems on high-performance PCs are often a large part of their visual appeal, but we’ve never seen anything like [DIY Perks]’ latest build: A massive bellow-cooled PC.

The system is derived from a silent bellow system built by [DIY Perks] in 2020. It uses a clever combination of hydraulics and neodymium magnets to smoothly reciprocate a large plate within a chamber. Instead of blowing the air straight into the room, it pushes it through a pair of wood ducts into a second chamber with PC components, and out through a water-cooling radiator. To prevent the hot air from being sucked back in as the bellow reciprocates, a row of check valves was added on each side of the PC chamber and at the external intakes. The sides of the bellow chamber and PC chamber are made of glass to allow a full view of the internal components.

The build was not without complications. While disassembling the old bellow, the acrylic tube in which the magnet reciprocates shattered. When a replacement rube arrived, [DIY Perks] discovered the magnet’s fit was very loose. He solved this by increasing the thickness of the magnet’s nickel coating with another run of electroplating. To achieve a uniform coating, he agitated the plating solution by suspending the magnet from a small speaker playing a sine-wave tone. The cooling performance is excellent, keeping the CPU and GPU at 60C or below, even while running them at full tilt.

Continue reading “Bellow-Cooled PC Is A Well Engineered Display Piece”

Litter Buggies Haul Trash Off The Beach

There is a depressing amount of trash in our oceans, and a lot of it is washes up on beaches. [Glenn Morris] has turned collecting all this trash into a favourite pastime, using a series of custom radio-controlled Litter Buggies to haul the load.

The most basic versions of these buggies are off the shelf RC rock crawlers, usually a Traxxas TRX-4, with a basket mounted in place of the body. However, [Glenn] has developed the buggies far beyond that, making extensive use of 3D printing to create purpose-built trash haulers. He has created several frame systems to hold removable baskets, buckets, lights and tools. Most of the buggies use lithium power tool batteries to allow quick swapping, and the electric motors, ESCs and gearing is selected for low speed and high torque. Since the buggies spend a lot of time exposed to salt water, almost all the steel hardware on the chassis are replaced with stainless steel. To allow for one handed control, [Glenn] attached 3D printed levers to the steering knobs of the standard RC controllers, allowing steering to be done with his thumb.

We really like what [Glenn] has been doing with these buggies, and think they might be a good platforms for adding some autonomous capabilities. Add a smartphone for target following or obstacle avoidance, or some solar panels and a GPS autopilot system.

Continue reading “Litter Buggies Haul Trash Off The Beach”

Convert Your Mouse Into A Paddle Controller

Early game consoles had a wide and interesting variety of controllers, many of which fell by the wayside as consoles evolved. One of these is the Atari 2600 paddle controller, which was the preferred interface for playing games like Kaboom!, Tempest, and Pong.  While it is possible to play these games with a mouse, [Retro Gaming I Guess] wanted to do it the historically correct way, so he created a simple hack to convert an optical mouse into a paddle controller.

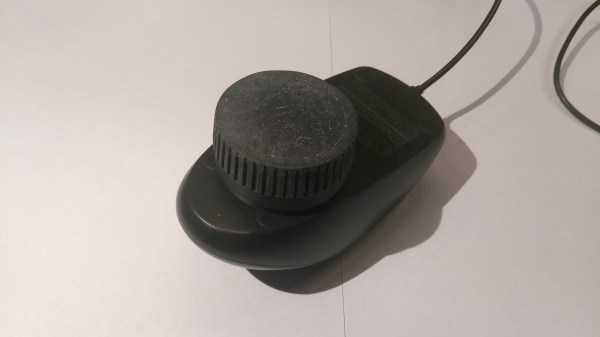
The main idea Is to attach a rotary knob to the bottom of the mouse, with the optical sensor located just inside the edge of the knob. To the optical sensor, it appears that the bottom surface of the knob is moving in a straight line, so the mouse pointer will move in a straight line as the knob rotates. The 3D printed knob (or bottle cap) is magnetically attached to the bottom of the mouse, by gluing one magnet into the center of the knob, and the other on the inside of the mouse under the PCB. This allows for quick conversion back to a normal mouse. You could off course sacrifice an old mouse to the cause to create a dedicated paddle controller, and make it closer to the original by adding end stops and a spring return.

We really like the simplicity of this hack, and we’re sure our readers can come up with a few other use cases for it in the comments below. You can also approach old Atari games from the opposite end, like adding a machine vision powered laser blaster. While many may think the Atari 2600 was the first gaming console, that honor actually goes to the Magnavox Odyssey, which was the start the of the multi-billion dollar home gaming industry we know today.