So Close To Landing A Model Rocket On Its Tail

We’ve become so used to seeing SpaceX boosters land themselves back on the pad with clockwork reliability, that it’s easy to forget it took them a good number of attempts to get right. Inspired by SpaceX’s work, [Joe Barnard] of [BPS.Space] started working to replicate it at the model scale five years ago, with no engineering education or experience. On the latest attempt with a brand-new thrust vectoring Scout E rocket, he has gotten tantalizingly close to doing a controlled propulsive landing with a solid-fuel rocket motor.

We’ve all been thrilled to see the SpaceX rockets return to earth, landing elegantly on a floating pad. But those are liquid-fueled. The trick with a solid-fuel rocket motor is it can’t be throttled directly, which is a challenge when you need precision control to land. Thanks to [Joe]’s custom AVA flight computer and the remarkably consistent thrust curve of the Estes F15 black powder motors he used, it becomes a matter of igniting the descent motor at the right moment to make the vertical velocity zero at touchdown. However, [Joe] found that the time between sending the ignition signal and when peak thrust is reached was inconsistent, so he had to work around that. He did this by controlling how much of the thrust is spent in the vertical direction, by vectoring the motor side to side to spend some trust horizontally.
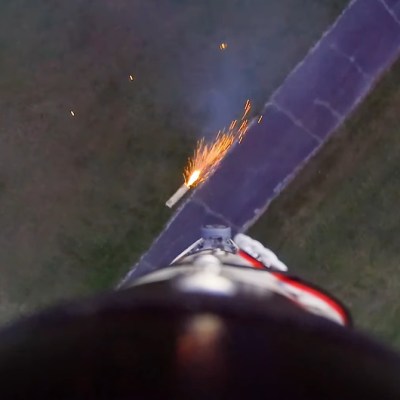
View from rocket of the ascent motor falling away immediately after being ejected

In this attempt, the rocket tipped over on landing due to excessive horizontal movement at touchdown. Joe tracked the cause down to a weak GPS signal caused by antenna position and a possible bug in the Kalman filter that fuses all the sensor data for position and velocity estimation. Thanks to incredibly detailed telemetry and logging done by the flight computer, data from every launch are used for future improvements. We are looking forward to the next flight in a few weeks, during which [Joe] plans to tune and test the control software, among other minor improvements.

Almost every single part of this rocket is a display of engineering ingenuity. The landing struts are designed to absorb as much impact as possible without bouncing while being light and quick to deploy. The ascent motor is ejected simply by moving the thrust vectoring mount to one of its extremes, allowing the descent motor to drop into place. The rocket also features a complete emergency abort system with a parachute, which can be activated manually, or by the flight computer if it calculates that landing isn’t feasible. We already covered [Joe]’s latest launch pad, which is a very interesting project all by itself.

Continue reading “So Close To Landing A Model Rocket On Its Tail”

Escape Tunnel In Your Living Room: A Different Take On The Infinity Mirror

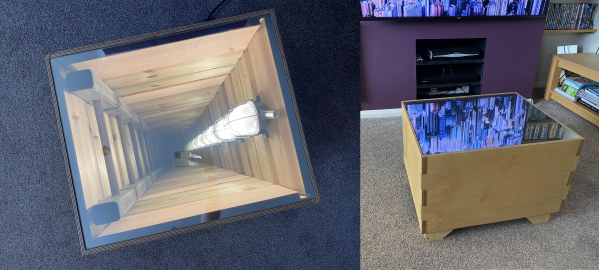
Most infinity mirrors are just minor variations on the same old recipe. Take a frame, add a normal mirror in the back, a one-way mirror on the front, and put some LEDs between them. [Stevens Workshop] took a slightly different approach and built an escape tunnel coffee table that really caught our attention.

To create the tunnel and ladder illusion, [Steven] kept the mirrors, but made a deeper wood frame, installed a light bulb in an industrial-looking socket instead of the usual LEDs, and added a single ladder rung. The end result makes for a very interesting conversation piece, and some of us prefer it to the multicolored LED look. Though he added his own touches, the idea was actually borrowed from from [asthhvdrt36] and [BreezleSprouts] on Reddit who used slightly different light and ladder designs.

While there’s nothing groundbreaking here, it’s certainly a case of “why didn’t I think of that”. Sometimes the old and familiar just needs a different perspective to create something fascinating. One of the advantages of the classic infinity mirror is the thin profile, which we’ve seen integrated into everything from guitars to coasters.

Watching The Global Oil Trade With Satellite Imagery

The global oil market plays a large role in the geopolitical arena, and it is often in the interest of various role players to conceal the figures on production, consumption and movement of oil. This may simply to be to gain an advantage at the negotiation tables, or to skirt around international sanctions. The website [TankerTrackers] is in the business of uncovering these details, often from open source intelligence. Using satellite imagery, they are using a simple way to monitor the occupancy crude oil storage facilities around the world.

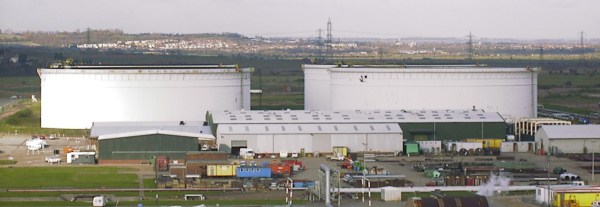
The key is in the construction of large capacity crude oil storage tanks. To prevent the flammable gasses emitted by crude oil from collecting inside partially empty tanks, they have roofs that physically float on top of the oil, moving up and down inside the steel sides as the levels change. By looking at imagery from the large number of commercial satellites that constantly photograph earth’s surface, one can determine how full the tanks are by comparing the length of a shadow inside the tank to the shadow outside the tank. Of course, you also need to know the diameter and height of a tank. Diameter is easy, just use Google Earth’s ruler tool. Height is a bit more tricky, but can often be determined by just checking the facilities’ website for ground level photos of the tanks. Of course these methods won’t give you exact numbers, but it’s good enough for rough estimates.

Another interesting detail we found perusing the [TankerTrackers] news posts (requires sign-up) is that tankers will sometimes purposefully switch off their AIS transponders, especially when heading to and from sanctioned countries such as Venezuela and Iran. Even in today’s world of omnipresent tracking technologies, it’s surprisingly easy for a massive ship to just disappear. Sometimes [TankerTrackers] will then use imagery to track down these vessels, often by just watching ports.

Thanks for the tip [Arpad Toth]!

Photo by [Terryjoyce] CC BY-SA 3.0

Open Source Self-Driving Smartphone Robot

Our smartphones are incredibly powerful computers in their own right, yet we don’t often see them directly integrated into projects. Intel Intelligent Systems Lab has done exactly that with the release OpenBot, an open source smartphone based self-driving robot.

Most of the magic happens on the smartphone, which runs an app built on TensorFlow Lite, and integrates the camera and array of sensors on the smartphone, as well as the data from ultrasonic sensors and wheel encoders on the robot. The robot itself is relatively simple, with four geared DC motors, motor drivers wired to an Arduino Nano that interfaces with an Android Phone over serial.

The app created by the Intel ISL team comes preloaded with three AI models that can do either person following, or two different modes of autonomous navigation. By connecting a Bluetooth controller to the smartphone and drive the robot around manually in your specific environment while collecting data, you can train a custom autonomous driving policy to suit your environment.

This looks like an excellent way to get a taste of autonomous robots on a small budget, while still being a viable base for more demanding applications. We’ve seen only a few smartphone based robots like DriveMyPhone and SmartiPresense, which don’t have AI capabilities, but are intended for telepresence applications. We’ve always wondered why we don’t see more projects with cellphones, so we welcome the example.

Continue reading “Open Source Self-Driving Smartphone Robot”

Giant Blacksmith Vise From Start To Finish

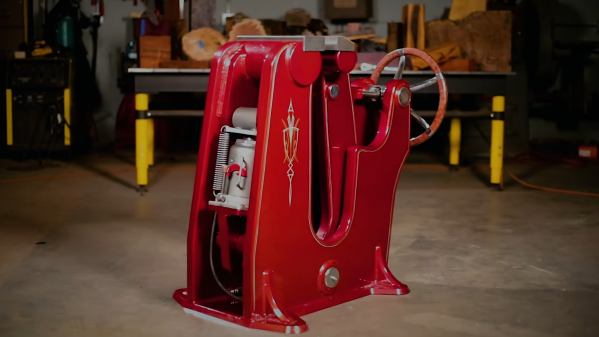
In any proper workshop you want to be able to securely hold a workpiece, whether it’s a tiny PCB or a heavy piece of forged steel. [Jason Marburger] from Fireball Tool needed a really large heavy-duty vise, so he built himself a massive 1490 lbs / 676 kg floor-standing blacksmith vise from scratch.

Blacksmith vises are designed to take a lot of heavy abuse, such as holding heavy pieces of steel that are being hammered. [Jason]’s vise stands about 3 feet tall, and the main frame components were cut from 1 5/8 inch (41.3 mm) steel with a water jet cutter. The jaws are operated with a large hand wheel connected to a lead screw. Bearings on the lead screw allow the hand wheel to be spun like a flywheel, allowing it to be quickly opened and closed. The weight of the moving jaw keeps the lead screw under tension, eliminating any backlash. This allows for really fine control over the holding force, which [Jason] demonstrates by carefully clamping a tiny screw. With the hand wheel alone the vise can exert 12880 lb / 5800 kg, but a hydraulic lift was also added, boosting the force to 30000 lbs. The deep throat allows a large object to be clamped, and the jaws can also be offset to clamp something to the side of the vise.

The vise was beautifully finished with powder coating and pin striping, which will no doubt wear over time if it’s properly used, but the vise itself should last a few lifetimes. While this isn’t something you can really build in a home workshop, it is always inspiring to see what is possible with a bit more tools, knowledge and skill. The build is documented in a 4 part series (link in first paragraph), but we’ve added a short highlights reel below for your viewing pleasure.

Continue reading “Giant Blacksmith Vise From Start To Finish”

DualShock Flight Simulator Yoke

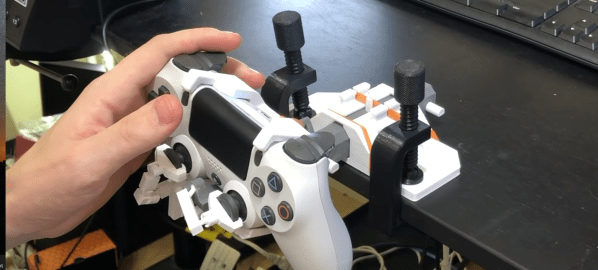
Aircraft control interfaces can be divided into stick or yoke, with the stick being more popular for flight simulators. [Akaki Kuumeri] has been designing some ingenious 3D printed adaptors for game console controllers, and his latest build is a yoke adaptor for the PlayStation DualShock Controller.

Like his previous joystick/throttle combination, this yoke makes use of a series of ball and socket links to convert the yoke’s push/pull and rotation motion into the appropriate inputs on the controller’s thumbs sticks. All the components are 3D printed except for rubber bands to provide spring tension. On the sliding contact surfaces between the different components, [Akaki] specifically designed the parts to slide along the grain (layer lines) to allow for smooth motion without resorting to bearings.

If you want an absolute minimalist yoke, tape some potentiometers to a desk drawer. Or you can go to the other end of the scale and build a complete cockpit. With the arrival of Microsoft Flight Simulator 2020, we’ll be seeing a lot of controller builds.

Minimalist Low Power Supercapacitor Sensor Node

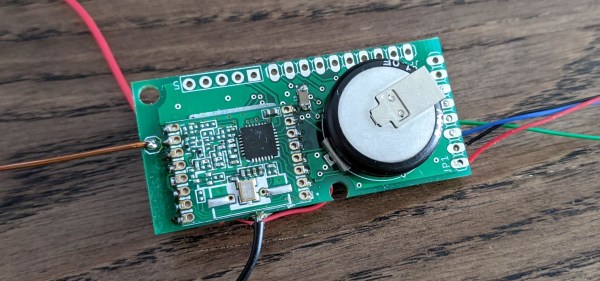
One of the biggest challenges for wireless sensor networks is that of power. Solar panels usually produce less power than you hoped, especially small ones, and designing super low power circuits is tricky. [Strange.rand] has dropped into the low-power rabbit hole, and is designing a low-cost wireless sensor node that runs on solar power and a supercapacitor.

The main components of the sensor node is an ATMega 328P microcontroller running at 4Mhz, RFM69 radio transceiver, I2C temperature/humidity sensor, 1F supercapacitor, and a small solar panel. The radio, MCU, and sensor all run on 1.5-3.6V, but the supercap and solar panel combination can go up to 5.5V. To regulate the power to lower voltage components a low-drop voltage regulator might seem like the simplest solution, but [strange.rand] found that the 3.3V regulator was consuming an additional 20uA or more when the voltage dropped below 3.3V. Instead, he opted to eliminate the LDO, and limit the charging voltage of the capacitor to 3.6V with a comparator-based overvoltage protection circuit. Using this configuration, the circuit was able to run for 42 hours on a single charge, transmitting data once per minute while above 2.7V, and once every three minutes below that.

Another challenge was undervoltage protection. [strange.rand] discovered that the ATmega consumes an undocumented 3-5 mA when it goes into brown-out below 1.8V. The small solar panel only produces 1 mA, so the MCU would prevent the supercapacitor from charging again. He solved this with another comparator circuit to cut power to the other components.

We see challenges like these a lot with environmental sensors and weather stations with smaller solar panels. For communication, low power consumption of a sub-Ghz radio is probably your best bet, but if you want to use WiFi, you can get the power usage down with a few tricks.