How To Design A BGA Breakout Module

Surface mount devices can take some adjusting to for hackers primarily used to working with through-hole components. Despite this, the lure of the hottest new parts has enticed even the most reticent to learn to work with the technology. Of course, time rolls on and BGA parts bring further difficulties. [Nate] from SparkFun worked on the development of the RedBoard Artemis, and broke down the challenges involved.

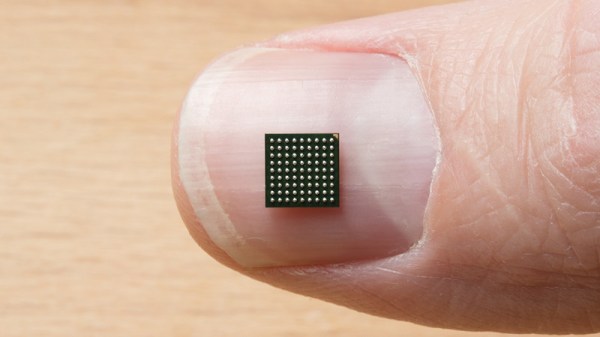
The RedBoard Artemis is an Arduino-compatible devboard built around the Ambiq Apollo3 chip. In addition to packing Bluetooth and 1 MB of Flash, it’s also capable of running TensorFlow models and using tiny amounts of power. The chip comes in an 81-Ball Grid Array at 0.5mm pitch, which meant SparkFun’s usual PCB fabrication methods weren’t going to cut it.

An initial run of prototype boards was run using 4 layers, blind and buried vias, and other fancy tricks to break out all the necessary signals. While this worked well, it was expensive and inefficient. The only part of the board that needed such fabrication was around the chip itself; the rest of the board could be produced with cheaper 2-layer methods. To improve this for mass production, instead, an SMD module was created to house the Apollo3, which could then be dropped into new designs on cheaper boards as necessary.

[Nate] does a great job of explaining the engineering involved, as well as sharing useful tips for others going down a similar path. So far, this is just part 1, with future posts promising to cover the RF shield design and FCC certification process. [Nate] has always been keen to share his wisdom, and we can’t wait to see what comes next!

This Handheld C64 Design Study Needs To Be Made

The Commodore 64 remains the best selling home computer of all time, and is unlikely to be toppled anytime soon. It continues to inspire a diehard community of makers and hackers to this day. [Cem Tezcan] is one of those people, and his design study of a handheld C64 is utterly droolworthy.

It’s quite likely that you’d run out of power before the cassette finished loading, but hey, we can dream.

The study includes renders of the device from several angles, as well as a basic blueprint outlining the various components. It features period accurate hardware, using a membrane keyboard, micro-cassettes for data storage, and a 3.5″ CRT. Other nice touches are the big red textured FIRE button, and a horrible early 80s 3.5mm jack.

The C64 hardware of the time required both 12 V and 5V power, and the current draw of even a small CRT would be high. It’s likely such a handheld would have battery life measured in minutes. It’s a wonderful picture of what could have been, though we suspect that such a design would have pushed the limits of the technology of the time.

However, electronics has matured since, and we sit here rather comfortably in 2019. We’d love to see the best handheld C64 that the community can muster, and with 3D printers and FPGAs on hand, it’s an eminently achievable feat. Bonus points to anyone who can make a microdatasette interface, too. All submissions to the tips line, and meanwhile, consider how easy it is to build a new C64 from scratch. Happy hacking!

Double Pendulum Uses Custom Slip Rings

Rotating mechanisms can be a headache when it becomes necessary to deliver power through them. [Igor Brkic] faced just such a challenge when creating his double-pendulum build, and solved it with a little DIY.

The project is known as KLAATNO, inspired by the Croatian word for pendulum, klatno. It’s a mechanical installation piece, consisting of a power-assisted pendulum, with a second pendulum fitted at the end of the swinging arm. A 24 volt geared motor is used to drive the assembly. It’s controlled by an Arduino Pro Mini, which measures the back EMF from the motor terminals to determine the speed and direction of the motor’s movement.

To make the installation more visually striking, EL wire was installed on the swinging arms of the twin pendulums. This required the transfer of power to the rotating assembly, which was achieved through the use of custom made slip rings. Copper sheet is used in combination with a flexible metal wire sourced from a guitar string. It’s not as low-friction as [Igor] would like, but it gets the job done.

It’s a fun installation that would be perfectly at home in the common area of any university engineering building. Of course, our favorite pendulums are of the siege weapon variety. Video after the break.

Continue reading “Double Pendulum Uses Custom Slip Rings”

Credit Card Skimmers Evolve – Shimmers Are Here

Credit cards are loaded with security features, but the game of cat and mouse goes on. Nefarious syndicates continue to develop technology to steal data in new and innovate ways. After SparkFun did a teardown on some illicit hardware, they were visited by local law enforcement, who requested their help once more.

[Nick] from SparkFun refers to the device in question as a “shimmer”. It’s intended to be installed inside the chip reader of a credit card terminal, in between the terminal and the user’s credit card. Fabricated on a flexible film PCB, it’s thin enough to glue inside without being obvious even during maintenance.

The investigation begins with identification of the major components on board, followed by attempts to communicate with the device. Unfortunately, the hardware was largely unresponsive, even when connected to a card reader. In an effort to learn more, a schematic was produced. [Nick]’s analysis raised more questions than answers, and the suspicion is that the hardware may have been damaged at some point. However, the basic capabilities of the device are obvious, given the ability of the hardware to interact with a card via its contacts and offload the data through the onboard nRF24L01 radio module.

Thanks to people like [Nick], and earlier work from SparkFun, we all now have a better understanding of the risks when using payment terminals out in the wild. Unfortunately, unless your local gas station is willing to let you spend 20 minutes disassembling their card reader before paying, there’s not a whole lot the individual can do about it. Stay vigilant, and if you’ve got the skinny on a skimmer, drop us a line.

Quick And Dirty Digital Conversion For Analog SLR

The unarguable benefits of digital photography has rendered the analog SLR obsolete for most purposes. This means that a wide selection of cameras and lenses are available on the second hand market for pennies on the dollar, making them ripe targets for hacking. [drtonis] decided to experiment with a quick and easy digital conversion to an old Canon A-1, and it’s got us excited about the possibilities.

Who needs Instagram filters? Just distort in-camera!

It’s a simple hack, but a fun one. The SLR is opened up, and the spring plate for holding the film is removed. A Raspberry Pi camera then has its original lens removed, and is placed inside the film compartment. It’s held in with electrical tape, upon a 3mm shim to space it correctly to work with the original optics.

[drtonis] notes that the build isn’t perfect, with some aberration likely caused by the reflective electrical tape in the film cavity. However, we think it’s a nice proof of concept that could go so much further. A Raspberry Pi Zero could be easily squeezed inside along with the camera, and everything glued in place to make things more robust. A specialist paint such as Stuart Semple’s Black 2.0 could also help cut down on light leaks inside. Plus, there’s plenty of small screens that can be used with the Raspberry Pi that would provide a useful preview function.

We’d love to see more conversions like this one. While it’s unlikely they’ll compete with commercial DSLRs on outright performance, everyone loves a little bit of charming distortion here and there, and all manner of fancy lenses can be had for cheap for analog platforms. We’ll be keeping a close eye on the tipline for further This fundevelopments – you know what to do!

Continue reading “Quick And Dirty Digital Conversion For Analog SLR”

5 Kilowatts In A 3D Printed Jet Boat

Radio control projects used to be made of materials such as metal or wood, and involve lots of hand crafted parts. That’s still one way to go about things, but 3D printing has become a popular tool in recent years. [RCLifeOn] has been working on a 3D printed jet boat, which recently got a serious power upgrade.

The boat in question received a 5000W brushless motor – significant power for a vehicle weighing less than 2kg. Powered by a 12S lithium pack, and outfitted with a water jacket for cooling, it drives the boat through an off-the-shelf turbine after initial attempts to DIY the drivetrain were unsuccessful.

The biggest problem in the project came from coupling the motor to the turbine. A 3D printed coupler was unable to hold up to the strain, while attempts to make a metal part failed due to the lack of a lathe. Eventually the solution was found by daisy chaining two off-the-shelf parts together.

The boat proved itself ably on the water, with the large motor proving more than capable of shifting the boat at a strong clip. It’s an excellent shakedown for the parts that will eventually find themselves in a powered surfboard build. We’ve seen [RCLifeOn]’s work before, too, like these stylish 3D printed sneakers. Video after the break.

Continue reading “5 Kilowatts In A 3D Printed Jet Boat”

Aging Alcohol In 30 Minutes

Many alcoholic beverages are aged in barrels for long periods of time. The aim is to impart flavors from the wood of the barrel into the liquid, and allow a whole host of chemical reactions to happen, changing the character of the taste. However, this takes time, and time is money. There’s potentially a faster way, however, and [The Thought Emporium] set out to investigate.

Inspired by several research papers, the goal was to examine whether using ultrasound to agitate these fluids could speed the aging process. Initial tests consisted of artificially aging milk, apple cider, and vodka in a small ultrasonic jewelry cleaner for 30 minutes, with cognac chips for flavor. Results were positive amongst the tasters, with the vodka in particular showing a marked color change from the process. A later test expanded the types of wood chip and beverages under test. Results were more mixed, but with a small sample size of tasters, it’s to be expected.

While taste is subjective, there were definite visible results from the aging process. It’s a technique that’s being explored by industry, too. We’ve seen hackers brew up plenty of tasty beverages before, too – often with a little automation thrown in Video after the break.

Continue reading “Aging Alcohol In 30 Minutes”