Closeup of the car dash with nixie tubes

Retro Future Nixie Corvair Instrument Panel

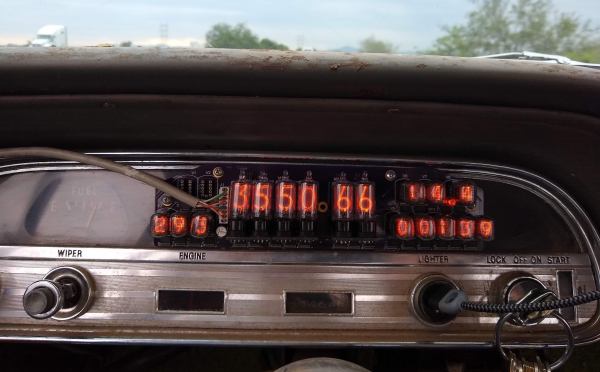
The future we know today looks very different than the one envisioned in the 60s and 70s. For starters, it has far too few Nixie tubes. An oversight [nixiebunny] wants to address with his Nixie tube instrument panel.

All the essential info is there: engine temperature, tachometer, speed, battery voltage, and even odometer. You might have noticed that there isn’t a clock. The justification that [nixiebunny] gives is that he’s always wearing his Nixie watch, so a clock in his car seems redundant. There is also a gap in the panel to allow an oil pressure display. Corvairs are known for throwing belts next to the oil sender, so any attached sensor needs to be designed well and thought through. A Teensy receives engine telemetry data (no OBDII port to hook into — GM didn’t come out with the first OBD port until the 80s) from the engine bay. The data is transformed into SPI data sent to the 74HC595 shift register chain via a CAT5 cable. Details are a little sparse, but we can see a custom PCB to fit the shape of the hole in the dash with the different Nixie tube footprints silkscreened on.

We love seeing Nixie tubes in unexpected places. Like this POV Nixie clock or this Nixie robot sculpture.

Remoticon 2021 // Matt Venn Helps You Make ASICS

What would you make if you were given about ten square millimeters of space on a silicon wafer on a 130 nm process? That’s the exact question that the Open MPW program asks, and that [Matt Venn] has stepped up to answer. [Matt] came to Remoticon in 2020 to talk about his journey from nothing to his own ASIC, and he came back in 2021 to talk about what has happened in a year.

image of the metal layers of an IC
[maxiborga] has been making beautiful renders of his and others’ chip designs
We expected great designs, but the variety of exciting and wonderful designs that have been submitted we think exceeded our expectations. [Matt] goes through quite a few of them, such as an analog neuron, a RISC-V Arduino-compatible microprocessor, and a satellite transceiver. Perhaps an unexpected side effect has been the artwork. Since the designs are not under an NDA, anyone can take the design and transform it into something gorgeous.

Of course, all of this hardware design isn’t possible without an open toolchain. There is an SRAM generator known as OpenRAM that can generate RAM blocks for your design. Coriolis2 is an RTL to GDS tool that can do placement and routing in VLSI. Finally, FlexCell is a cell library that tries to provide standard functions in a flexible, customizable way that cuts down on the complexity of the layout. There are GitHub actions that can run tests and simulations on PRs to keep the chip’s HDL in a good state.

However, it’s not all roses, and there was an error on the first run (MPW1). Hold time violations were not detected, and the clock tree wasn’t correct. This means that the GPIO cannot be set up, so the designs in the middle could be working, but without the GPIO, it is tricky to determine. With a regular chip, that would be the end, but since [Matt] has access to both the layout and the design, he can identify the problem and come up with a plan. He’s planning on overriding the IO setup shift register with an auxiliary microcontroller. (Ed Note: [tnt] has been making some serious progress lately, summarized in this video.)

It is incredible to see what has come from the project so far, and we’re looking forward to future runs. If this convinces you that you need to get your own ASIC made, you should check out [Matt]’s “Zero to ASIC” course.

Continue reading “Remoticon 2021 // Matt Venn Helps You Make ASICS”

A PNG Based Circuit Simulator

We’re sure thousands of hours have been spent in Minecraft implementing digital logic. Inspired by that, [lynnpepin] created a digital logic simulator named Reso that is based on pixels rather than voxels.

There are a few clever things here. First, different colors represent different parts. There are three different colors of wire, output and input wires, XOR gates, and AND gates. OR gates are just output wires, which or all the input wires together. By implementing these gates, Reso is, by definition, Turing complete. Since it’s just a PNG, it is trivial to open it up in GIMP and copy and paste one bit of the circuit multiple times. The different color wires are mainly to help route in a 2d plane, as you don’t have vias. Currently, the image compiles into a graph that is executed. [Lynn] chose code readability and ease of prototyping over premature optimization, so the code isn’t particularly fast. But it is pretty fun, squinting at the pixels that make up the adders and clocks he has on his blog. After giving Reso your image, it outputs a series of images that enumerate the state for several states.

The code is available on Github, and a Rust version has already been written that offers some impressive speed improvements at the expense of not being at feature parity yet. If MS-Paint isn’t your IDE of choice, perhaps a more Javascript-based digital logic simulator might be more to your taste.

the rotary piston

There’s A Wrinkle In This 3D Printed Wankel

Rotary engines such as the Wankel have strange shapes that can be difficult to machine (as evidenced by the specialized production machines and patents in the 70s), which means it lends itself well to be 3D printed. The downside is that the tolerances, like most engines, are pretty tight, and it is difficult for a printer to match them. Not to be dissuaded, [3DprintedLife] designed and built a 3D printed liquid piston rotary engine. The liquid piston engine is not a Wankel and is more akin to an inside-out Wankel. The seals are on the housing, not the rotor itself, and there are three “chambers” instead of two.

The first of many iterations didn’t run. There was too much friction, but there were some positive signs as pressure was trapped in a chamber and released as it turned. The iterations continued, impressively not using any o-rings to seal, but instead sanding each part down using a 1-2-3 block as a flat reference, within 25 microns of the design. Despite his care and attention to detail, it still couldn’t self-sustain. He theorizes that it could be due to the resin being softer than other materials he has used in the past. Not to be left empty-handed, he built a dynamo to test his new engine out. It was a load cell and an encoder to measure speed and force. His encoder had trouble keeping up, so he ordered some optical limit switches.

This engine is a follow-on to an earlier 3D printed air-powered Wankel rotary engine, and we’re looking forward to part two of the liquid piston series. Video after the break.

Continue reading “There’s A Wrinkle In This 3D Printed Wankel”

the algae panel

Move Aside Solar, We’re Installing An Algae Panel

[Cody] of Cody’sLab has been bit by what he describes as the algae growing bug. We at Hackaday didn’t know that was a disease floating around, but we’ll admit that we’re not surprised after the last few years. So not content to stick to the small-time algae farms, [Cody] decided to scale up and build a whole algae panel.

Now, why would you want to grow algae? There are edible varieties of algae, you can extract oils from it, and most importantly, it can be pumped around in liquid form. To top it off, all it needs is just sunlight, carbon dioxide, and a few minerals to grow. Unlike those other complicated land-based organisms that use photosynthesis, algae don’t need to build any structure to hold themselves up or collect sunlight; it floats.

The real goal of the algae is to build a system known as “Chicken Hole.” The basic idea is to have a self-sufficient system. The algae feed the insects, the insects feed the chickens, and so on up the chain until it reaches [Cody]. While glass would make an ideal material for the algae tubes, plastic soda bottles seem like a decent proxy for a prototype and are much cheaper. He connected around 100 half-liter bottles to form long tubes and a PVC distribution system. The algae needs to be pumped into an insulated container to prevent it from freezing at night. At first, a simple timer outlet controlled the pump to only run during the day, draining it via gravity at night. However, the algae can’t heat up enough when running on cloudy, cold winter days, and it cools off. A solar panel and a temperature sensor form the logic for the pump, with a minimum temperature and sunlight needed to run.

[Cody] mentions that he can expect around 10 grams of algae per day on a panel this size in the winter. He’s going to need quite a few more if he’s going to scale up properly. Perhaps in the future, we’ll see panels growing algae robots? Video after the break.

Continue reading “Move Aside Solar, We’re Installing An Algae Panel”

Making Something Gorgeous From Framing Lumber

Here at Hackaday, we typically cover things that blink, bleep, and occasionally they might even bloop. However, the name of the site is Hackaday. We’re about being clever, reusing things in new ways, and most importantly celebrating interesting projects. While not a traditional project that would grace the front page, we would argue that this nightstand made from framing lumber clearly belongs.

Framing lumber is infamous for being squirrely, weird, and heavily knotted. Most serious furniture makers avoid using the cheap stuff and opt for more expensive harder woods. Here in the US, the big box hardware stores carry cheap fast-grown soft pine that has significant amounts of warp and twist inherent in the wood. The process of getting it straight with right-angle corners is involved and even once it has been cut, the internal stresses inside the wood are released, rendering the board twisted and warped again over time. The timelapse process of planing, jointing, and cutting in the video has an almost therapeutic aspect to it. The results are two wonderful pieces of useful furniture that would look at home in most rooms.

The craftsmanship evident in the build is noteworthy but more impressive is the process of taking cheap and unfit materials and making something beautiful out of them. Perhaps if you’re inspired and decide to make your own nightstand this weekend, you can add some touch-sensitive electronics to it. Video after the break.

Continue reading “Making Something Gorgeous From Framing Lumber”

No ARM Printer Driver? Just Write Your Own

When you think of the small machines that print the sticky labels on packages, you might not expect to find a complex printer with its own programming language (ZPL). However, [Dan Pastusek] was looking around online and found a small label printer on everyone’s favorite online warehouse for a great price that suggested it supported ZPL. Unfortunately, [Dan] had big dreams for creating a Raspberry Pi-based print station and found the drivers packaged for this particular printer were not ARM compatible. Not quite content to leave it there, he began to chip away at the layers until he had a working driver.

ZPL, at its core, is just a language describing ASCII commands transmitted over a serial connection. So while the printer showed up as an endpoint, it wasn’t working as the filters (the part of the driver that knows how to convert from a PNG to ZPL) was x86 only. On Linux, printer drivers also have a PPD file that describes what a printer can handle in paper size and other settings. The PPD file for the little printer gave the first clue. In the ShortNickName field, it identifies itself as HPRT N41, which is a popular HP printer. So this little printer must be a clone of a printer in that family. Notably, they don’t support ZPL. Instead, the HPRT series support TSPL, another printer language developed by TSC.

This presented a problem as the shipping service that provided the labels that [Dan] was using offered labels in three formats: PNG, PDF, and ZPL. Currently, it does seem like there’s a TSPL to ZPL converter out there for use, so rather than write his own, he took a shortcut and wrote a rasterizer instead. Initially, he tried to use some sample code that he found, and while he got something to come out of the printer, it was blank. So the next test was to save the raw TSPL output from a filer and cat directly to the serial port. This worked amazingly. Next, he wrote a converter to take a PNG and convert them into the bitmap format the TSPL has. The converter is in Javascript as it runs as part of the webserver that manages the print station. Could it be faster in a different language? Sure. But a different language wouldn’t make the printer any faster.

With the addition of a wireless barcode scanner, it’s satisfying to see the print station up and running. Here at Hackaday, we’re no stranger to seeing folks take apart printers to peel back the software and physical layers that make them up.