The ray tracer racer

Whipping Together A Little Ray Tracer Racer

When you hear raytracing, you might think of complex dark algorithms that to stare too long at their source code invites the beginning of madness. And you’re technically not far off from the truth, but [h3r2tic] put a small open-source ray tracing game demo up on GitHub. The actual rust code powering the game is relatively short (just four files), with the longest file being the physics file. But, of course, there is a small mountain of code under this sample in the form of libraries.

Kajiya, physx-rs, and dolly are the three libraries that make this little demo possible. Kajiya, in particular, is what makes raytracing possible as it uses the newer RTX features (so only more recent Nvidia and AMD cards are supported) and Vulkan bindings. But, of course, it isn’t wholly ray-traced as we are still several years out from proper real-time raytracing. Nevertheless, the blend between raytracing and traditional rasterization looks incredible. The most important thing about this simple tiny sample isn’t the game itself but what it stands for. It shows how easy it is to create a sample like this. Even just five years, creating a demo like this required massive effort and expertise.

Visually, it is stunning to look at. While the reflections are most apparent, the takeaway from this is the ease that real-time global illumination brings. A quick look through the code shows that there are very few lights in the scene, despite looking well lit with soft shadows. Traditional video games spend a significant amount of development time lighting a scene, placing additional lights, and tweaking them to make up for all the shortcuts that lighting has to take in a rasterized environment. As more and more games are built with raytracing in mind rather than tacked on at the end, we can ditch the small crumbling mountain of hacks that we are forced to use in games today and just rely on the rays to accurately light a scene.

If using a library for your raytracing seems too easy, perhaps you’d like to take on the challenge of raytracing in excel. Video after the break.

Continue reading “Whipping Together A Little Ray Tracer Racer”

Inspecting a SIM card via MTM

Diving The Depths Of Ma Bell

The modern smartphone is a marvel of sensors, radios, inputs, outputs, and processing power. In particular, some of those radios, such as WiFi and cellular, have grown fiendishly complex over the years. Even when that complexity is compressed down for the user into the one-dimensional space of the signal strength bars at the top of your phone. So when [David Burgess] was asked to look at some cellphone records of text messages and figure out where some of the more mysterious messages were coming from, it led him down a rabbit hole into the dark arts behind the glowing phone screen.

The number in question was 1111340002, sent by a phone connected to AT&T at the time, and was crucial for a legal case around distracted driving. [David’s] tools in his investigation were YateBTS (a cellular network simulator), SimTrace2 (pictured above), and old reliable Wireshark. Since the number isn’t a specific phone number and is not reachable from the public phone network, it must be a unique number inside AT&T processed by one particular AT&T SMSC (Short Message service center). The SMSC in question is in Atlanta and isn’t a typical texting center, so it must have some particular purpose. The message’s payload is raw binary rather than text, and [David] has done a pretty good job of decoding the majority of the format.

The most exciting revelation in this journey is that the phone (in the traditional sense) does not send this message. The processor on the phone does not know this message and executes no code to send it. Instead, the SIM card itself sends it. The SIM card is connected directly to the baseband processor on the phone, and the baseband polls the sim every so often, asking for any commands. One of those commands is an SMS (though many other commands have worrying consequences).

The SMS that [David] was chasing is triggered whenever a SIM detects a new IMEI, and the message lets the network know what about the previous and current IMEI. However, in the case of this message, it was unlikely that the SIM changed phones, so what happened? After some additional lab work and the deposition of an AT&T employee, [David] showed that a baseband firmware update would also trigger this SMS.

It’s a fascinating journey into the fragmented world of a smartphone’s minds and [David] does a fantastic job on the writeup. If you’re interested in sniffing wireless accessories, you will enjoy this soundbar’s wireless protocol laid bare.

roetz shows off his multi hot end 3d printer

Maximum Throughput Benchie

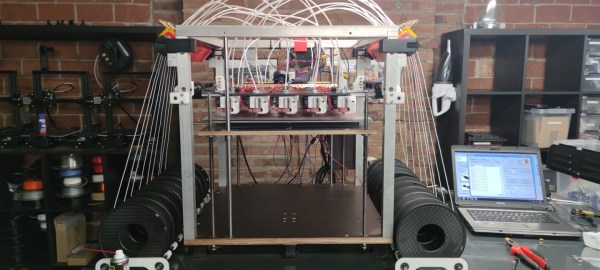
Have you ever needed to make a few hundred of something quickly? [Roetz 4.0] has got you covered with his massively parallel entry into the SpeedBoatRace competition.

The idea behind the SpeedBoatRace is how quickly you can print a Benchy — the little boat that is used as a test print for a 3d printer. Speeding up a print is quite tricky as it means moving the head quicker and giving layers less time to deposit and a whole other host of problems. So [Roetz] took a page out of a CPU designer’s playbook, and rather than increasing the latency, he raised the throughput. The original plan was for 20 hot ends, but due to cooling issues, that had to be reduced to 18. Perhaps even more impressive than the scale of the machine is that the only off-the-shelf parts on it are the fans for cooling. Everything else is printed or machined by [Roetz] himself. The whole run was completed in less than an hour, which technically gives him a sub 3.6 minute time per benchy, even accounting for a few that failed.

This isn’t [Roetz’s] first custom 3d printer. He turned a CMM into a 3d printer a while back that offered incredible accuracy across a large build area. Thanks [Jan Roetz] for sending this one in! Video after the break.

Continue reading “Maximum Throughput Benchie”

several chocolate figurines of various sizes

Cast Your Own Holiday Chocolate Bunny, Or Rather Mouse

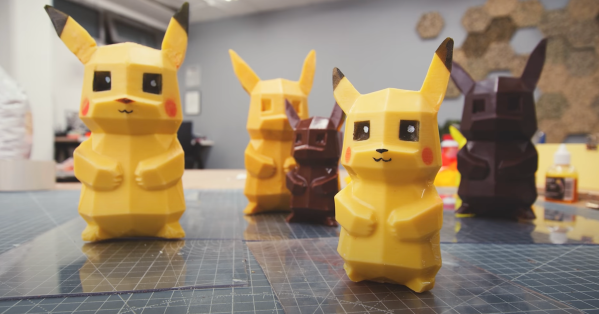
The art of forming and using a mold is, well, an art. The already tricky process would be made even harder by using a fickle material, like chocolate. This is exactly where [Alexandre Chappel] found himself as he tried to cast his own chocolate figurines.

The starting point was a 3D low-poly model of everyone’s favorite fictional electric mouse. He tweaked the model to add offsets so that after the model was vacuum formed, there would be something to clamp onto. [Alexandre] was left with four different pieces, and he vacuum-formed them with 1 mm PETG plastic. Electing for white chocolate to add coloring, he started heating the chocolate. Adding too much colorant resulted in a seized mess, so the process was a bit of trial and error. Finally, he poured in chocolate and spun it around to form an even layer of chocolate as a shell. The flashing lines were easy to trim with a utility knife.

The last thing to add was a little splash of color via airbrush and food-grade paint. The results are stunning, and even though the techniques are simple, the results came together nicely. The files are available on his website if you’re curious about making your own. If you’re curious about more clever casting techniques with chocolate, take a look at the creative use of diffraction grating to get iridescent chocolate.

Continue reading “Cast Your Own Holiday Chocolate Bunny, Or Rather Mouse”

3D Prints With A Mirror Finish

As anyone who has used a 3D printer before knows, what comes off the bed of your regular FSD printer is by no means a mirror finish. There are layers in the print simply by the nature of the technology itself, and the transitions between layers will never be smooth. In addition, printers can use different technology for depositing layers, making for thinner layers (SLA, for example). With those challenges in mind, [AlphaPhoenix] set out to create an authentic mirror finish on his 3D prints. (Video, embedded below.)

As the intro hints, mirrors need very flat/smooth surfaces to reflect light. To smooth his prints, [AlphaPhoenix] first did a light sanding pass and then applied very thick two-part epoxy, allowing surface tension to do the smoothing work for him. Once dried, silver was deposited onto the pieces via a few different sprays. First, a wetting agent is applied, which prevents subsequent solutions from beading up. Next, he sprays the two precursors, and they react together to deposit elemental silver onto the object’s surface. [AlphaPhoenix] asserts that he isn’t a chemist and then explains some of the many chemical reactions behind the process and theorizes why the solutions break down a while after being mixed.

He had an excellent first batch, and then subsequent batches came out splotchy and decided un-mirror-like. As we mentioned earlier, the first step was a wetting agent, which tended to react with the epoxy that He applied. Then, using a grid search with four variables, [AlphaPhoenix] trudged through the different configurations, landing on critical takeaways. For example, the curing time for the epoxy was essential and the ratio between the two precursor solutions.

Recently we covered a 3D printed mirror array that concealed a hidden message. Perhaps a future version of that could have the mirror integrated into the print itself using the techniques from [AlphaPhoenix]?

Continue reading “3D Prints With A Mirror Finish”

The Dreamcast Legacy

The Dreamcast is a bit of an odd beast. Coming on the heels of the unpopular Sega Saturn, the Dreamcast was meant to be a simple console built with off-the-shelf parts and released in late 1998. The Nintendo 64 was already tough competition (1996). Ultimately, the Dreamcast fell out of the public eye in the early 2000s as the Playstation 2, Xbox, and Gamecube were all released with incredible fanfare just a few years later. In some sense, Sega’s last console is a footnote in gaming history.

But despite not achieving the success that Sega hoped for, the Dreamcast has formed a small cult following, because as we know, nothing builds a cult-like following like an untimely demise. Since its release, it has gained a reputation for being ahead of its time. It was the first console to include a modem for network play and an easy storage solution for transferring game data between consoles via the VMUs that docked in the controllers. It had innovative and classic games such as Crazy TaxiJet Set RadioPhantasy Star Online, and Shenmue. Microsoft even released a version of Windows CE with DirectX allowing developers to port PC games to the console quickly.

We see our fair share of console hacks here on Hackaday, but what is the ultimate legacy of the Dreamcast? How did it come to be? What happened to it, and why did so much of Sega’s hopes ride on it? Continue reading “The Dreamcast Legacy”

Showing off the jet powered tesla

Tesla Model S Gets Boost With Jet Engine Upgrade

Tesla is well known for making cars that can accelerate quickly, but there’s always room for improvement. [Warped Perception] decided that his Tesla Model S P85D needed that little bit of extra oomph (despite the 0-60 MPH or 0-97 km/h time of 3.1 seconds), so he did what any sensible person would: add three jet turbines to the back of his car.

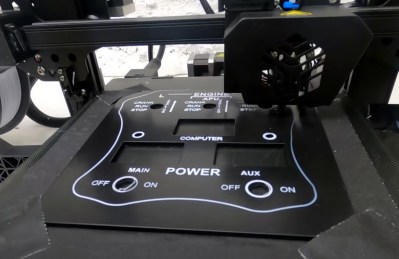
The best part of this particular build is the engineering and fabrication that made this happen. With over 200 pieces and almost all personally fabricated, this is a whirlwind of a build. The control panel is first, and there’s a particularly clever technique of 3D printing the lettering directly onto the control panel for the flat stuff. Then for the pieces with angles that would prevent the head from moving freely, he printed onto a plastic sheet in reverse, applied glue, then stuck the letters to the plate as a sheet. A top layer of clear coat ensures the letters won’t come off later.

Using a 3D printer to apply lettering on the control panel.

He installed the control electronics in the trunk with wiring strung from the car’s front to the rear. Three Arduinos serve as controllers for the jets. Afterward, came the bracket to hold the engines and attach it to the car’s underside. Unfortunately, supplies were a little hard to come by, so he had to make do with what was on hand. As a result it didn’t come out as strong as he would have hoped, but it’s still pretty impressive.

[Warped Perception] does a few tests before taking it out on the road. Then, he shifted the car into neutral and could drive the car solely on jet power, which was one of his goals. While we don’t love the idea of testing a jet engine on public roads, it certainly would discourage tailgaters.

Next, he finds a quieter road and does some speed tests. Unfortunately, it was drizzling, and the pavement was damp, putting a damper on his 0-60 standing times. Electric-only he gets 4.38 seconds, and turning on the jets plus electric shaves that down to 3.32 seconds. Overall, an incredible build that’s sure to draw a few curious glances whenever you’re out on the town.

If you’re looking to upgrade your Tesla, perhaps instead of jet engines, you might opt for a robot to plug it in for you?

Continue reading “Tesla Model S Gets Boost With Jet Engine Upgrade”