DIY High Flow 3D Printing

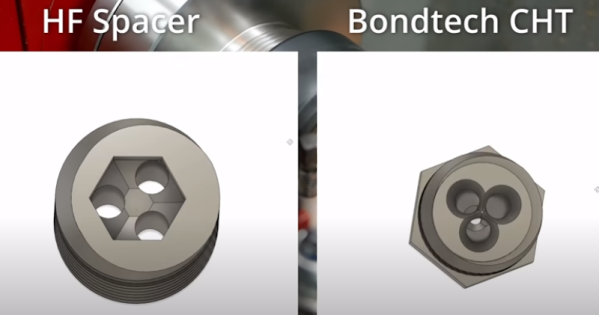
Sometimes we’re impressed by the sheer audacity of a project. [Stefan] rarely disappoints in that area, and his latest video shows him making an adapter to convert a normal 3D printed nozzle into a high-flow nozzle, similar to one you’d find on a Volcano. We say similar because [Stefan] took the trouble to drill three holes in the adapter to increase the melting surface area. The audacious part is that he doesn’t really have the machine shop to drill three tiny precision holes in close proximity — and he shows us the pictures to prove that he didn’t get it right the first (or fifth) time. But he did stick with it and got good results.

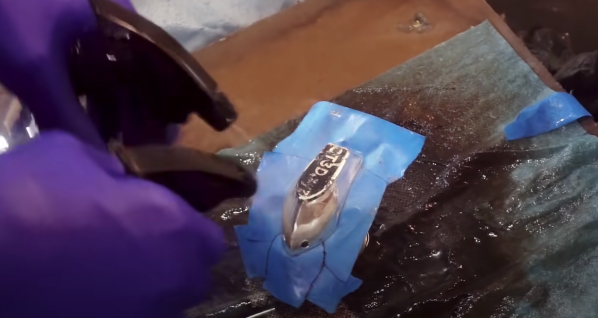
Why do such a thing? He wanted to mount the high-efficiency nozzles he’s been experimenting with on the Volcano extruder. The commercial one, in particular, doesn’t come in the extended size. To simplify things, he started with a long brass insert. The conical hex cut offers a natural center point if you are satisfied with a single hole through the center of the adapter. The hex cutout allows you to use a key to install or remove the spacer easily.

The idea behind the longer nozzles is that the filament has more time at temperature and can therefore move faster and still melt. The additional surface area should help, too. Of course, [Stefan] does plenty of testing and you can see the results in the video. A Volcano nozzle started misbehaving around 25 mm/s but at 30 mm/s, things started going bad. The CHT nozzle on the homemade standard spacer stayed working up to 30 mm/s and even at 60 mm/s was doing better than the standard nozzle at 45 mm/s. Sadly, the multiple holes in the special adapter caused worse extrusion performance, presumably by increasing pressure in the extrusion system. However, it did work well in real-life printing. Since the single bore adapter and the CHT nozzle worked great we don’t think it would be worth making the more complex one, as impressive a feat as that was.

[Stefan] thinks a lot about nozzles. He worries about wear, of course. He also built his own version of the high-flow nozzle.

Continue reading “DIY High Flow 3D Printing”

several chocolate figurines of various sizes

Cast Your Own Holiday Chocolate Bunny, Or Rather Mouse

The art of forming and using a mold is, well, an art. The already tricky process would be made even harder by using a fickle material, like chocolate. This is exactly where [Alexandre Chappel] found himself as he tried to cast his own chocolate figurines.

The starting point was a 3D low-poly model of everyone’s favorite fictional electric mouse. He tweaked the model to add offsets so that after the model was vacuum formed, there would be something to clamp onto. [Alexandre] was left with four different pieces, and he vacuum-formed them with 1 mm PETG plastic. Electing for white chocolate to add coloring, he started heating the chocolate. Adding too much colorant resulted in a seized mess, so the process was a bit of trial and error. Finally, he poured in chocolate and spun it around to form an even layer of chocolate as a shell. The flashing lines were easy to trim with a utility knife.

The last thing to add was a little splash of color via airbrush and food-grade paint. The results are stunning, and even though the techniques are simple, the results came together nicely. The files are available on his website if you’re curious about making your own. If you’re curious about more clever casting techniques with chocolate, take a look at the creative use of diffraction grating to get iridescent chocolate.

Continue reading “Cast Your Own Holiday Chocolate Bunny, Or Rather Mouse”

A pair of RP2040-based USB microphones

Mico Is A USB Microphone Based On A Pi Pico

When [Mahesh Venkitachalam] was experimenting with machine learning for audio applications on a Raspberry Pi, he found himself looking for a simple USB microphone. A cheap one was easy to find, but the sound quality and directionality left much to be desired. A large, studio-quality mic would be overkill, so [Mahesh] decided to simply build exactly what was needed: a compact, yet high-quality USB microphone that he called Mico.

The sensing device is a MEMS microphone that outputs a pulse density modulated (PDM) signal. There are chips available to directly interface such a microphone to a USB port, but [Mahesh] found them difficult to work with and therefore settled on something he knew already: the Raspberry Pi Pico platform. Luckily, someone had already figured out how to read out a microphone and present a USB device to a PC, so all that was needed was to put all the bits together into a convenient form factor.

The great thing about the Pico platform is that its main controller chip, the RP2040, is available as a separate component. [Mahesh] designed a sleek little PCB that holds the RP2040 along with the MEMS microphone and a USB connector. The end result looks tidy enough that it might have come out of a mass-produced gizmo. Those don’t usually come with full schematics and source code, but the Mico does: everything is available on its GitHub page for anyone to re-use and improve.

You can judge the sound quality for yourself in the video embedded below. If you like DIY USB microphones, you’re in luck: we’ve featured one based on an STM32 as well as a beautiful recreation of a studio-quality mic.

Continue reading “Mico Is A USB Microphone Based On A Pi Pico”

3D Printing Gets Tiny

Using a process akin to electroplating, researchers at the University of Oldenburg have 3D printed structures at the 25 nanometer scale. A human hair, of course, is thousands of time thicker than that. The working medium was a copper salt and a very tiny nozzle. How tiny? As small as 1.6 nanometers. That’s big enough for two copper ions at once.

Tiny nozzles are prone to every 3D printer’s bane: clogged nozzles. To mitigate this, the team built a closed-loop control that measured electrical current between the work area and inside the nozzle. You can read the full paper online.

Continue reading “3D Printing Gets Tiny”

Mini Linear Actuators From DVD Drive Parts

For many years now a source for some of the smallest and cheapest home made CNC mechanisms has been the seemingly never-ending supply of surplus CD and DVD-ROM drives. The linear actuator that moves the laser may not be the longest or the strongest, but it’s free, and we’ve seen plenty of little X-Y tables using CD drives. It’s these mechanisms that [Nemo404] has taken a little further, freeing the lead screw and motor from the drive chassis and placing them in a 3D-printed enclosure for a complete linear actuator that can be used in other projects. (Video, embedded below.)

There seems to be no positional feedback, not even the limit switch that would grace a typical CD drive, but aside from that it makes for a compact unit. There are two versions, one for a linear bearing and the other for the brass bushes found in CD drives. It’s unclear how strong the result is, but it appears to be strong enough to demonstrate lifting a small container of screws.

Should you need to make your own actuator then aside from the easy-to-obtain old CD drive the files can be found on Thingiverse. And introduce yourself to the world of CD drives for CNC machines by taking a look at this mill.

Thanks [BaldPower] for the tip!

Continue reading “Mini Linear Actuators From DVD Drive Parts”

Blender? No, Grinder

[Leandro Felipe] is no stranger to the dirty hack, and this video of his conversion of a blender into a handheld rotary grinding tool is no exception. (Embedded below.) But the end result is something pretty useful — a lighter and more maneuverable rotary grinder that’s got a lot more grunt to boot.

(The video is in Portuguese, but the captions work pretty well, once you get over the fact that the robots translate “grinding tool” as “rectifier” a lot of the time. And anyway, you’re here for the hacks.)

The highlights are a handmade coupling that mates the blender motor with the flexible shaft and chuck, purchased separately. And the flattened-out PVC pipe used as a mounting bracket. And him using the motor itself against a file to “lathe” down the drive shaft. And…

The tip of the day comes when he holds the blender motor in a metal vise to test it out. Metal and spinning magnets — what’s the worst that could happen?  Sparks, smoke, and a trip to the thrift store for another used blender.

If you just want to see the finished piece, you can jump ahead to the end. But it’s basically, get yourself a speed-adjustable blender, couple it to the shaft of an off-the shelf grinder, and you’re set.

It’s an idea so conceptually easy, you might wonder if Hackaday has ever showcased a blender dr3mel before. We have. What else can you power with a blender motor?

Thanks [Danjovic] for the tip!

Continue reading “Blender? No, Grinder”

3D Prints With A Mirror Finish

As anyone who has used a 3D printer before knows, what comes off the bed of your regular FSD printer is by no means a mirror finish. There are layers in the print simply by the nature of the technology itself, and the transitions between layers will never be smooth. In addition, printers can use different technology for depositing layers, making for thinner layers (SLA, for example). With those challenges in mind, [AlphaPhoenix] set out to create an authentic mirror finish on his 3D prints. (Video, embedded below.)

As the intro hints, mirrors need very flat/smooth surfaces to reflect light. To smooth his prints, [AlphaPhoenix] first did a light sanding pass and then applied very thick two-part epoxy, allowing surface tension to do the smoothing work for him. Once dried, silver was deposited onto the pieces via a few different sprays. First, a wetting agent is applied, which prevents subsequent solutions from beading up. Next, he sprays the two precursors, and they react together to deposit elemental silver onto the object’s surface. [AlphaPhoenix] asserts that he isn’t a chemist and then explains some of the many chemical reactions behind the process and theorizes why the solutions break down a while after being mixed.

He had an excellent first batch, and then subsequent batches came out splotchy and decided un-mirror-like. As we mentioned earlier, the first step was a wetting agent, which tended to react with the epoxy that He applied. Then, using a grid search with four variables, [AlphaPhoenix] trudged through the different configurations, landing on critical takeaways. For example, the curing time for the epoxy was essential and the ratio between the two precursor solutions.

Recently we covered a 3D printed mirror array that concealed a hidden message. Perhaps a future version of that could have the mirror integrated into the print itself using the techniques from [AlphaPhoenix]?

Continue reading “3D Prints With A Mirror Finish”