
Testing Coulomb’s Law And Similar Fundamentals Yourself Remains Tricky

How easy is it to build a simple demonstration at home that proves fundamental law of physics, such as Coulomb’s inverse square law, or Maxwell’s equations? This is one of those questions that always nagged at [Casual Physics Enjoyer] as they sought to find ways to develop a more intuitive understanding of these fundamentals with simple DIY-at-home experiments. Unfortunately this turned out to be rather tricky for Coulomb’s law.

Us H. sapiens – courtesy of a few bright individuals – have figured out many of the fundamentals that underlie this physical world over the past few thousands of years. Even if we still got some pretty massive fundamentals left today for equally bright-minded folk to bash their collective heads against, basics like Coulomb’s law or Maxwell’s equations ought to be a snap now for the average person to replicate since they were after all performed in an era before quantum mechanics, computers or even electrification.

To the dismay of the average physics student, experiments that demonstrate these fundamental laws of physics are still pretty hard to replicate without some solid time and monetary investment. This is demonstrated quite succinctly in the linked article, where the question of how to demonstrate the force between two charged particles, as in Coulomb’s law, and that it is an inverse square relationship is attempted.

Whereas the Wikipedia entry claims it to be a ‘simple experiment’ with just two identical spheres, in a DIY setting this is somewhat tricky, including the part where you have to charge up the spheres and measure the force. Using some aluminium foil and wires you can get the two ends to separate as you’d expect, but quantifying the force is a whole other matter.
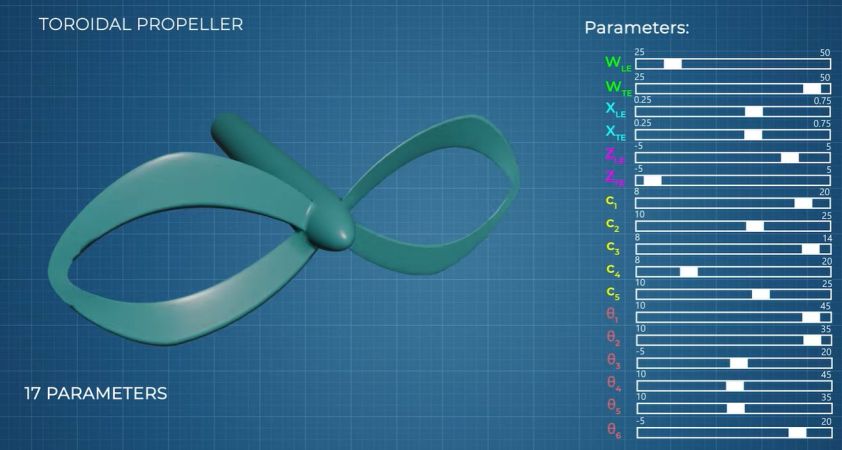

Pitting A CFD-Optimized Toroidal Propeller Against A Conventional One

Although we often think that we got certain aspects of aerodynamics pretty much licked at this point, details like the optimal shape of a propeller remains hotly debated, both in- and outside of academia. This also includes wilder designs like toroidal propellers that even after more than a hundred years are still mostly just being evaluated. Recently [Neuronautics] took a shot at figuring out whether toroidal propellers even make sense.

In order to do this, first an efficiency baseline was established using a conventional and highly optimized propeller. After scanning it in to get its exact geometry and running it through a computational fluid dynamics (CFD) simulation, the software spat out a number of about 73%.

This left figuring out an optimized shape for the toroidal propeller to pit against it. While you can absolutely brute-force the seventeen shape parameters being considered here and test them in CFD, this would take insanely long. The hack here is to use multiple reference frame (MRF) to drastically speed up the selection process, though even then it still took two months. An example of using MRF with regular propellers is discussed  in a 2019 paper by [Randi Franzke] et al. in Energies.

Although MRF saves a lot of simulation time, you still end up with a lot of data that has to be analyzed for interesting patterns. For this [Neuronautics] trained a artificial neural network to automate filtering the many options for the most optimal ones, until converging onto a single design.

This G1401 design was the lucky winner, though with only a simulated 62.9% efficiency. Subsequently the one aspect that had been left unchanged was also iterated through, in the form of many different airfoil shapes until the final design appeared.

This design was then 3D printed in resin, which showed the first hurdle with the selection process, in that the printed versions were too thin and flexible to be usable as propellers. Cue many hours of manual tweaking of the design to make it actually printable.

Although the final design didn’t exceed 62% efficiency in a final test, the comment section to the video rightfully points out that the comparison was between a commercially made propeller and a DIY resin-printed one, which adds a whole other batch of variables. That said, it’s unlikely that there’d have been an obvious improvement either way, otherwise we’d already have seen toroidal propellers pop up everywhere on drones and aircraft.

Continue reading “Pitting A CFD-Optimized Toroidal Propeller Against A Conventional One” →

Jet Megatextures Demo For ESP32-S3

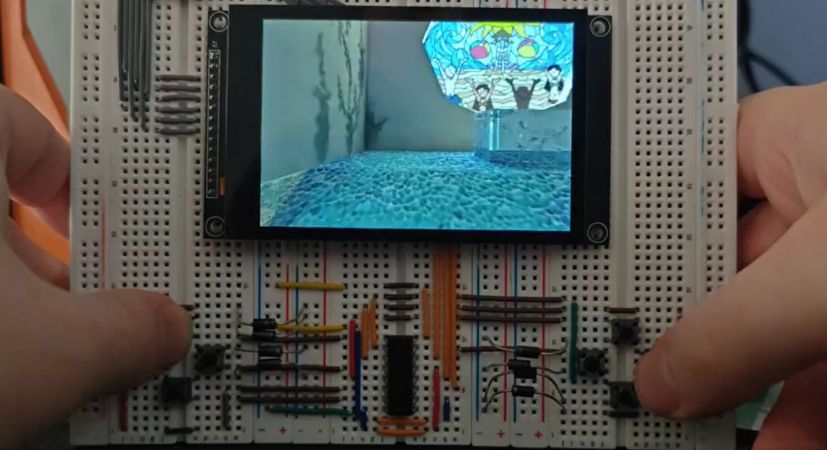
Mipmapping is a good way to add a lot more detail to a 3D scene without overburdening the rendering hardware with detail that won’t be seen by the user. This level-of-detail rendering technique was demonstrated on the N64 console hardware a few years ago by [James Lambert] with [Michael Biggins], also known as [PhonicUK], now demonstrating it on the ESP32-S3 using his own Jet rendering engine.

Although level-of-detail rendering really speeds things up, it does also require far larger texture sizes, with [James]’s N64 demo taking up 40 MB of a 64 MB cartridge. To fit it on an ESP32-S3 with 16 MB of PSRAM and no SD card expansion or such the textures were further compressed to use 8-bit indexing, resulting in a mere 5.01 MB of textures.

There’s a demonstration video over on the associated Reddit thread, which shows the camera moving through the scene. Even if not as exciting as the Wipeout port by [Michael] that we previously covered, it does make clear that even without a proper 3D GPU the ESP32-S3 is already a pretty capable gaming machine that can go toe-to-toe with some 1990s consoles.

Continue reading “Jet Megatextures Demo For ESP32-S3” →

Using The SNES Super FX Chip To Run Super Mario 64

Although the Nintendo 64 was the first to bring real 3D graphics to the table in 1996, the Super Nintendo had an ace up its sleeve in the form of the Super FX chip. One major advantage of using cartridge-based games is that you have the option to add wild features such as a 3D graphics chip to your SNES, something that got used to make games like Star Fox, and as [Tobi] demonstrates in a recent video, can also totally run Super Mario 64 if you squint a lot.

While there’s a rumor that Nintendo was looking to release a ‘Super Mario FX’ game for the SNES, there’s no evidence for such a project. Fortunately these days we got hobbyists prepared to give it a shake to see what a determined group of SNES game developers could have accomplished back then.

The pleasant surprise here is that although a new engine was needed, the SM64 assets could be used with this ‘SMFX’ game and it runs fairly well. There is still room for performance improvement, and the 2 MB memory limit is a problem that may require some culling of parts of levels.

Frames are painted back to front since there’s no advanced Z-culling or similar features, but it shows just how capable the Super FX chip is. [Tobi] has said that he’ll look at releasing the project in some form once he’s happy with how it works and runs, which is definitely something that we’ll look forward to.

Continue reading “Using The SNES Super FX Chip To Run Super Mario 64“ →

Going On A Tangent With The Intel 8087’s Hybrid CORDIC Algorithm

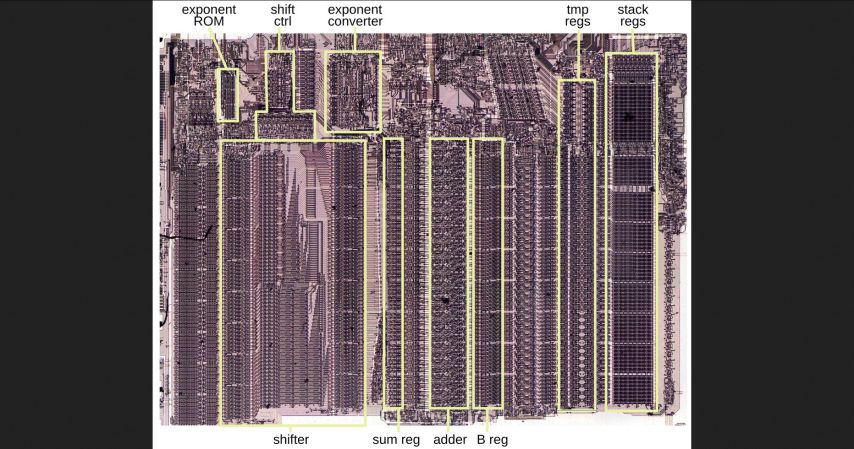
Continuing their reverse-engineering of Intel’s 8087 FPU, [Ken Shirriff] and friends took a look at one of the trigonometric functions, specifically FPTAN.  The most exciting part with such reverse-engineering is probably figuring out which algorithm was used in the implementation, while trying to determine the reasoning behind the final hardware design.

If you’re running a simple MCU or MPU like the 6502 or Z80 without hardware functions you’d likely use an algorithm such as CORDIC or similar, as this requires only basic hardware features like addition, subtraction, bitshift, and look-up tables. One can also use polynomial approximation if there’s hardware support for a potential speed-up, or as is the case in the 8087, create a hybrid approach that targets speed and accuracy.

In the article the exact implementation to get to 64 bits of accuracy is detailed, starting with the 16 bits calculated using CORDIC before switching to the Padé approximant technique involving the ratio of two polynomials. Since after calculating the brunt of the final value with CORDIC the remainder is a fairly small value, this polynomial approximation is not just very accurate but also fast.

This approach allows the FPTAN and similar trigonometric functions in this FPU to hit a very high level of accuracy and not require the look-up table sizes and additional time required to work through the remaining bits with CORDIC. For those who want to see the full algorithm Intel’s engineers used, [Ken] has the full microcode listing with comments in the article as well.

As for the exact speed-up from this approach, [Ken] calculates for one value that FPTAN would spend 33% on CORDIC pseudo-division, 47% on CORDIC pseudo-multiplication and a mere 15% on the polynomial approximation along with about 5% overhead.

With the Pentium series of CPUs Intel moved completely away from CORDIC, as it’s clear that as accurate as it may be, it’s hard to scale to a significant number of bits without incurring significant time penalties. With the introduction of SIMD instructions the x87 ISA has further seen its functionality reduced, but this analysis shows once again why the 8087 made such an impact when it was released.

When The Debugger Lies With Stale Cache Values

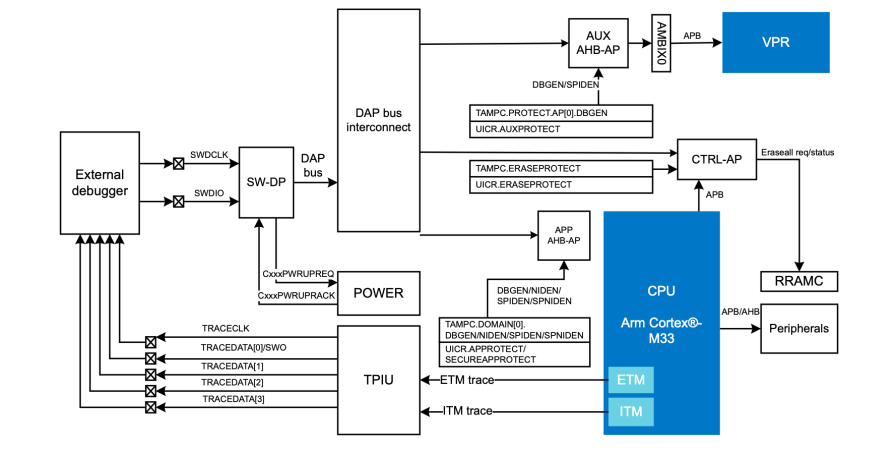
In a recent blog post by [Daniel Mangum] he goes over a scenario observed while debugging the Cortex-M33-based nRF54LM20, reading and writing values while running through a few scenarios. After initially it seemed to go seemingly without any issues, suddenly the GDB debugger would happily return values that suggested that a previous operation had not succeeded. Or, as the case turned out to be, stale cached values were being returned.

What follows is a very technical and low-level breakdown of how this MCU functions inside, especially its cryptographic features and Key Management Unit, which is used for storing sensitive information. The most amusing part is probably you can bypass the cached data by explicitly specifying the access port and memory address along with other parameters.

This ReadMemAP command supported by the JLinkGDBServer used here showed the right value, whereas the normal GDB read command using x kept returning the cached values. This raised the question of which cache was doing this. The direct read from the AHB-AP access port worked fine, so the suspicion is that the J-Link software’s own caching, with a run without the J-Link caching indeed working fine.

J-Link has had some hardware-related issues too, with this new issue pointing to an awkward software bug that could be table-flip-and-rage-quit worthy depending on how much time it wastes during a debug session. Fortunately [Daniel] seems to have caught this one quickly and had an easy way to bypass it, but we aren’t all that lucky.


The Low-Level Waste Dumps In The Atlantic Have Become Ecosystems

Dumping of the barrels into the Atlantic. (Credit: Greenpeace, Pierre Gleizes)

Recently French and international researchers took a look at the state of the thousands of barrels of radioactive waste that were dumped into the Atlantic Ocean between 1950 and 1990, trying to ascertain the state of this waste and its effect on the ecosystem.

Although a lot of fuss is made of the spent uranium fuel and high-level waste produced by light water reactors and fuel reprocessing facilities, the overwhelming majority of nuclear waste is low- and intermediate-level waste (LLW and ILW) churned out by hospitals, laboratories and various industries.

Due to the sheer volume of this waste over the decades creative ways have been sought to dispose of it, which include burying in landfills and incinerating.

For a while tossing such waste into the ocean was also deemed to be an excellent destination for LLW and ILW, with the latter especially encapsulated in bitumen or cement. This was the poured into the barrels that many people have come to associate with nuclear waste in general. Since the approximately 200,000 tons of such barrels and similar were tossed into the Atlantic Ocean decades ago the question was where they ended up and their state.

The Radiocean mission site lists the objectives, including the mapping of the sites and identifying the elements of the ecosystems in addition to any radioisotope levels and their effect on said ecosystems. As it turns out, although the barrels have definitely degraded and their contents are slowly collapsing, the local ecosystems seem to have adapted well, treating the dump sites more as convenient shelters rather than a hazard. Some more photos can be found on the Bluesky account of [Javier Escartin].

None of this should come as a surprise if you are aware of just how much radioactive material is already dissolved naturally in the oceans, with much more uranium present in seawater than can be mined on-shore. Although the introduction of isotopes that are not part of the normal thorium and uranium decay chains into the ocean is of course undesirable, it’s good to know that this rather haphazard treatment of LLW and ILW has apparently just resulted in some Atlantic Ocean floor critters ending up with an interesting reef.