Any-size SIL Connector Kit

any-sized-SIL-cable-kit

Etching and populating a board is childs play compared to finding connectors which link several components. But Hackaday alum [Ian Lesnet] and his crew over at Dangerous Prototypes have come up with a solution that makes us wonder why we haven’t seen this long ago? They’re prepping an any-size ribbon cable kit.

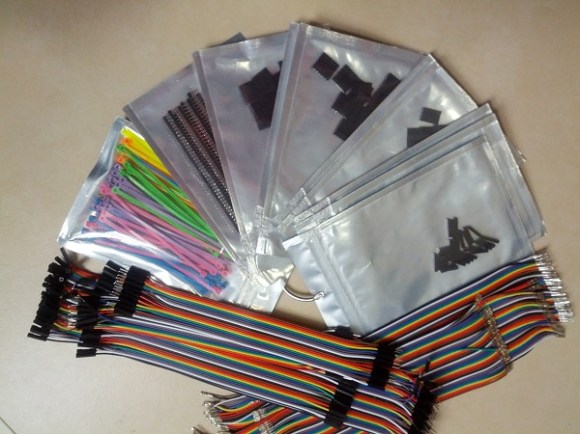
So lets say you do find the type of connector you want. You need to cut the ribbon cable to length, crimp on the connectors, then seat those connectors in the housing. We’ve done this many times, and being cheapskates we use needle-nose pliers instead of buying a proper crimper. This solution does away with that grunt work. The kit will ship several different lengths of ribbon wire with the connectors already placed by machine. This way you peel off the number of connectors you need, select the proper house size and plunk it in place. Also in the kit are several lengths of male, female, and male/female jumper cables you can peel off in the same way.

Now what are we going to do with the rest of the spool of ribbon cable sitting in the workshop?

Breakout Board For $11 LCD Module With Small Pitch

breakout-for-strange-pitch-LCD-screen

[Ibrahim] picked this little LCD module out because of its price point and resolution. In single units you can grab one of the 128×32 pixel displays for just $11. The only problem is that the pinout is too small to use with a breadboard. He whipped up a breakout board for it that throws in some extras.

First off, we like it that the board doesn’t add much to the part’s outline. What it does add is a Low-DropOut voltage regulator and a level converter. The upper range of the LCD’s input voltage is 3.3V, and these added parts make it possible to drive the device using 5V hardware like the Arduino Uno pictured above. While he was adding in parts he included a MOSFET to switch the backlight. This way he can use PWM for dimming as well.

We usually hit eBay when looking for LCD screens. A search for the NHD-C12832 part number didn’t turn it up. We tried out FindChips for the first time (owned by Supply Frame who just bought Hackaday) and it works just as well as Octopart which we’re more familiar with since we’ve seen some hacking of that site before.

Tools And Talent For Custom Platinum Jewelry

custom-platinum-jewelry


The diamond engagement ring is arguably the most universally adopted of all jewelry. It’s artwork that even the most common men and women appreciate, and it’s creation calls for skills that go back centuries. [Jerome Kelty] crafts custom jewelry from platinum. Here’s an in-depth look at his process.

The first step of his Instructable post is so long you might be fooled into thinking it’s the whole post. He shows off the equipment that he used in taking this ring from design to reality — we thought the use of beeswax to pick up small stones is an interesting technique.

Click through the steps to see that he starts with a cad drawing. This model is sent offsite for casting and arrives back as an oversized blank which he then begins to clean up. A range of differend files bring it to its finished shape. He preps the areas where stones will be set. A trip to the buffing wheel gives it the shine it needs before the diamonds are put in place.

Regular Hackaday readers may recognize his name. When [Jerome] isn’t making jewelry he’s building animatronics, like Predator or Stargate replicas.

Continue reading “Tools And Talent For Custom Platinum Jewelry”

Self-contained Time-lapse Rig Braves Elements From Thirty Feet

Perspective is a bit hard to grasp in this image, but all of this hardware is mounted thirty feet above the ground. This time-lapse photography box makes use of the sun and a Raspberry Pi to document the goings on. The rig is one of three that were built by [Patty Chuck] to record progress on a seventy acre construction site over the course of eighteen months. The gallery linked above shows off the project well, but a much more in-depth text description is found in his Reddit thread.

What’s not shown in the image is a solar array which powers the box. When they were installed there were no utilities on site. To guard against power-loss there’s a hardware RTC that keeps ticking. The Raspberry Pi uses GPIO pins to switch the Nikon D7100 camera on once every five minutes during the work day. It snaps a photo before powering it down again. It also monitors a temperature sensor and actuates circulation fans if necessary.

He’s planning to post the videos once the project’s done in 18 months. If you see them and remember this post, send us the link and we’ll post the update.

2013 Open Hardware Summit Badge Includes EPaper Display

Take a look at this sexy piece for open hardware. It’s what you’ll be wearing around your neck at the Open Hardware Summit this year. WyoLum teamed up with Repaper for the display and Seeed Studios for the boards.

It’s called the BADGEr and it’s both an Arduino and and Arduino shield. There are several different power options; coin-cell, microUSB, unpopulated barrel jack, or the lanyard terminals if you want to wear the power supply around your neck. You can see the five momentary push buttons see above, but on the back you’ll find the microSD card slot along with a power switch for preserving the coin cell.

Check out the video below for a quick look. In addition to acting as your credentials the conference schedule comes preloaded. And of course, this is an Open Source design so you can dig through schematic, board artwork, and code at the page linked above. Oh, and the first hack has already been pulled off. Here’s the badge reading Crime and Punishment.

Speaking of conference badges, DEF CON starts this week. Hackaday writer [Eric Evenchick] will be there and we hope he has a chance to look in on some of the badge hacking at the event.

Continue reading “2013 Open Hardware Summit Badge Includes EPaper Display”

Headless Tethering Between Raspberry Pi And IPhone

rpi-iphone-tethering

This hack doesn’t necessarily have a target application. But there’s a lot of potential. It’s a headless setup for tethering your Raspberry Pi to an iPhone. Building sensor arrays that upload to the Internet (live or just to dump its logs)  immediately comes to mind. But we’re sure there are a ton of other applications just waiting to be thought of.

Tethering is pretty simple with the Raspberry Pi. Just install a few packages that are available in the repositories and make a quick configuration file tweak to allow hot-plugging. But this is dependent on the iPhone being mounted and that task is normally only automatic if the GUI is running. To get by without the X desktop [Dave Controy] walks through the ifuse setup to mount the phone from command line. The result is that your RPi will establish a network connect whenever the iPhone is plugged into it, without any intervention from you.

[Thanks Michael]

Chromecast Bootloader Exploit

chromecast-hack

Well that didn’t take long. The team over at GTVHacker have worked their magic on Chromecast. The HDMI dongle announced by Google last week was so popular they had to cancel their 3-free-months of Netflix perk. We think the thing is worth $35 without it, especially if we end up seeing some awesome hacks from the community.

So far this is just getting your foot in the door by rooting the device. In addition to walking through the exploit the wiki instructions give us a lot more pictures of the internals than we saw from the teardown in yesterday’s links post. There’s an unpopulated pad with seventeen connections on the PCB. You can patch into the serial connections this way, running at a 115200 8n1. But you won’t have terminal access out of the box. The exploit uses a vulnerability in the bootloader to flash a hacked system folder which provides root. After wiping the cache it reboots like normal but now you can access a root shell on port 23.

Continue reading “Chromecast Bootloader Exploit”