Add External Power To Any USB Hub

[Andrew] was getting some poor performance from a couple of USB devices he had connected through an unpowered hub. This is a problem because the hub prevents devices from negotiating with the host controller for more current. He fixed it by adding an external power supply to his USB hub.

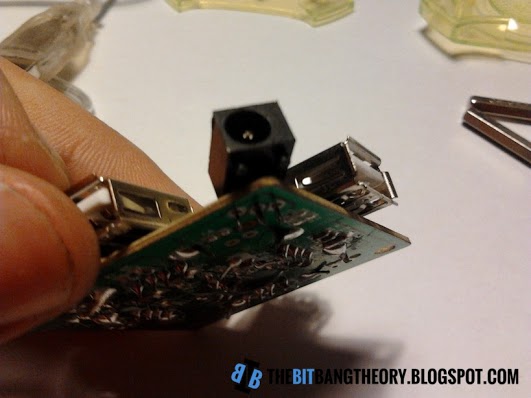
In this case the PCB already had a footprint for a power connector. The manufacturer uses one board for several different models and just leaves the supply components unpopulated. [Andrew] managed to find a barrel jack in his parts bin that matched the footprint.

One important thing to do before hooking up the source is to disconnect the 5v wire from the incoming cable from the computer. The other tip we can give you is to use a good regulated 5v source to ensure you don’t damage the stuff you’re trying to power. That means avoiding deals that are too good to be true.

Alert Tube Monitors All Aspects Of Your Digital Life

alert-tube

This futuristic appliance can keep you apprised of all you social network goings on and much more. [Mike Watson] calls the device the Alert Tube because of its functionality and shape. The hardware depends primarily on a Raspberry Pi board which seems tailor-made for this type of use. The information gathering side of this shows off the power of a fledgling services called If This Then That.

We’ve heard of IFTTT only because [Chris Gammel] and [Dave Jones] covered it on an episode of The Amp Hour. [Dave] dismissed it as have little to no practical use. But this project shows how it can be leveraged to make quick work of pulling your desired data from the Internet. Think of it as a collection of APIs for many sites like Twitter, Facebook, as well as local weather, etc. This project sets up IFTTT to monitor your accounts, alerting you with colors of like, sound, and even text-to-speech.

The project explanation is several pages long but you can get a quick look at it by watching the demo video.
Continue reading “Alert Tube Monitors All Aspects Of Your Digital Life”

Use Your Ears As An Oscilloscope

image

When work on an engine control circuit [Scott] found himself in need of a way to compare the performance of two control circuits at once. The hobby quality oscilloscope he owns wasn’t up to the task. After thinking about it for a bit he ended up using his ears as the oscilloscope.

The signals he was measuring are well suited for the challenge as they fell within the human range of hearing. He used some wire wrapped around each of the three conductors on the jack of his headphones in order to connect them to a breadboard. Then he simply connected each channel to one of the motor driver circuits, and connected the common ground. Listening to the intonation of the pitches in each ear he was literally able to tune them up.

If he had been looking for a specific frequency he could have used his sound card to take and analyze a sample. But balance was what he needed here and you must admit that this was an easy and clever way to get it!

RPi Control Your Server PSU Over The Internet

remote-server-psu-control-via-RPi

Here’s an interesting use of a Raspberry Pi to control the PSU on a server. [Martin Peres] is going to be away for a few months and still wants access to his PC. This isn’t really all that tough… it’s what SSH is made for. But he also wants lower-level access to the hardware. Specifically he needs to control and get feedback on what the PSU is doing, and even wanted to have access to the serial console without having to go through the computer’s NIC.

The image above shows one part of his solution. This is a custom Ethernet port that connects to his Rasberry Pi header breakout board. Inside the computer the jack is wired to the motherboard power LED to give feedback about the current state of the power supply. It also patches into the green wire on the PSU, which lets him turn on the power by pulling it to ground. After working out the cable routing he developed a web interface that makes it easy to interact with the setup.

As with other hacks along these lines letting an embedded computer run 24/7 is a lot less wasteful than leaving a PC on. That’s a concept we can really get behind.

Continue reading “RPi Control Your Server PSU Over The Internet”

3W Handheld Laser Raises Hope For A Real Lightsaber Someday

That banner image may seem a little bit theatric, but it’s a good representation of what this 3W handheld laser can really do. Turn the thing on in a slightly smoky room and it looks exactly like a thin beam Lightsaber.

What kind of tricks would you expect this thing to perform? Perhaps it’ll pop some black balloons? Prepare to be shocked because it’s orders of magnitude more powerful than that. The video below shows it burning and igniting a collection of items almost instantly. [Styropyro] tested his creation by igniting paper, cardboard, flash paper, flash powder, burning through a stick of wood, and igniting an undisclosed substance at the end of the video. But one of our favorites is when he drives a solar powered toy car with the intense beam.

He pulled the diode from a DLP projector, and drives it with a pair of 18650 Lithium Ion batteries which are commonly found in laptops. He made the enclosure himself. It looks great but we can’t help but wonder if the components would fit in a painstakingly made replica.

Continue reading “3W Handheld Laser Raises Hope For A Real Lightsaber Someday”

Tamagotchi ROM Dump And Reverse Engineering

tamagotchi-rom-dump-and-reverse engineering

Often the true key to success is persistence and that holds true for this project which dumped the ROM from the current generation of Tamagotchi toys. If you’re a fan of learning the secrets built into consumer electronics — and you know we are — you’ll want to go back and watch the 24-minute lecture on Tamagotchi hacking which [Natalie Silvanovich] gave a 29C3 last year. She had made quite a bit of headway hacking the playable pods, but wasn’t able to get her hands on a full ROM dump from the General Plus chip on board processor. This update heralds her success and shares the details of how it was done.

As we learned form the video lecture it was a huge chore just to figure out what processor this uses. It turned out to be a 6502 core with a few other things built in. After prowling the manufacturer’s website she found example code for writing to Port A. She was then able to execute her own code which was designed to dump one byte of ROM at a time using the SPI protocol.

[Natalie] posted her code dump if you’re interested in digging through it. But as usual we think the journey is the most interesting part.

[Thanks Itay]

Tweaking Designs For [Theo Jansen] Walking Machines

image

We love the look, and most especially the gait, of [Theo Jansen’s] walker designs. We don’t fully understand them or the math behind them. But that could change if we spend enough time studying [Aaron Birenboim’s] body of work. He wants to incorporate the legs in a project so he’s been trying to optimize the Jansen leg design.

The calculations are delivered in a source code package available from his site. To make heads or trails out of the numbers you need a way to visualize them. He has provided that as well in the form of a MATLAB script which shows leg piece design and can even spit out an animated .gif file of the virtual legs in motion.

If you have no idea what we’re talking about make sure to check out [Jansen’s] original creations. We’re also excited to read more about the Klann and Ghassaei linkage designs which [Aaron] talks about in his post.