Electric Motorcycle Hits The Racing Circuit

electric-motorcycle-hits-the-race-track

Check out that beefy electric motor hanging out where the swing arm connects to the body of this motorcycle. It’s the muscle that makes this recently completed electric motorcycle ready to race.

[Jackson Edwards] has been hard at work building this from the ground up. His goal was to make it competitive with production line motorcycles and his most recent test runs are pointing to success. The film shows off a couple of problems with the rear suspension. This actually led to him dumping the bike on a turn. He was unharmed but the control panel on the handlebars was unfortunately trashed. A bit of work fixed the handling and he was able to ride with confidence. We’re struck by how quiet the thing is as it tears past the camera at the very beginning of the video.

Sure, we’ve seen other electric motorcycles before. Those were all conversions from gas. Designing from the ground up really opened up a lot of choices not possible with a retrofit. Make sure to dig through all the posts on his blog to get the full picture.

Continue reading “Electric Motorcycle Hits The Racing Circuit”

Trimethyl Borate Lantern Built From Garbage

scratch-build-lantern

This lantern was built from recyclable goods. It’s a bit dangerous when used like the image above, but [The Green Gentleman] does give you a few other options in his build instructions which make for much safer operation.

The lantern enclosure is made from old cans and a glass jar. He screwed a couple of boards together at a right angle to act as a jig for cutting the glass. The V-shape created by the boards holds the jar on its side, giving his glass cutting tool something to rest upon. He then turns the jar to score it around the top, and then bottom. He alternated pouring boiling and chilled water on the score mark to shock the glass into breaking along the line.

This makes up the clear part of the enclosure which is later mated with metal top and bottom pieces. From there he adds either an LED, an alcohol lamp, or the Trimethyl Borate lamp seen above. The first two are relatively safe, but the latter burns at around 1500 degrees F. We have reservations about using a plain old glass jar as the enclosure for something burning this hot. It really should be heat resistant glass.

Camera-based Touchscreen Input Via An FPGA

piano-hero-uses-camera-based-touch-input

[Chonggang Li] wrote in to share a link to the final project he and [Ran Hu] built for their embedded systems class. It’s called Piano Hero and uses an FPGA to implement a camera-based touch screen system.

All of the hardware used in the project is shown above. The monitor acts as the keyboard, using an image produced by the FPGA board to mark the locations of each virtual key. It uses a regular VGA monitor so they needed to find some way to monitor touch inputs. The solution uses a camera mounted above the screen at an obtuse angle. That is to say, the screen is tilted back just a bit which allows the images on it to be seen by the camera. The FPGA board processes the incoming image, registering a key press when your finger passes between the monitor and the camera. This technique limits the input to just a single row of keys.

This should be much simpler than using a CCD scanner sensor, but that one can track two-dimensions of touch input.

Continue reading “Camera-based Touchscreen Input Via An FPGA”

UK Hackerspace Builds Mobile Spaceship Disaster Simulator

mobile-space-ship-simulator

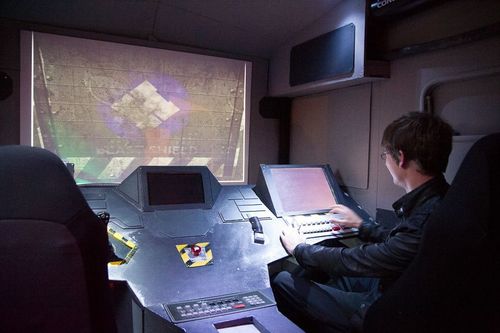
A spaceship simulator sounds fun. But a spaceship disaster simulator is pure win. Members of the London Hack Space poured their hearts and souls into this build which they call the LHS Bikeshed. Now they’re taking the show on the road, letting attendees of Maker Faires all over the UK try their hand at beating the Kobayashi Maru disaster simulation.

The real question is how do you take your simulator on the road with you? You build it in an old camper (or caravan as the Brits call it). The towable sleeping quarters were gutted to make room for the well-crafted command center seen above. The demonstration video also shows off some bulkhead doors which open to reveal a wiring mess that must be fixed to prevent a disaster. Not only does the physical build really sell the concept, but the audio and video produced for the simulator look fantastic too. The link above is a recent post, but you should dig through their archives see multiple steps during the project build.

It makes us thing we should keep going with our VW Bus hacking.

Continue reading “UK Hackerspace Builds Mobile Spaceship Disaster Simulator”

Hackaday Links: Sunday, May 19th, 2013

hackaday-links-chain

Laser cutter owners may find this online box design tool which [Jon] built quite useful. It’s got a few more joint options than the Inkscape box design add-on does.

Apparently the US Navy has the ability to bring down drones in a flaming pile of laser-caused death. [Thanks Joshua]

[Michail] has been working on a transistor-based full adder. He’s posted a Spice simulation if you want to learn about the design.

Turn your crystal clear LED bodies into diffuse ones using a wooden dowel, power drill, and sandpaper. The results look better than what we’ve accomplished by hand. [Thanks Vinnie]

Play your favorite Atari Jaguar games on an FPGA thanks to the work [Gregory Estrade] did to get it running on a Stratix-II board. You can pick up the VHDL and support tools in his repo. If you’re just curious you can watch his demo vid.

Members of Open Space Aarhus — a hackerspace in Risskov, Denmark — have been playing around with a bunch of old server fans. They made a skirtless hovercraft by taping them together and letting them rip. Too bad it can’t carry its own power supply

Here’s another final project from that bountiful Cornell embedded systems class. This team of students made a maze game that forms the maze by capturing walls drawn on a white board.

And finally, here’s a unique chess board you can build by raiding your parts bin. [Tetris Monkey] made the board from the LCD screen of a broken monitor. The playing pieces are salvaged electronics (like big capacitors) against corroded hardware (like nuts and bolts). We think it came out just great!

ATX Raspi Is A Smart Power Source For Raspberry Pi

One aspect of the Raspberry Pi that has always challenged us is the power supply. It was a great idea to power the board from a standard micro-USB port because economy of scale makes phone chargers (even in the 1A range necessary for stable operation of the RPi) cheap and easy to acquire. The thing we miss is the ability to power the device on and off using the built-in hardware. The quandary has given rise to many different solutions, and the ATX Raspbi smart PSU is one of the better ones we’ve come across. It’s a nicely packaged take on the PIC-based version we saw earlier in the year.

The device is a small PCB that acts bridge between the micro-USB power supply and the RPi board. It offers several breakout headers, one of which is used for a power button. The button is monitored by a microcontroller that switches the on-board relay accordingly. But it won’t just kill the power when you want to shut down. It first signals one of the RPi GPIO pins, causing the OS to execute a shutdown script. It then monitors the RPi for the shutdown tasks to finish before cutting the power.

Continue reading “ATX Raspi Is A Smart Power Source For Raspberry Pi”

FPGA Plays Mario Like A Champ

fpga-controls-mario-bros

This isn’t an FPGA emulating Mario Bros., it’s an FPGA playing the game by analyzing the video and sending controller commands. It’s a final project for an engineering course. The ECE5760 Advanced FPGA course over at Cornell University that always provides entertainment for us every time the final projects are due.

Developed by team members [Jeremy Blum], [Jason Wright], and [Sima Mitra], the video parsing is a hack. To get things working they converted the NES’s 240p video signal to VGA. This resulted in a rolling frame show in the demo video. It also messes with the aspect ratio and causes a few other headaches but the FPGA still manages to interpret the image correctly.

Look closely at the screen capture above and you’ll see some stuff that shouldn’t be there. The team developed a set of tests used to determine obstacles in Mario’s way. The red lines signify blocks he will have to jump over. This also works for pits that he needs to avoid, with a different set of tests to detect moving enemies. Once it knows what to do the FPGA emulates the controller signals necessary, pushing them to the vintage gaming console to see him safely to the end of the first level.

We think this is more hard-core than some other autonomous Mario playing hacks just because it patches into the original console hardware instead of using an emulator.

Continue reading “FPGA Plays Mario Like A Champ”