Adding Ambilight Clone System To Your Home Theater Just Got A Big Price Cut

Whenever we get a tip claiming a project is cheap and easy we raise a cynical eyebrow. But [Yonsje] isn’t telling us a story, his Amiblight clone really does boil down the complexity and slash the price.

For the uninitiated, this is a clone of the Philips Amilight system that has been an option with some of their TVs over the years. It puts RGB LEDs on the back of the frame, pointed at the wall. They are tuned to the edge colors of the display, linking the color of the ambient light in the room to the colors on the screen. We’ve seen a ton of clones over the years, just search our blog for “Ambilight”.

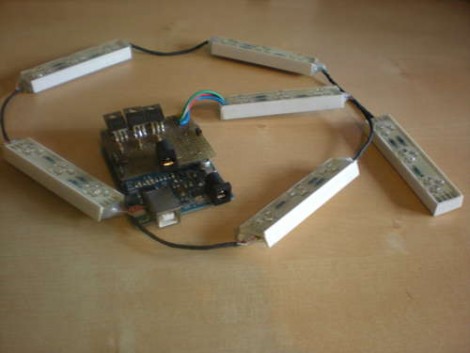
Like the others, this iteration depends on you playing back video from a computer. [Yonsje] is using an Arduino with his own shield to connect to the HTPC. NPN transistors in the shield drive the RGB LEDs. The real cost savings is in his lighting source. A Deal Extreme RGB LED bar costs just $11.30 including shipping, and can be cut into six different segments for even spacing around your television. Check it out in the clip after the break.

Continue reading “Adding Ambilight Clone System To Your Home Theater Just Got A Big Price Cut”

How To Take A Travelling Electronics Lab On The Road With You

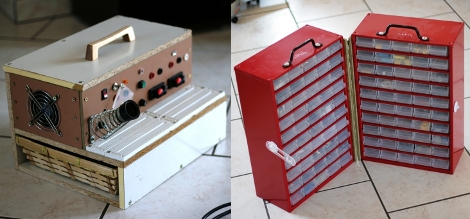
If you’re a frequent traveler, or if you don’t have a garage or basement and find your kitchen table is doomed to serve most of its life as an electronics bench this hack is for you. [Robovergne] came up with a mobile electronics lab (translated) in order to help preserve the Wife Acceptance Factor for his hobby.

The project comes in two parts. On the right you see the pair of component storage cabinets. These are high-quality examples that fully enclose each drawer (cheaper cabinets are open at the back). This way, [Robovergne] was able to connect two of them together with a piano hinge, and add some carrying handles to the top.

The second half of the project is the bench itself. It features a lab supply, soldering iron transformer and holder, and some breadboards for good measure. The base of the unit houses a drawer which carries the bulk of his tools. Now he can pack up and clear out the living room in one single trip.

Hackaday Links: July 31, 2011

Indestructible earbuds

We’re still waiting for our [Lt. Uhura] style earbuds. But until then, can we interest anyone in a set that will stand up to some abuse?

Solder Pot Scavenger

[Felicitus] says we should get a solder pot and use it to scavenge for parts. His method looks pretty easy and it’s cheaper than buying a rework station for this purpose.

Smartphone cooling

Turn all your hacking skills loose to beat the heat. That’s what [Stephanie] did when she added iPhone control for an oscillating fan.

Tunes calculator

Graphing equations and crunching numbers wasn’t enough for [Drew]. He went and figured out how to make his TI-84+ play music off of a thumb drive.

Geek-chic

Don’t let anyone out-geek you at company parties. Beef up your arsenal with this resistor color-code necktie. And yes, you can wear it with a T-shirt!

Do You Have What It Takes To Make Lumber Keep Time?

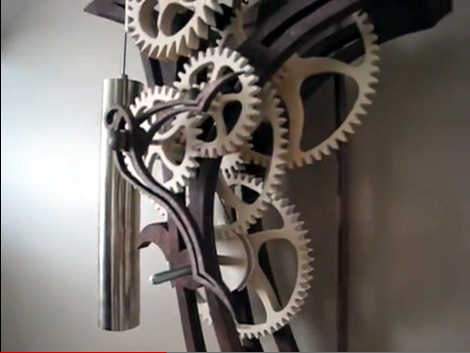
[Frank] sent in a link to this fantastic wooden clock. The design was dreamed up by [Clayton Boyer] and he’s got full-sized templates for sale on his site. We’ve marveled at his creations in the past, having featured his useless machine that was made from wooden gears. This “Bird of Paradise” clock steps up the complexity quite a bit, creating a timepiece without a case to show off the beauty of all of those teeth.

We wondered what goes into building one of these yourself. From the FAQ page it seems you could get by with a scroll saw, drill press, Dremel, and sander. That’s the medium-tech method, but you could opt to scan the plans in order to laser cut your parts, or just use hand tools. But in addition to building tips, there’s advice on how to fine tune clocks that don’t want to keep running, thoughts on finishing the wood parts, sanding, tweaking the teeth, and much more. It’s no secret we have a love for digital clock projects, but there’s something very seductive about a design like this that uses no electricity. Don’t miss the clip after the break to see what we mean.

Continue reading “Do You Have What It Takes To Make Lumber Keep Time?”

Monitoring The World’s DNS Status Using A Display Straight Out Of WarGames

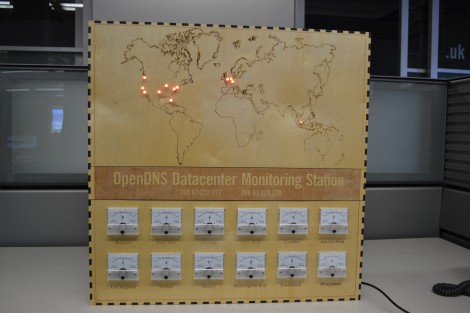
Nothing says Cold War like a map of the work with LEDs embedded in it. Throw in some analog dials for good measure and you’ve got a piece that would be comfortable mounted next the WOPR in everyone’s favorite ’80s-computers-run-amok movie. We think [Dima] really hit the mark when building this status panel for OpenDNS datacenter monitoring.

[Dima] works for OpenDNS and wanted to make something special for its upcoming 5 year anniversary. He’d already been toying with making boxes from laser-cut wooden pieces. This was just a matter of choosing a size that would fit the dials and leave a suitable area for a laser-etched map. Each of the twelve panel meters gets a PWM signal from the Arduino Mega that he used to bring the device to life. It shows a comparative server load for each data center based on the previous day’s numbers. There is an LED in the map for each of these centers. Right now they’re all red, but he used RGB LEDs and plans to upgrade the capability soon. He should have no problem doing this as he sourced some TLC5940 drivers to extend his I/O capabilities.

Don’t forget the check out the clip embedded after the break. Continue reading “Monitoring The World’s DNS Status Using A Display Straight Out Of WarGames”

Parametric Script Makes Laser Cutter Designs A Snap

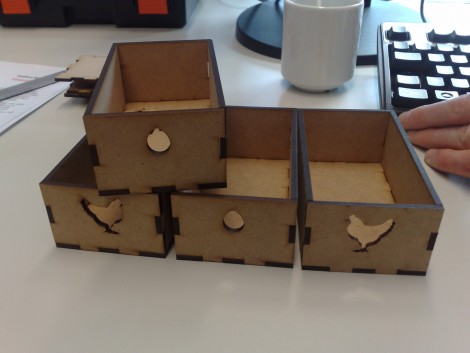
[Tinkerer] bought a small cupboard from an antique store to fit nicely into his kitchen decor. After getting it home, he realized that some of the cubbyholes had originally housed drawers. The originals were long gone but this provided an opportunity for him to make the replacements seen above.

The first design approach that popped into [Tinkerer’s] mind was to draw the pieces in an editor like Inkscape. Some consultation with others at the local Hackerspace led him to this script-based parametric SVG design tool. We jumped right in to give it a whirl, clicking on Load –> Construction (category) –> Better Box. Once you’ve chosen the script, click on ‘Parameters’ on the left column and enter the sizing you want for your box. When all values are correct, click the renter tab, then export it as a Scalable Vector Graphic.

We’ve lamented time and again about our lack of a laser cutter, so we were unable to test this out. But we can’t see why it wouldn’t reproduce the same results that [Tinkerer] achieved.

AVR Programmer Modelled After The MkII – Uses LUFA

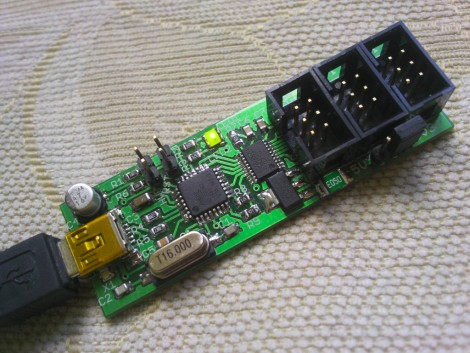
Here’s a new option for building your own AVR programmer. It’s called the MkII Slim and the diminutive size makes it live up to its name. The design is rather spartan, using just three chips; a voltage regulator, a MAX3002 level converter, and an Atmel AT90USB162 as the main microcontroller. This chip has a built-in USB module, foregoing the need for a separate FTDI chip.

The firmware is built on the Lightweight USB Framework for AVRs (LUFA). This is a USB stack implementation originally called MyUSB that was developed by [Dean Camera]. Regular lurkers over at the AVRfreaks forums will recognize [Dean’s] name, or his handle [abcminiuser] as a source for many of the high quality AVR tutorials found there. But we digress.

The programmer offers all the features you’d want in an In-System Programmer. It can easily be reflashed with future updates thanks to the bootloader running on the chip. There’s jumper-selectable power options, and it can program targets running at 3.3V or 5v. The full development package including code and artwork is available for download at the site linked above. For your convenience we’ve embedded the schematic after the break.

Continue reading “AVR Programmer Modelled After The MkII – Uses LUFA”