LED necklace

IBling Is An LED Display Necklace

Are you tired of being ignored? Do you want a fashion accessory that says, “Pay attention to me!” If so, you should check out [Al’s] recent instructable. He’s built himself a necklace that includes a display made up of 512 individual LEDs.

This project was built from mostly off-the-shelf components, making it an easy beginner project. The LED display is actually a product that you can purchase for just $25. It includes 512 LEDs aligned in a 16 x 32 grid. The module is easily controlled with a Pixel maker’s kit. This board comes with built-in functionality to control one of these LED modules and can accept input from a variety of sources including Android or PC. The unit is powered from a 2000 mAH LiPo battery.

[Al] had to re-flash the firmware of the Pixel to set it to a low power mode. This mode allows him to get about seven hours of battery life with the 2000 mAH battery. Once the hardware was tested and confirmed to work correctly, [Al] had to pretty things up a bit. Some metallic gold spray paint and rhinestones transformed the project’s cyberpunk look into something you might see in a hip hop video, or at least maybe a Weird Al hip hop video.

The Pixel comes with several Android apps to control the display via Bluetooth. [Al] can choose one of several modes. The first mode allows for pushing animated gif’s to the display. Another will allow the user to specify text to scroll on the display. The user can even specify the text using voice recognition. The final mode allows the user to specify a twitter search string. The phone will push any new tweets matching the terms to the display as scrolling text.

Moonpig

When Responsible Disclosure Isn’t Enough

Moonpig is a well-known greeting card company in the UK. You can use their services to send personalized greeting cards to your friends and family. [Paul] decided to do some digging around and discovered a few security vulnerabilities between the Moonpig Android app and their API.

First of all, [Paul] noticed that the system was using basic authentication. This is not ideal, but the company was at least using SSL encryption to protect the customer credentials. After decoding the authentication header, [Paul] noticed something strange. The username and password being sent with each request were not his own credentials. His customer ID was there, but the actual credentials were wrong.

[Paul] created a new account and found that the credentials were the same. By modifying the customer ID in the HTTP request of his second account, he was able to trick the website into spitting out all of the saved address information of his first account. This meant that there was essentially no authentication at all. Any user could impersonate another user. Pulling address information may not sound like a big deal, but [Paul] claims that every API request was like this. This meant that you could go as far as placing orders under other customer accounts without their consent.

[Paul] used Moonpig’s API help files to locate more interesting methods. One that stood out to him was the GetCreditCardDetails method. [Paul] gave it a shot, and sure enough the system dumped out credit card details including the last four digits of the card, expiration date, and the name associated with the card. It may not be full card numbers but this is still obviously a pretty big problem that would be fixed immediately… right?

[Paul] disclosed the vulnerability responsibly to Moonpig in August 2013. Moonpig responded by saying the problem was due to legacy code and it would be fixed promptly. A year later, [Paul] followed up with Moonpig. He was told it should be resolved before Christmas. On January 5, 2015, the vulnerability was still not resolved. [Paul] decided that enough was enough, and he might as well just publish his findings online to help press the issue. It seems to have worked. Moonpig has since disabled its API and released a statement via Twitter claiming that, “all password and payment information is and has always been safe”. That’s great and all, but it would mean a bit more if the passwords actually mattered.

Name of the game

Repairing And Reviewing A 1976 PONG Clone

Hackaday alum [Todd] has been searching for an old PONG clone for the last two years. This variant is called, “The Name of the Game”. [Todd] has fond memories of playing this game with his sister when they were young. Unfortunately, being the hacker that he is, [Todd] tore the game apart when he was just 14 to build his own Commodore 64 peripherals. He’s been wanting to make it up to his sister ever since, and he finally found a copy of this game to give to his sister last Christmas.

After opening up the box, [Todd] quickly noticed something strange with the power connector. It looked a bit charred and was wiggling inside of the enclosure. This is indicative of a bad solder joint. [Todd] decided he’d better open it up and have a look before applying power to the device.

It was a good thing he did, because the power connector was barely connected at all. A simple soldering job fixed the problem. While the case was still opened, [Todd] did some sleuthing and noticed that someone else had likely made repairs to several other solder joints. He also looked for any possible short circuits, but everything else looked fine. The system ended up working perfectly the first time it was started.

The end of the video shows that even after all this time, simple games like this can still capture our attention and be fun to play for hours at a time. [Todd] is working on part 2 of this series, where he’ll do a much more in-depth review of the system. You can watch part 1 below. Continue reading “Repairing And Reviewing A 1976 PONG Clone”

tweeter

Repairing Burnt Speakers With A Steady Hand

[Martin] seems to have a knack for locating lightly damaged second-hand audio gear. Over the years he’s collected various types of gear and made various repairs. His most recent project involved fixing two broken tweeter speakers.

He first he needed to test the tweeters. He had to remove them from the speaker cabinet in order to gain easier access to them. The multimeter showed them as an open-circuit, indicating that they had likely been burned. This is an issue he’s seen in the past with this brand of speaker. When too much power is pumped through the speaker, the tiny magnet wire inside over heats and burns out similar to a fuse.

The voice coil itself was bathing in an oily fluid. The idea is to help keep the coil cool so it doesn’t burn out. With that in mind, the thin wire would have likely burned somewhere outside of the cooling fluid. It turned out that it had become damaged just barely outside of the coil. [Martin] used a sharp blade to sever the connection to the coil. He then made a simple repair by soldering the magnet wire back in place using a very thin iron. We’ve seen similar work before with headphone cables.

He repeated this process on the second tweeter and put everything back together. It worked good as new. This may have ultimately been a very simple fix, but considering the amount of money [Martin] saved on these speakers, it was well worth the minimal effort.

RasPi Traffic Monitor

Dedicated Automobile Traffic Monitor With Raspberry Pi

[j3tstream] wanted an easier way to monitor traffic on the roads in his area. Specifically, he wanted to monitor the roads from his car while driving. That meant it needed to be easy to use, and not too distracting.

[j3tstream] figured he could use a Raspberry Pi to run the system. This would make things easy since he’d have a full Linux system at his disposal. The Pi is relatively low power, so it’s run from a car cigarette lighter adapter. [j3tstream] did have to add a custom power button to the Pi. This allows the system to boot up and shut down gracefully, preventing system files from being corrupted.

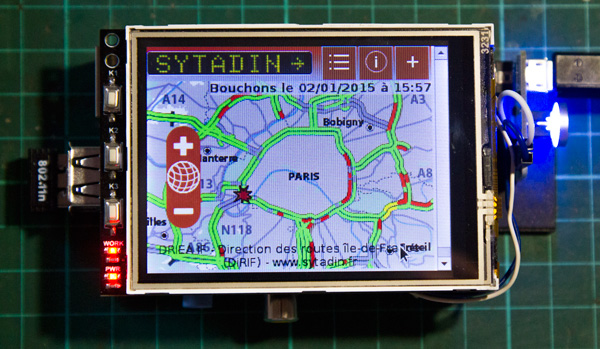
After searching eBay, [j3tstream] found an inexpensive 3.2″ TFT LCD touchscreen display that would work nicely for displaying the traffic data. The display was easy to get working with the Pi. [j3tstream] used the Raspbian linux distribution. His project page includes a link to download a Raspbian image that already includes the necessary modules to work with the LCD screen. Once the image is loaded, all that needs to be done is to calibrate the screen using built-in operating system functions.

The system still needed a data connection. To make things simple and inexpensive, [j3tstream] used a USB WiFi dongle. The Pi then connects to a WiFi hot spot built into his 4G mobile phone. To view the traffic map, [j3tstream] just connects to a website that displays traffic for his area.

The last steps were to automate as much as possible. After all, you don’t want to be fumbling with a little touch screen while driving. [j3tstream] made some edits to the LXDE autostart file. These changes automatically load a browser in full screen mode to the traffic website. Now when [j3tstream] boots up his Pi, it automatically connects to his WiFi hotspot and loads up local traffic maps.

phone controller

Breathe New Life Into Payphones With Asterisk

Payphones used to be found on just about every street corner. They were a convenience, now replaced by the ubiquitous mobile phone. These machines were the stomping grounds for many early computer hackers, and as a result hold a place in hacker history. If you’ve ever wanted to re-live the good ol’ days, [hharte’s] project might be for you.

[hharte] has been working to make these old payphones useful again with some custom hardware and software. The project intends to be an interface between a payphone and an Asterisk PBX system. On the hardware side, the controller board is capable of switching various high voltage signals required for coin-line signaling. The controller uses a Teensy microcontroller to detect the hook status as well as to control the relays. The current firmware features are very basic, but functional.

[hharte] also wrote a custom AGI script for Asterisk. This script allows Asterisk to detect the 1700hz and 2200hz tones transmitted when coins are placed into the machine. The script is also in an early stage, but it will prompt for money and then place the call once 25 cents has been deposited. All of the schematics and code can be found on the project’s github page.

[Thanks mies]

PuzzleBox

Captain Hermano’s Mystery Box Is Full Of Puzzles

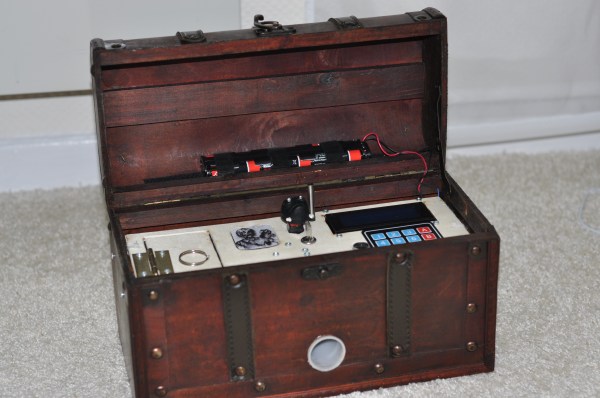
[Raffi] needed a birthday present idea but he wanted to do something extra special. He realized that a big part of gift giving is the anticipation and excitement of opening the present. In order to prolong this experience, [Raffi] built an electronic puzzle box. The box contains the final gift, but first a series of puzzles must be solved in order to open the box.

The project runs on an Arduino Mega. This is hooked up to several sensors, including a temperature sensor, GPS unit, and CO sensor. There is also an LCD screen and numeric keypad for user input and output. The project page contains a flow chart that shows all of the puzzles and their solutions. One of the more interesting puzzles requires the user to blow tobacco smoke into a tube. The CO sensor detects the smoke and unlocks the next puzzle.

Some of the puzzles require interacting with outside systems. For example, one puzzle requires the user to send an email to the fictional Captain Hermano’s email address. If the correct keyword is included in the email, the user will receive a reply with the code to enter into the box. Another puzzle requires the user to call a particular phone number and listen for another riddle. We’ve included the video demonstration below.

This isn’t the first puzzle box we’ve seen, but each one has its own special flair. This one is very well made and looks like a lot of care was put into it. We’ve seen another that uses only discrete components. We’ve seen yet another that uses Morse code. Continue reading “Captain Hermano’s Mystery Box Is Full Of Puzzles”