Papydoo Is Watching You!

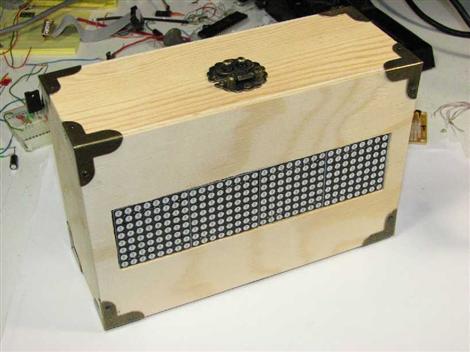
Papydoo spends most of its time sleeping, but if startled by vibration it will wake up and stare you down with a cold and unnerving robo-gaze like you have not seen before. Or it might just do something crazy like display a scrolling Space Invaders character marquee.  That’s the thing with Papydoo, you just never know.

Vibration sensing is accomplished with a piezo element harvested from an old horn speaker that is simply sandwiched between the project enclosure and the surface it is sitting on. A MCP601 op-amp is used to amplify the weak potentials from the piezo element and feed them to the ADC of a Zilog Z8F083A microcontroller. When sufficient vibration is detected, the MCU wakes up and displays one of a number of different animations on the front panel 32X8 LED matrix. The various display modes can also be manually selected using a small button on the back of the enclosure.

Power consumption is reduced to 150uA while sleeping by only briefly waking the MCU once per second to check the current vibration level. Nearly all of this power draw can be attributed to the op-amp, and although there are much more efficient models available, sometimes the best choice is just the one you already have on hand in your parts bin. Regardless, the power consumption is low enough to run the device off of a set of AA batteries.

We could imagine that similar setup could be used for a number of different low-powered messaging applications that would only “wake up” when someone was near enough to read and interact with. Add a loud speaker and this might even make a good alarm to keep pesky coworkers out of your “cube”. What would you do with a Papydoo?

Thanks for the tip [Laurence]! If you happen to read this, we are dying to know: why “Papydoo”?

Short video after the break.

Continue reading “Papydoo Is Watching You!”

Trackuino – An Open Source Arduino APRS Tracker

trackuino board

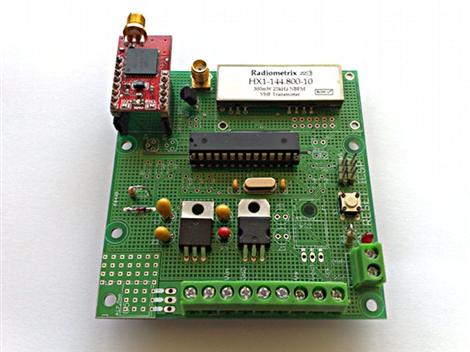
Trackuino is a new open source (GPLv2 license) Arduino APRS tracker designed by [Javier Martin]. If you are unfamiliar: APRS (Automatic Packet Reporting System) is an amateur radio method used to relay small packets of position-tracking data to an online database for easy access and mapping. In this case, GPS telemetry data is used to track latitude, longitude, altitude, course, speed, and time measurements in near real-time via aprs.fi.

Although this reminds us of the WhereAVR that we covered previously, the Trackuino includes an onboard radio so no external handheld unit is necessary. Since the Trackuino was designed primarily for high-altitude balloon tracking, a number of useful related features are also included: dual temperature sensors, support for a humidity sensor, and a remote “cut-down” trigger really make this a complete package.

Initially there was some concern that the 300mW radio used would not be powerful enough to reach the ground-based receivers from peak altitudes. This was clearly not an issue however, as the signal was heard from nearly 600Km away during the maiden voyage. If this still doesn’t sound like enough power, a 500mW radio is also supported.

Make sure to check out [Javier]’s blog for some amazing high-altitude photos and everything needed to get your own Trackuino up and running in no time!

Thanks [Brad]!

Oscilloscope Piano Tuning 101

fft on scope

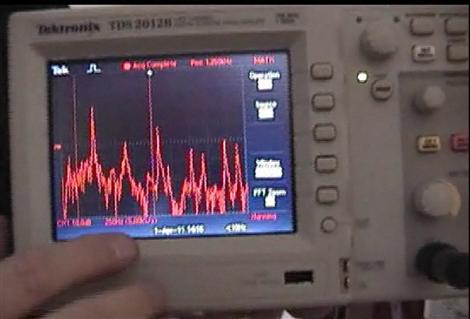
[Todd Harrison] recently wrote in to tip us off on his submission to the Tektronix oscilloscope contest – using a scope to tune a piano. In his video he demonstrates how a Fast Fourier Transform can be used to determine the fundamental frequency of the note being played. This is a quick and easy way to determine if that key is in tune, and if not, how far off it is from the desired frequency and in which direction.

He goes on to explain that a scope can only be used as a starting reference point since “mathematically correct” tuning on a piano doesn’t sound right to the human ear. It turns out that when struck, the stretched wires in the piano behave less than ideally. In the case of a piano, the overtones (the other peaks shown on the scope higher in frequency than the fundamental) are actually slightly sharper (higher in frequency) than the expected harmonic whole-number multiple of the fundamental frequency.  As a result, the frequency ranges of each octave must be “stretched” in order to accommodate this and sound correct when multiple notes are played together across octaves.

Typically, only the A4 key is actually tuned to its correct frequency of 440Hz and all of the other keys are manually tuned off of this baseline. The amount of necessary stretch applied to each octave increases as you get further away from this initial reference point in either direction and is unique to each and every individual instrument – thus there is no universal device capable of perfect tuning. Although [Todd] admits that he won’t attempt to tune the entire piano himself using this technique, he finds it a convenient way to keep the most heavily played center sections of the piano closer to true between professional tunings.

If you have any interesting or unique uses for your Techtronix scope, you can enter the contest here. Just don’t forget to tip us off too!  Thanks [Todd]!

OSHW Logo Announced

The results are in and the new Open Hardware logo has been selected! After tallying nearly 9,000 votes it has been decided that “Golden Orb” by Macklin Chaffe will now represent the OSHW definition v1.0.

Rest assured that despite earlier controversy regarding a few users that had submitted a very large number of duplicate votes (over 3,100 in all), the results have been cleaned up and validated prior to announcing the winner.

If you agree with the definition you can now go ahead and use the logo on your creations! Some creative individuals at this Open Hardware Summit forum have made it easy for you with logos of varying sizes, colors, and fill – perfect for application on any background. Here you will also find vector-based versions and even an Eagle parts library for inclusion on your next board’s silkscreen!

[Jason] at MrDecals.com has also generously offered 3 free decals of the new logo to anyone who asks – just pay for shipping. Please note that this is not a paid advertisement, [Jason] received permission from opensourcehardware.org to run the promotion and $1 for US shipping seems very reasonable. We are guessing from the responses to previous giveaways that many HackaDay readers might be interested!

We personally love the way that the new logo keeps with the feel of the Open Source Intiative logo and can’t wait to see what hardware it starts showing up on!

Giant Scale Printer

Giant Printer Print Head

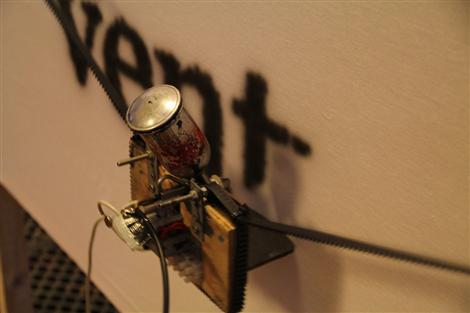
This giant printer was originally constructed by [Komponent/LAB] in 2006 to print some large-format banners for a festival, but has recently been pulled out of storage and updated for the Venture Cup competition. The system received a few mechanical and software updates and was also mounted on tripods in order to make it fully portable.

Instead of using stepper motors and encoders to directly control the print head as in a typical printer, the entire print axis is turned vertically and the relative lengths of two belts are varied (along with the constant downward pull of gravity) to precisely control movement across the plane. The software uses HPGL plotter files and is able to scale them to fit the available printing area.

Although there are some issues with the print head wobbling due to the rapid accelerations, any printed imperfections appear to be difficult to notice from more than a few feet away. Precision could be further increased by tweaking the software to compensate for such unwanted movements.

Although we can imagine many different applications for such a printer such as architectural or street art, some fine tuning would definitely be required at very large scales and to compensate for wind, etc if done outdoors.

Here are some pictures of the build and there is a short video of it in action after the jump.

[via GeekPhysical]

Continue reading “Giant Scale Printer”

How Low Can You Go?

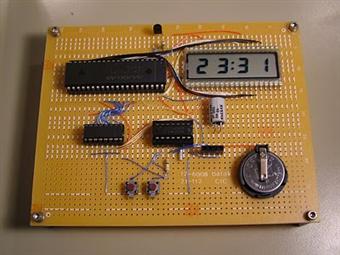
That’s exactly what [Kenneth Finnegan] figured out with his original investigation into low powered MSP430-based circuits. He was able to keep a count-up timer running off of 20F worth of capacitors for over 10 weeks. Although quite impressive by its own merit, many people left comments that questioned whether similar results would be seen in a circuit with functionality more advanced than simply incrementing a single digit on an LCD. Well folks, [Kenneth] has stepped it up again with this ultra low power LCD clock.

The biggest challenge in creating this clock was finding an efficient way to drive the 28 LCD segments off of the limited number of pins on his MSP430G2231 chip while still having open pins for button inputs as well. An ICM7211 LCD driver is definitely up for the task (with a few clever modifications to drive the auxiliary characters such as the center colon), but requires 8 pins to drive it. A standard 74HC595 latching shift register brings this number down to a more manageable number of 3 total pins.

Once completed the total current consumption was found to be around 12μA – low enough for a claimed run-time of approximately two and a half years from the 3V 200mAh CR2032 coin cell used. If true, a set of standard AA alkaline cells in series as found in many clocks would run this little circuit for decades.

Stick around for a short video after the break and make sure to check out the original blog entry for schematics and the complete source code!

Continue reading “How Low Can You Go?”

PID Sous-Vide Slow Cooker – Bon Appétit!

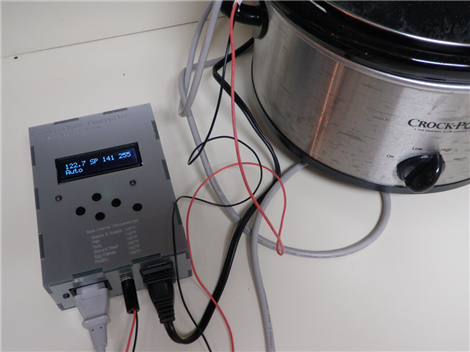
In search of a perfectly-cooked brisket, [Aaron] recently completed this DIY  PID-controlled sous-vide slow cooker. Sous-vide (French for “under vacuum”) is a cooking technique in which foods are typically vacuum-sealed and then cooked in a relatively low temperature water bath for an extended period of time. This is done to minimize temperature gradients throughout the food to ensure even cooking. Precise regulation of the water temperature is the key to ensuring that the results are exactly as desired – when cooking for many hours or days, even a few degrees discrepancy can greatly influence the final product.

A few months ago we featured a similar hack that utilized a simple switching temperature controller spliced into an extension cord.  Although probably sufficient for most aspiring “hacker-chefs”, the temperature was not as stable as it could be. The problem is that it takes time for the heat generated in the slow cooker’s heating element to reach the temperature probe (and food) suspended in the water bath.  By the time the probe reads the elevated temperature, the element is already too hot and the temperature overshoots the target. One way to mitigate this effect is to circulate the water to minimize temperature gradients, as is done in many of the expensive commercial units. In order to achieve similar results, [Aaron] instead created a PID controller that uses temperature feedback over time to precisely maintain the desired temperature and reduce any deviations resulting from outside disturbances.

The build is covered in detail and looks great in a custom acrylic enclosure. All of the board schematics, enclosure layout files, and source code are available under Creative Commons licensing at the bottom of his blog page. A good deal of time is also spent addressing the actual PID programming and tuning – something that could be useful for many different hacks requiring precise feedback control.

The end result is a professional looking control box and a slow cooker that is able to maintain temperature within 1°F even while using a DS1820 temperature sensor that is only rated as accurate to 0.5°C (0.9°F). From the pictures it looks like [Aaron] has finally achieved brisket bliss! Now the only question remaining is: what is the best setting for reheating left-over pizza?