Cardboard CNC Machine Boxes Up Both A Tool And A Framework

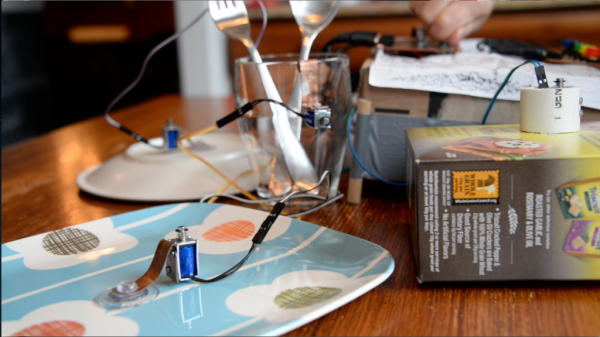
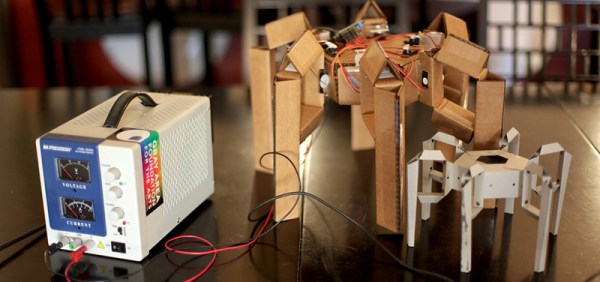
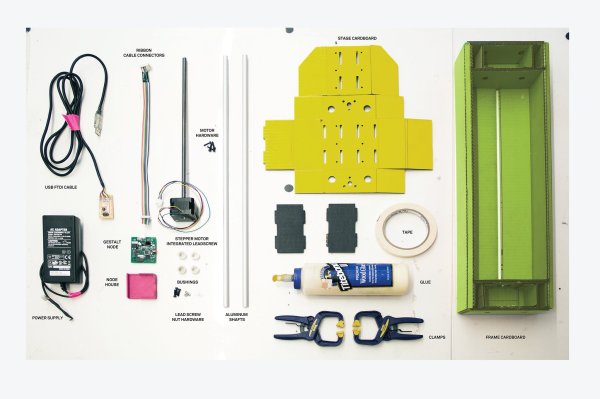
Want to build up a desktop CNC machine without breaking your pocketbook? [James Coleman], [Nadya Peek], and [Ilan Moyer] of MIT Media Labs have cooked up a modular cardboard CNC that gives you the backbone from which you can design your own machine.

The CNC build comprises of design instructions for a single axis linear stage and single axis rotary stage with several ideas on how to combine multiple of these axes together to construct a particular machine. Whether your milling wood, laser-engraving your desk, or pipetting your bacteria samples, the designs [Dropbox] and physical components can be adopted for your end-application.

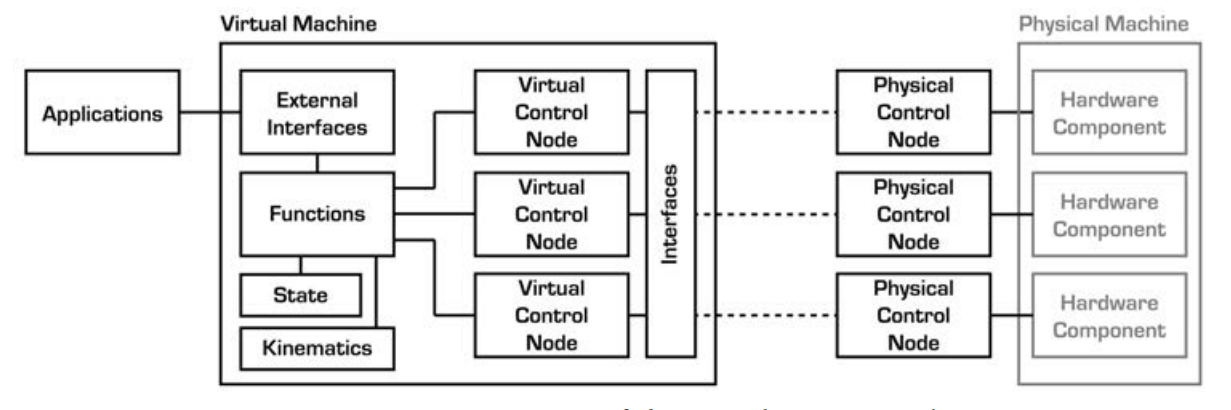
Perhaps the most interesting aspect of this project is that, at the high level, it is not just a cnc, but a framework known as Gestalt. This architecture enables users to develop their own machine configuration consisting of multiple software nodes linked together with high-level Python Code. Most of the high level computation is organized by a Python library that calls compiled C-code. This high-level framework processes instructions through the desired machine’s kinematics to output commands to the motor controllers. Finally, the top-level interface does away with the archaic GCode with two alternatives: a Python interface consisting of function calls to procedures and a remote interface to make procedure calls through http requests. While the downside of a motion control language is that commands have no standardization; they are, however, far more human-readable, a benefit that plays into the Gestalt Framework’s aim “to be accessible to individuals for personal use.”

gestaltFramework

In the paper [PDF], [Ilan] expresses the notion of a tool as an impedance-matching device, an instrument that extends the reach of our creativity to bend and morph a broader range of shapes into forms from our imagination. Where our hands fail in their imprecision and weakness, tools bridge this gap. Gestalt and the Cardboard CNC are first steps to creating a framework so that anyone can design and realize their own impedance-matching device, whether they’re weaving steel cables or carving wood.

The folks at MIT Media Labs a familiar heavy-hitters in this field of low-cost machinery, especially the kind that fit in a suitcase. We’re thrilled to see a build that reaches out directly to the community.

via [CreativeApplications.net]

Kitsch-Instrument Pulls A Sonata Out Of Your Dishware

Remember those childhood memories of your grandmother telling you to stop hammering away at her pots and pans? Odds are pretty good that the last time you struck a beat with her dishware, you had a few more years to go before you understood tempo and rhythm. Now that we’re a bit older, [Jiffer Harriman] invites us to return to our kitchen armed not only with those childhood memories, but also a with the Kitsch-Instrument: a suite of solenoids, a controller, and a software pipeline to algorithmically turn your kitchen into a giant percussion instrument.

The Kitsch-Instrument is a modular music system that enables the user to pull a percussive pattern out of his or her everyday kitchen utensils. The percussion hits come from a series of mosfet-driven solenoids that can be fixed onto plates, cups, and other everyday items through a variety of clips. These solenoids are collectively driven by two stacked custom Arduino shields that are, in turn, driven either by hand with a button-interface, or algorithmically with a pattern generated by the graphical programming language, Pure Data.

In designing this project, [Jiffer] and his team intended to bring not just a musical tool to young tinkerers. They also aimed to help educate these young minds with multiple entry points into their project. For top-level users, adding buttons is almost as easy as plug-in-and-play. For experienced circuit designers and tinkerers, the entire project is open source with the board layout and software available for download. Overall the project can be explored from lower and lower levels while still retaining its functionality as a musical interface.

If you suspect that this project seems to have that same whimsical sense as the Auto-Meter-Reader Feeder, you’d be right! [Jiffer] and [Zack] hail from the same lab at the University of Colorado. We’re excited to see what upcoming beats will arise from a truly off-the-shelf symphony.

via the [Tangible Embedded and Embodied Conference]

Continue reading “Kitsch-Instrument Pulls A Sonata Out Of Your Dishware”

Fold A Hexapod From Pilfered Office Supplies

Hexapods are wonderful things. With their elegant gait and insect-like caricature, they’re an instant hit for coffee-table-conversation-starters. They’re also wonderfully expensive, with the redundancy of each leg chewing viciously into your pocket. This price point is a deal-breaker for many, but for others, it’s a challenge to let one’s design skills defy that barrier. [Mike Estee] is one such engineer who’s done his best to design away a stock structure with a cardboard variant that wont break the bank.

On the table, [Mike] assembles his hexapod frame from budget servos, corrugated cardboard, paper clips, and tape. The result is a hexapod frame that can be built for practically just the cost of the servos (about $80 in this case). In his posts, [Mike] details the design evolution of the frame focusing especially on the legs, which he intended to be folded from a single sheet. After a few revisions, [Mike] succeeded, and he’s graciously posted his latest revision on his blog [PDF].

While we’ve certainly seen impressive budget hexapods before, we really appreciate the elegance and simplicity of a design made entirely from a single sheet of cardboard. His progress is a step forward to reaching a ubiquitous low-cost, force-control based robot platform. While that’s a milestone many of us hope to see in the future, he’s done a fantastic job designing a proof-of-concept frame template that anyone can cut out and assemble with a couple of spare hours.

Continue reading “Fold A Hexapod From Pilfered Office Supplies”

Home-brew Vibration Cleaner Leaves Your SLA Prints Squeaky-Clean

If you’ve had the chance to add a Form 1+ 3D printer to your basement, you might find the post-print cleaning step a bit tedious. (A 20-minute alcohol bath? Outrageous!) Fortunately, for the impatient, [ChristopherBarr] has developed the perfect solution: a post-print agitator that cuts the time in-and-out-of the bath from 20 minutes to about two.

[ChristopherBarr’s] build is the right conglomerate of parts we’d expect when keeping the price down for this hack. He’s combined a palm sander, a couple pints of urethane expanding foam, and two loaf pans into one agitating mechanism that he’s dubbed “the Loafinator.” With the urethane expanding foam, [ChristopherBarr] achieved a near-perfect fit of the sander inside the loaf pan, now that the foam has filled in the remaining contours to hold the sander in place. Best of all, the sander hasn’t been sacrificed for this build; instead, the foam holder was assembled in three stages and isolated from the sander with a layer of plastic wrap to enable later extraction.

[ChristopherBarr’s] simple, yet practical, hack serves as an excellent solution to a number of hobbyists looking to “get things agitated.” While his device is able to polish off the uncured resin from his resin prints much faster than the conventional approach, we’d imagine that a similar build could greatly expedite the PCB etching process in a muriatic-acid or ferric-chloride based PCB etching procedure–far more quickly than our previous automated solution. The time-saving comes at a price; however. Once you’ve installed your very own Loafinator alongside your printer, expect a few nosy neighbors to start asking for visits to check out your new motorboat.

Continue reading “Home-brew Vibration Cleaner Leaves Your SLA Prints Squeaky-Clean”

Auto-Meter Reader Feeder Keeps Meter-Maids At Bay

Planting your car just about anywhere almost always comes at a price; and, if you’re overdue for your return, odds are good that you’ll end up paying a much steeper price than intended. Parking meters are wonderful devices at telling the authorities just how much time you have left until you’re ticketworthy. [Zack] figured that five–even ten minutes late—is an absurd reason to pay a fine, so he’s developed a tool that will preload a meter with a few extra coins when the authorities get too close.

The law-enforcement detection system puts together of number of tools and techniques that we’re intimately familiar with: 3D printing, Arduino, a photoresistor, and a proximity (PIR) sensor. At the code level, [Zack] filters his analog photo resistor with a rolling average to get a clean signal that triggers both by day and by night. The trigger? Two possibilities. The PIR sensor detects curious law enforcement officers while the filtered photoresistor detects the periodic twirling siren lights. Both events will energize a solenoid to drop a few extra coins through a slide and into the meter slot.

For a collection of well-known components, [Zack] could’ve packed his contraption into a Altoids Tin and called it a day. Not so. As an interaction designer, looks could make or break the experience. For this reason, he opts for a face-hugging design with a steampunk twist. Furthermore, to achieve compatibility across a range of devices, [Zack’s] CAD model is the result of adjusting for various meter profiles from images he snapped in the urban wilderness. The result? A clean, authentic piece of equipment compatible with a family of meters.

For the shrewd-eyed observers, [Zack’s] first video post arrived online in 2011, but his work later resurfaced at a presentation in the 2015 Tangible, Embedded, and Embodied Conference by his former design instructor [Eric Paulos], who was eager to show off [Zack’s] work. For a deeper dive into the upcoming second edition, head on over to [Zack’s] image feed.

Continue reading “Auto-Meter Reader Feeder Keeps Meter-Maids At Bay”

Spline Thieving Makes Hobby Servos Even More Useful

For years the proprietary spline pattern of rc servos has been a dealbreaker for hobbyists who want to add custom shafts and gears to their servos. First, different servo sizes have different spline sizes, and each vendor equips their servos with different patterns. True, some special vendors sell custom gears that mate to these patterns, but, overall, the hard-to-replicate pattern has severely limited the output options for servos.

This pattern didn’t deter [JB], however. With some clever CAD skills, and two working implementations, he’s demonstrated that these spline patterns can be (1) harvested and (2) added into custom components, opening a new suite of design opportunities involving servos.

To capture the spline, [JB] imports an image into Solidworks, and traces the pattern on a properly scaled image. From there, he can embed this pattern directly into a physical model for fabrication.

To make parts that preserve this pattern, [JB] has two options. With his FormLabs printer, he can print components that already have the pattern feature, allowing him to press-fit custom links directly onto servos. Alternatively, for a sturdier component, he presents the milling method. With this technique, he drills a circle of bolt holes onto the desired output shaft and then mills out the center. From here, the shaft can also be directly pressed onto the servo spline where each spline groove fits snugly into the edge of the previously-drilled holes.

So, how well do they work? According to [JB] he’s actually managed to do some damage to himself before damaging to the 3D-printed part while trying to strip the pattern. The end-goal is to insert these shafts into transmissions for a miniature combat robot, another one of [JB’s] projects which is well-underway. Until then, we’re looking forward to seeing more servos tightly-integrated into upcoming projects.

SPATA: Shaving Seconds And Saving Brainpower Whilst 3D-modeling

If you’ve spent some late nights CADing your next model for the 3D printer, you might find yourself asking for a third hand: one for the part to-be-modeled, one for the tool to take measurements, and one to punch the numbers into the computer. Alas, medical technology just isn’t there yet. Luckily, [Christian] took a skeptical look at that third hand and managed to design it out of the workflow entirely. He’s developed a proof-of-concept tweak on conventional calipers that saves him time switching between tools while 3D modeling.

His build [PDF] is fairly straightforward: a high-resolution digital servo rests inside the bevel protractor while a motorized potentiometer, accelerometer, and µOLED display form the calipers. With these two augmented devices, [Christian] can do much more than take measurements. First, both tools are bidirectional; not only can they feed measurement data into the computer with the push of at button, both tools can also resize themselves to a dimension in the CAD program, giving the user a physical sense of how large or small their dimensions are. The calipers’ integrated accelerometer also permits the user to perform CAD model orientation adjustments for faster CAD work.

How much more efficient will these two tools make you? [Christian] performs the same modeling task twice: once with conventional calipers and once with his tools. When modeling with his augmented device, he performs a mere 6 context switches, whereas conventional calipers ratchet that number up to 23.

In a later clip, [Christian] demonstrates a design workflow that combines small rotations to the model while the model is sculpted on a tablet. This scenario may operate best for the “if-it-looks-right-it-is-right” sculpting mindset that we’d adopt while modeling with a program like Blender.

Of course, [Christian’s] calipers are just a demonstration model for a proof-of-concept, and the accuracy of these homemade calipers has a few more digits of precision before they can rival their cousin on your workbench. (But why let that stop you from modifying the real thing?) Nevertheless, his augmented workflow brings an elegance to 3D modeling that has a “clockwork-like” resonance of the seasoned musician performing their piece.

[via the Tangible, Embedded, and Embodied Interaction Conference]

Continue reading “SPATA: Shaving Seconds And Saving Brainpower Whilst 3D-modeling”