Store Digital Files For Eons In Silica-Encased DNA

If there’s one downside to digital storage, it’s the short lifespan.  Despite technology’s best efforts, digital storage beyond 50 years is extremely difficult. [Robert Grass, et al.], researchers from the Swiss Federal Institute of Technology in Zurich, decided to address the issue with DNA.  The same stuff that makes you “You” can also be used to store your entire library, and then some.

As the existence of cancer shows, DNA is not always replicated perfectly. A single mismatch, addition, or omission of a base pair can wreak havoc on an organism. [Grass, et al.] realized that for long-term storage capability, error-correction was necessary. They decided to use Reed-Solomon codes, which have been utilized in error-correction for many storage formats from CDs to QR codes to satellite communication. Starting with uncompressed digital text files of the Swiss Federal Charter from 1291 and the English translation of the Archimedes Palimpsest, they mapped every two bytes to three elements in a Galois field. Each element was then encoded to a specific codon, a triplet of nucleotides. In addition, two levels of redundancy were employed, creating outer- and inner- codes for error recovery. Since long DNA is very difficult to synthesize (and pricier), the final product was 4991 DNA segments of 158 nucleotides each (39 codons plus primers).

Continue reading “Store Digital Files For Eons In Silica-Encased DNA”

ESP8266 ESP07 Module DoA Fix

It seems the Far-East factories can’t churn out ESP8266 based modules fast enough to feed all the world’s hackers. Well, Pick-n-Place machines are human too, so it’s not too long before you end up with a messed up batch from a factory. [Tracker Johnny] found a bunch of ESP07 modules which had their resonator mounted the wrong way around, effectively making them DoA. The resonator mounting isn’t consistently wrong too – most have reported them 90 deg offset, while others had them 180 deg. off.

Unfortunately, you need some tools and skills to fix the error. The ESP07 modules have a metal shield which needs to be removed to access the resonator. This is best done using a hot air gun. With the cover removed, you need to de-solder the resonator, and put it back in the right orientation as shown in the pictures on [Tracker Johnny]’s blog. You can find other people reporting the same fault at this forum thread. Coming in the wake of the problem with magic smoke from ESP8266 based ESP01 modules we reported earlier, it seems obvious that quality comes at a cost.

Pre-Web Hardware Connects To The Web

We’re not quite to the 25th anniversary of the world wide web, but that doesn’t mean the greatest innovation in information distribution since [Gutenberg]’s press can’t be celebrated a bit early, does it? [Suhayl] is throwing some of his hardware into the ring, and loading up the first web page with a modem from the mid 1960s and a teletype from the mid 70s. No, no sane person would have ever done this 25 years ago, but it’s neat to watch in any event.

The hardware [Suhayl] is using includes a Livermore Data Systems modem. It’s a finely crafted wooden box with an acoustic coupler on top, and a DB-25 connector on a side that connects to a terminal or computer via RS-232. If that Livermore Data Systems acoustic coupler modem looks familiar, you might be right. This modem was demoed back in 2009 by [phreakmonkey]. It’s an impressive little box that can connect to a remote system at up to 300 baud.

The I/O is handled by an ASR-33 teletype. This was the standard way to connect to computers and mainframes before we were all blessed with video terminals and TV typewriters. The whole setup connects to a Unix system with a much more familiar Hayes modem, runs a text-only browser, and retrieves the first web page as it was served up at CERN some 25 years ago.

Fold A Hexapod From Pilfered Office Supplies

Hexapods are wonderful things. With their elegant gait and insect-like caricature, they’re an instant hit for coffee-table-conversation-starters. They’re also wonderfully expensive, with the redundancy of each leg chewing viciously into your pocket. This price point is a deal-breaker for many, but for others, it’s a challenge to let one’s design skills defy that barrier. [Mike Estee] is one such engineer who’s done his best to design away a stock structure with a cardboard variant that wont break the bank.

On the table, [Mike] assembles his hexapod frame from budget servos, corrugated cardboard, paper clips, and tape. The result is a hexapod frame that can be built for practically just the cost of the servos (about $80 in this case). In his posts, [Mike] details the design evolution of the frame focusing especially on the legs, which he intended to be folded from a single sheet. After a few revisions, [Mike] succeeded, and he’s graciously posted his latest revision on his blog [PDF].

While we’ve certainly seen impressive budget hexapods before, we really appreciate the elegance and simplicity of a design made entirely from a single sheet of cardboard. His progress is a step forward to reaching a ubiquitous low-cost, force-control based robot platform. While that’s a milestone many of us hope to see in the future, he’s done a fantastic job designing a proof-of-concept frame template that anyone can cut out and assemble with a couple of spare hours.

Continue reading “Fold A Hexapod From Pilfered Office Supplies”

Spin Up An Old Hard Drive With A Solenoid Motor

Just about all of us have a few old hard drives in our junk box. There are a myriad of projects out there to put them to work in new and interesting ways. One of those ways is to turn your hard drive into a solenoid motor of sorts. (YouTube link) This isn’t a new hack, videos of it have been kicking around the internet for years. [black1985vette] gives a pretty good explanation of how he’s done it. He used a piece of brass as a connecting rod between the drive head and a pin mounted off-center to the platter hub. One of the platter mounting screws provides the perfect place to set the pin. A bent safety-pin rubs the center of the hub, which is partially insulated with tape. When the pin contacts the hub, the drive head is energized, pushing the whole assembly around. The mass of the platters acts as a flywheel, carrying the motor the rest of the way around.

[Pulverrostmannen] performed a similar mod, though he used a micro switch to time the drive head. Rather than a brass connecting rod, [Pulverrostmannen] used a spare head. With a simple transistor circuit acting as a speed control, his hard drive motor revved up to around 1560 RPM, which is pretty respectable for a bunch of junk parts.

So next time you’re stuck in on cold rainy weekend, pull out some of those old drives and get hacking! Click past the break to several of these projects in action.

Continue reading “Spin Up An Old Hard Drive With A Solenoid Motor”

Play Music With Your Painting Using Teensy

[sab-art], a collaboration between [Sophia Brueckner] and [Eric Rosenbaum], has created a touch-sensitive musical painting. Initially, basic acrylic paint is used for the majority of the canvas. Once that is dry, conductive paint is used to make the shapes that will be used for the capacitive touch sensing. As an added step to increase the robustness, nails are hammered through each painted shape and connected with wiring in the back of the painting. These wires are then connected to the inputs of a Teensy++ 2.0, using Arduino code based on MaKey MaKey to output MIDI. The MIDI is then sent to a Mac Mini which then synthesizes the sound using Ableton Live.  Any MIDI-processing software would work, though. For this particular painting, external speakers are used, but incorporating speakers into your own composition is certainly possible.

A nice aspect of this project is that it can be as simple or as complex as you choose. Multiple conductive shapes can be connected through the back to the same Teensy input so that they play the same sound. While [sab-art] went with a more abstract look, this can be used with any style. Imagine taking a painting of Dogs Playing Poker and having each dog bark in its respective breed’s manner when you touch it, or having spaceships make “pew pew” noises. For a truly meta moment, an interactive MIDI painting of a MIDI keyboard would be sublime. [sab-art] is refining the process with each new painting, so even more imaginative musical works of art are on the horizon. We can’t wait to see and hear them!

Continue reading “Play Music With Your Painting Using Teensy”

Pain Box Project

Making The Dune “Pain Box” A Reality

If you are unfamiliar with Dune, then you may not know what the pain box is. The pain box is a fictional device that produces an excruciating burning sensation without causing any actual damage. [Bryan] has been working on a project to duplicate this effect in the real world. It sounds like he may be on the right path by using the “thermal grill illusion”.

The thermal grill illusion is a sensory trick originally demonstrated back in 1896. The trick is made up of two interlaced grills. One is cool to the touch, and the other is warm. If the user touches a single grill, they won’t experience any pain because neither temperature is very extreme. However if the user places their hand over the interlaced grills simultaneously they will immediately experience a burning heat. This usually causes the person to pull their hand away immediately. It’s a fun trick and you can sometimes see examples of it at science museums.

The thermal grill illusion sounded like the perfect way to make the pain box a reality. [Bryan] has set specific constraints on this build to make it more true to the Dune series. He wants to ensure the entire package fits into a small box, just big enough to place an adult hand inside. He also wants to keep safety in mind, since it has the potential to actually cause harm if it were to overheat.

[Bryan] has so far tried two methods with varying success. The first attempt involved using several thermoelectric coolers (TECs). [Bryan] had seen PCBs etched a certain way allowing them to radiate heat. We’ve seen this before in 3D printer surfaces. He figured if they could become hot, then why couldn’t they become cold too? His idea was very simple. He etched a PCB that had just two large copper pours. Each one branched out into “fingers” making up the grill.

Each side of the grill ultimately lead to a flat surface to which a TEC was mounted. One side was cold and the other was hot. Heat sinks we attached to the open side of the TECs to help with performance. Unfortunately this design didn’t work. The temperature was not conducted down to the fingers at all. The back side of the PCB did get hot and cold directly under the TECs, but that wouldn’t work for this illusion.

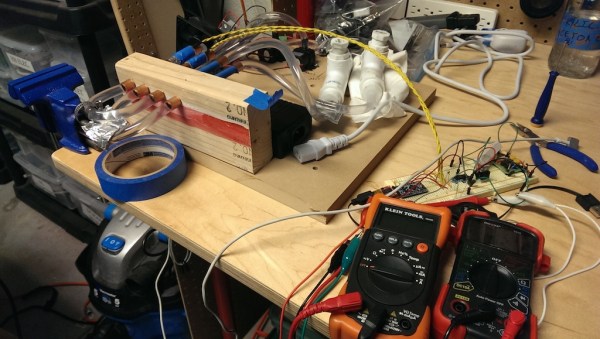
The latest version of the project scraps the PCB idea and uses small diameter copper tubing for the grill. [Bryan] is working with two closed loop water systems. One is for warm water and the other is for cold. He’s using an aquarium pump to circulate the water and the TECs to actually heat or cool the water. The idea is that the water will change the temperature of the copper tubing as it flows through.

While the results so far are better than the previous revision, unfortunately this version is having problems of its own. The hot water eventually gets too hot, and it takes over an hour for it to heat up in the first place. On top of that, the cold water never quite gets cold enough. Despite these problems, [Bryan] is hopefully he can get this concept working. He has several ideas for improvements listed on his blog. Maybe some Hackaday readers can come up with some clever solutions to help this project come to fruition.