Northern Pike 3D printed plane

Awesome Looking 3D Printed RC Plane Is Full Of Design Considerations

Designing and 3D printing RC planes offer several interesting challenges, and so besides being awesome looking and a fast flier, [localfiend’s] Northern Pike build is definitely worth a look. Some details can be found by wading through this forum but there’s also quite a bit on his Thingiverse page.

Tongue-and-groove joint for the wing
Tongue-and-groove joint

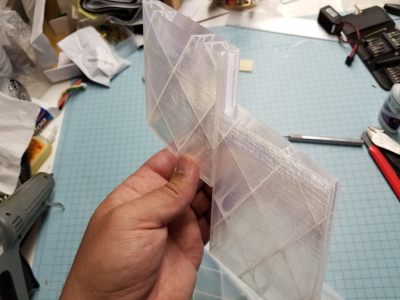
Naturally, for an RC plane, weight is an issue. When’s the last time you used 0% infill, as he does for some parts? Those parts also have only one perimeter, making this thin-walled-construction indeed. He’s even cut out circles on the spars inside the wings. For extra strength, a cheap carbon fiber arrow from Walmart serves as a spar in the main wing section. Adding more strength yet, most parts go together with tongue-and-groove assembly, making for a stronger join than there would be otherwise. This slotted join also acts as a spar where it’s done for two wing sections. To handle higher temperatures, he recommends PETG, ABS, ASA, Polycarbonate, and nylon for the motor mount and firewall while the rest of the plane can be printed with PLA.

As you can tell from the videos below, [localfiend’s] flier is a high-performance 3D printed machine. But such machines don’t have to be relegated to the air as this RC jet boat demonstrates. Though some do hover on a thin cushion of air.

Continue reading “Awesome Looking 3D Printed RC Plane Is Full Of Design Considerations”

One-byte binary LED display

See Binary On Your Breadboard

When you’re debugging a board which has an ESP32, Raspberry Pi, or Arduino, it’s easy to slap on a small LCD display or connect via WiFi to see what’s wrong. At least, that’s what the kids are doing. But what if you’re old-school or you don’t have one of those pimped-out, steroid-filled boards? A resistor and an LED will often suffice. Powering the LED means one thing and not powering it means another. And with seven more LEDs you can even display 0-255 in binary.

[Miguel] is clearly in the latter camp. To make debugging-with-LEDs easy, he’s come up with an 8-LED board complete with resistors. He’s even included the Gerber files needed for you to make your own. One row of pins are all connected together and the other row are not. So whether you’re using common cathode or common anode depends on how you orient the LEDs when you solder them in place. You might perhaps have one board of each type at the ready.

But who are we kidding? This is just plain fun to have on a breadboard. Show your prototype doohickey to a friend and you know they’ll be drawn to the little binary counter in the corner pulsing 42 or counting down until it starts flashing 255.

At risk of getting too feature-rich, you could then add two keys for a binary keyboard or add more LEDs to display 32-bit binary Unix Epoch time and see how long until your friends figure that one out.

Continue reading “See Binary On Your Breadboard”

Monitoring blinking LED for home power usage

Monitoring Power By Counting Blinks

What do you do when you want to add a new feature to some electronics but you can’t or don’t want to tear into the guts? You look for something external with which you can interface. We like these hacks because they take some thinking outside the box, literally and figuratively, and often involve an Aha! moment.

[Simon Aubury’s] big household load was electric heating and his ancient heaters didn’t provide any way to monitor their usage. His power meters weren’t smart meters and he didn’t want to open them up. But the power meters did have an external LED which blinked each time 1 Wh was consumed. Aha! He could monitor the blinks.

Home power usage graph
Maximum is white, average is orange, and minimum is blue.

Doing so was simple enough. Just point photoresistors at the two meter’s LEDs and connect them and capacitors to a Raspberry Pi’s GPIO pins. Every time a pulse is detected, his Python code increments the LED’s counter and every fifteen minutes he writes the counters to an SQL database. Analysing his data he saw that nothing much happens before 5 AM and that the lowest daytime usage is around noon. The maximum recorded value was due to a heater accidentally being left on and the minimum is due to a mini holiday. Pretty good info given that all he had to go on was a blinking light.

Where else are there LED indicators which you can tap into? Here’s an only slightly more invasive usage where a washing machine’s “end of cycle” LED  was removed and the power going to it was rerouted to an Arduino for remote monitoring.

sigrok I2C screenshot

Doing Logic Analysis To Get Around The CatGenie’s DRM

The CatGenie is an amazing device to watch in action, basically a self-cleaning litter box for cats that even does away with the need to replace the litter. It’s comparable to what the indoor flush toilet is for humans compared to maintaining a composting toilet. However, there is a problem. It uses costly soap cartridges which have to be replaced because an RFID reader and a usage counter prevent you from simply refilling them yourself.

CatGenie and Arduino

[David Hamp-Gonsalves] reverse engineered the electronics so that he didn’t have to pay for the cartridges anymore. This has been done before and one of those who did it created a product called the CartridgeGenius, but it’s made and sold as a parttime project and there were none in stock. The cartridges have an RFID tag and another solution which we’ve covered before is to replace the RFID reader board with an Arduino. That’s the solution [David] adopted. So why write this post if this isn’t new?

The RFID reader board communicates with the rest of the CatGenie using I2C and he needed to know what was being transmitted. To do that he learned how to use a cheap logic analyzer to read the signals on the I2C wires, which makes this an interesting story. You can see the logic analyser output on his blog and GitHub repository along with mention of a timing issue he ran into. From what he learned, he wrote up Arduino code which sends the same signals. He and his cat are now sitting pretty.

What he didn’t do is make a video. But the CatGenie really is amazing to watch in action as it goes through its rather complex 30-35 minute process so we found a video of it doing its thing, shown at 3.5x speed, and included that below.  If you’re into that sort of thing.

Continue reading “Doing Logic Analysis To Get Around The CatGenie’s DRM”

Electronics in clear epoxy pyramid

Epoxy Embedded Electronic Art Running On Pyramid Power

We sometimes get our inspirations from art. When [kodera2t] saw some Japanese art of fish drawings embedded in clear epoxy he just had to make his own. But while skilled in electronics, he wasn’t skilled at drawing. We’d still call him an artist, though, after seeing what he came up with in his electronics embedded in crystal clear epoxy.

Controlling epoxy-empedded leds through Bluetooth
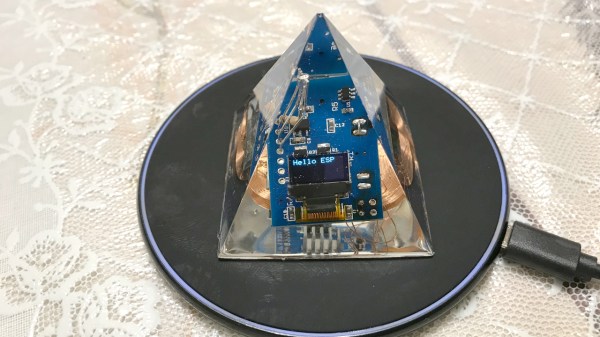
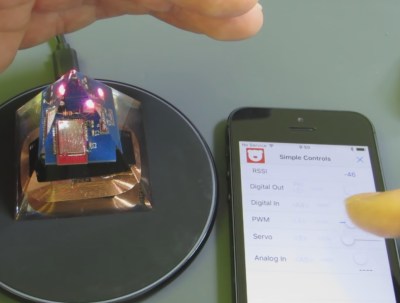
His first works of electronic art were a couple of transistors and some ICs, including an 80386, encased in epoxy. But then he realized that he wanted the electronics to do something interesting. However, once encased in epoxy, how do you keep the electronics powered forever?

He tried a solar cell charging a battery which then powered an LED but he didn’t like the idea of chemical batteries encased in epoxy for a long time.

He then switched to wireless power transmission with a receiving coil in the base of epoxy pyramids. For one of them, the coil powers a BLE board with an attached LED which he can control from his phone. And his latest contains an ESP32-PICO with an OLED display. The code allows him to upload new firmware over the air but on his Hackaday.io page, he shows the difference between code which can brick the ESP32 versus code which won’t. But don’t take our word for it. Check out the video below to see his artistry for yourself.

While embedding electronics in epoxy is new to [kodera2t], we’ve seen it a few times before. once in the form of an amplifier circuit done beautifully, dead bug style, and a more experimental attempt with a solar lantern.

Continue reading “Epoxy Embedded Electronic Art Running On Pyramid Power”

Speech recognition to control a faucet

Talk To The Faucet

Your hands are filthy from working on your latest project and you need to run the water to wash them. But you don’t want to get the taps filthy too. Wouldn’t it be nice if you could just tell them to turn on hot, or cold? Or if the water’s too cold, you could tell them to make it warmer. [Vije Miller] did just that, he added servo motors to his kitchen tap and enlisted an AI to interpret his voice commands.

Look closely at the photo and you can guess that he started with a single-lever type of tap, the kind which can be worked with an elbow, so this project was probably just for fun and judging by his video below, he does have a sense of humor. But the idea is practical for dual taps with rotating knobs. He did realize, however, that in future versions he should move the servo motor openings from the top plate to the bottom instead, to avoid any water getting in. A NodeMCU ESP8266 ESP-12E board serves for communicating with the speech recognition side but other than the name, JacobAI, he’s keeping the speech part to himself. We secretly suspect that he has a friend named Jacob.

However, we can think of a number of options for it such as DeepSpeech and Wit.ai which we covered when talking about natural language phone bots, and the ubiquitous Alexa as used here with another NodeMCU for turning on Christmas tree lights.

Continue reading “Talk To The Faucet”

DIY laser rifle doing damage long distance

DIY Long Distance Laser Telescope Does Some Damage

Here’s a DIY laser rifle which can explode a balloon at around 150 feet (45 meters) as well as some angry chemicals at a similar distance. Since there are plenty of videos of lasers doing that at around a meter, why shouldn’t doing so farther away be easy? Despite what many expect, laser beams don’t remain as straight lines forever. All light diverges over a distance. This makes it hard to create a laser which can do damage from more than around a meter and is why most demonstrations on YouTube are that distance or less.

Galilean telescope and laser idea[Styropyro’s] handheld, DIY laser rifle, or Laser Telescope Blaster as he calls it, works for long distances. His solution lies in some surprising physics: the larger the diameter of the beam, the more slowly it will diverge. So he used the opposite of a Galilean telescope to take the small beam of his 405-nanometer laser and increase its diameter. His best result was to explode a balloon at 150 feet (45 meters).

He did run into another issue first though. Anyone who’s tried to keep a camera aimed at a target through a telephoto lens while holding the camera in their hands knows that even a tiny movement will throw the camera off target. For a laser beam to sufficiently heat up the balloon in order to make it explode, the beam has to stay on it for a short period of time. But at a long distance, small movements of his rifle made the beam wander. Putting the rifle on a tripod fixed that. In the video below you can see him work through his design and these issues to finally get his big success.

We can guess what spurred on this interest in long-distance laser rifles. Back in July, a Chinese company made bold claims to building one which could do damage at 800 meters.

Continue reading “DIY Long Distance Laser Telescope Does Some Damage”