One-byte binary LED display

See Binary On Your Breadboard

When you’re debugging a board which has an ESP32, Raspberry Pi, or Arduino, it’s easy to slap on a small LCD display or connect via WiFi to see what’s wrong. At least, that’s what the kids are doing. But what if you’re old-school or you don’t have one of those pimped-out, steroid-filled boards? A resistor and an LED will often suffice. Powering the LED means one thing and not powering it means another. And with seven more LEDs you can even display 0-255 in binary.

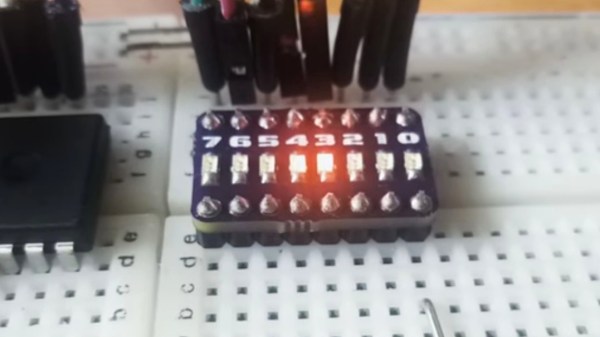
[Miguel] is clearly in the latter camp. To make debugging-with-LEDs easy, he’s come up with an 8-LED board complete with resistors. He’s even included the Gerber files needed for you to make your own. One row of pins are all connected together and the other row are not. So whether you’re using common cathode or common anode depends on how you orient the LEDs when you solder them in place. You might perhaps have one board of each type at the ready.

But who are we kidding? This is just plain fun to have on a breadboard. Show your prototype doohickey to a friend and you know they’ll be drawn to the little binary counter in the corner pulsing 42 or counting down until it starts flashing 255.

At risk of getting too feature-rich, you could then add two keys for a binary keyboard or add more LEDs to display 32-bit binary Unix Epoch time and see how long until your friends figure that one out.

Continue reading “See Binary On Your Breadboard”

A Switching Power Supply, 1940s-Style

“They don’t build ’em like they used to.” There’s plenty of truth to that old saw, especially when a switch-mode power supply from the 1940s still works with its original parts. But when said power supply is about the size of a smallish toddler and twice as heavy, building them like the old days isn’t everything it’s cracked up to be.

The power supply that [Ken Shirriff] dives into comes from an ongoing restoration of a vintage teletype we covered recently. In that post we noted the “mysterious blue glow” of the tubes in the power supply, which [Ken] decided to look into further. The tubes are Thyratrons, which can’t really be classified as vacuum tubes since they’re filled with various gasses. Thyratrons are tubes that use ionized gas – mercury vapor in this case – to conduct large currents. In this circuit, the Thyratrons are used as half-wave rectifiers that can be rapidly switched on and off by a feedback circuit. That keeps the output voltage fixed at the nominal 140V DC required by the teletype, with a surprisingly small amount of ripple. The video below is from a series on the entire restoration; this one is cued to where the power supply is powered up for the first time. It’s interesting to see the Thyratrons being switched at about 120 Hz when the supply is under load.

Cheers to [Ken] and his retrocomputing colleagues for keeping the old iron running. Whether the target of his ministrations is a 1974 scientific calculator or core memory from an IBM 1401, we always enjoy watching him work.

Continue reading “A Switching Power Supply, 1940s-Style”

Shoelace-Tying Robot With Only Two Motors

Many things that humans do are very difficult for machines. Case in point: tying shoelaces. Think of the intricate dance of fingers crossing over fingers that it takes to pass off a lace from one hand to the other. So when a team of five students from UC Davis got together and built a machine that got the job done with two hooks, some very clever gears, and two motors, we have to say that we’re impressed. Watch it in action on Youtube (also embedded below).

The two-motor constraint would seem at first to be a show-stopper, but now that we’ve watched the video about a hundred times, we’re pretty convinced that a sufficiently clever mechanical engineer could do virtually anything with two motors and enough gears. You see, the secret is that one motor is dedicated to moving a drive gear back and forth to multiple destinations, and the other motor provides the power.

This being Hackaday, I’m sure that some of you are saying “I could do that with one motor!” Consider that a challenge.

Meanwhile, if you need to see more gear-porn, check out this hummingbird automaton. Or for the miracles of cam-driven machines, check out [Fran Blanche]’s work with the Maillardet Automaton.

Continue reading “Shoelace-Tying Robot With Only Two Motors”

Modular Keyboards For CAD, Gaming, And Video Editing

Of all the input devices, the keyboard is the greatest. This comes at a cost, though: there were times back in the Before Days, when video and music editing applications came with custom keyboards. There were Pro Tools keyboards, Final Cut keyboards, and innumerable Adobe keyboards. What’s the solution to this problem? More keyboards, obviously, and this time we’ll make them modular.

For his Hackaday Prize entry, [Cole B] is building modular, programmable USB keyboards. It’s got everything: a standard 3×3 keypad, a keyboard that’s just four potentiometers, a keyboard that’s a rotary encoder, and a keyboard that’s a set of faders.

The design of these keyboards is inherently modular, and that means there needs to be a way to connect all these modules together, preferably without a bunch of USB cables strewn about. Right now, the best idea [Cole] is working with is pogo pins and magnets. It’s a great idea although Apple Thinks Differently™ and probably wouldn’t be too keen on seeing the whole ‘magnets and pins’ idea stolen out from under them.

Nevertheless, it’s an excellent project that shows how far you can go with manufacturing on a limited budget. These are fantastic keyboard modules already, and the connector scheme already pushes this project into the upper echelon of keyboard hacks.

The rust language logo being branded onto a microcontroller housing

Pun Intended: Bare Metal Attracts Rust

Programming languages tend to polarize, and Rust is by far no exception. Whether it will stick around and grow as an alternative for the lower levels or not — time will tell. In the meantime, if you’re curious about the language and its low-level abilities yourself, [phil-opp] has written a series of blog posts on building your own little bare metal kernel in Rust.

Starting from the basics, [phil-opp] describes in detail the set-up and build process to create a standalone executable that won’t be linked against the Rust standard library. From here he proceeds to build a simple operating system kernel that prints a good old Hello World via VGA output — QEMU emulation included. And of course, there is a GitHub repository with all of the source code.

[phil-opp] has been working on this for a while already, and he is currently writing the second edition of the series. Some content is therefore still missing, but you may find more of it in his first edition. And in case you know absolutely nothing about Rust in the first place, let’s just take a step back and start with the basics. After all, we might see more of it in the future.

SMART Response XE Gets Wireless Bootloader

A few months back we first brought word of the progress being made in unlocking the SMART Response XE, an ATmega128RFA powered handheld computer that allowed teachers to create an interactive curriculum in the days before all the kids got Chromebooks. Featuring 2.4 Ghz wireless communication, a 384×160 LCD, and a full QWERTY keyboard, schools paid around $100 each for them 2010. Now selling for as little as $5 on eBay, these Arduino-compatible devices only need a little coaxing and an external programmer to get your own code running.

The previous post inspired [Larry Bank] to try his hand at hacking the SMART Response XE, and so far he’s made some very impressive progress. Not only has he come up with his own support library, but he’s also created a way to upload Arduino code to the devices through their integrated 802.15.4 radio. With his setup, you no longer need to open the SMART Response XE and attach a programmer, making it much easier to test and deploy software.

[Larry] has written up a very detailed account of his development process, and goes through the trouble of including his ideas that didn’t work. Getting reliable communication between two of these classroom gadgets proved a bit tricky, and it took a bit of circling around until he hit on a protocol that worked.

The trick is that you need to use one SMART Response XE attached to your computer as a “hub” to upload code to other XEs. But given how cheap they are this isn’t that big of a deal, especially considering the boost in productivity it will net you. [Larry] added a 5 x 2 female header to his “hub” XE so he could close the device back up, and also added a physical power switch. In the video after the break, you can see a demonstration of the setup sending a simple program to a nearby XE.

Between this wireless bootloader and the Arduboy compatibility covered previously, we’d suggest you get your SMART Response XE now. We wouldn’t be surprised if the prices of these things start going up like they did with the IM-ME. Continue reading “SMART Response XE Gets Wireless Bootloader”

Cheap FPV Goggles Turned Pocket Sized Display

Thanks to the exploding popularity of First Person View (FPV) RC flying over the last couple of years, the cost of the associated hardware has dropped rapidly. Today you can get entry-level FPV goggles for under $40 USD on various import sites. For the money you’re getting a 5.8 GHz receiver, battery, and an LCD display; even if the components themselves aren’t exactly high end, at that price it’s essentially an impulse buy.

[nomand] didn’t necessarily have a use for a cheap FPV headset, but he did like the idea of having a pocket sized display that he could pass off to others so they could see what he’s seeing during flights. So he harvested the principle components from a Eachine VR006 headset and designed a new 3D printed enclosure for them. The final result looks fantastic, and is much cheaper than commercial alternatives on the market.

He’s created an exceptionally detailed step-by-step guide on how you can perform the conversion yourself in the project’s GitHub repository, and has also put together a video where he goes over the modification and discusses the end result. [nomand] clearly intends for this to be a project for others to duplicate instead of a one-off build, and given the price and final results, we wouldn’t be surprised if this conversion becomes popular in FPV circles.

Perhaps the best part of this project is that it requires almost no modification of the original hardware; just soldering two wires because the original connector is too large. Otherwise just need to take the headset apart carefully, and transplant the components into the 3D-printed case [nomand] has meticulously designed. The case is so well designed it doesn’t even need any fasteners, it slides together and everything is held in with some strategically placed pieces of foam.

Between this modification and the custom built spectator display we covered recently, it looks like there’s a clear demand for sub-$50 portable FPV monitors. Seems odd that no manufacture is trying to fill this niche so far.

Continue reading “Cheap FPV Goggles Turned Pocket Sized Display”