Repairing A Desktop Jukebox

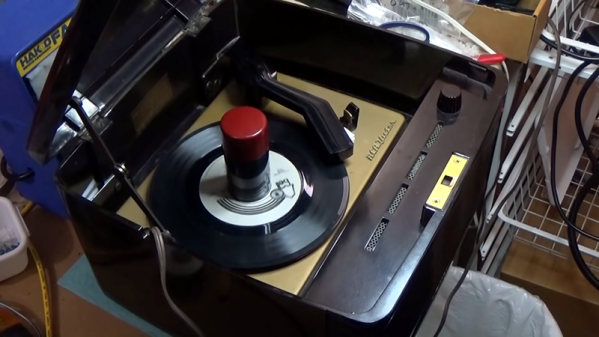
Although vinyl records have had a bit of resurgence, they are far away from their heyday. There was a time when 45 RPM singles were not just how you listened to music at home, but they also populated the jukeboxes you’d find in your local malt shop or anywhere else in public. [Fran] has an old 45 RPM “desktop jukebox” from RCA. It really isn’t a jukebox, but an automatic record changer dating from the 1950s. The problem is, the cartridge was toast. Replacing it wasn’t a big problem, even though replacing it with an exact duplicate wasn’t possible. But, of course, that was just the start.

You can see in the video below, that there were some weight problems with the cartridge, but the changer part would not work. She tears it down and makes some modifications. She even pulled out the schematic which had three tubes — one of which was just a rectifier.

Continue reading “Repairing A Desktop Jukebox”

Shop-Made Pneumatic Cylinders From PVC And Plywood

You see a lot of pneumatic actuators in industrial automation, and for good reason. They’re simple, powerful, reliable, and above all, cheap. Online sources and fluid-power suppliers carry a bewildering range of actuators, so why would anyone bother to make their own pneumatic cylinders? Because while the commercial stuff is cheap, it’s not PVC and plywood cheap.

Granted, that’s not the only reason [Izzy Swan] gives for his DIY single-acting cylinder. For him it’s more about having the flexibility to make exactly what he needs in terms of size and shape. And given how ridiculously easy these cylinders are, you can make a ton of them for pennies. The cylinder itself is common Schedule 40 PVC pipe with plywood endcaps, all held together with threaded rod. [Izzy] cut the endcaps with a CNC router, but a band saw or jig saw would do as well. The piston is a plywood plug mounted to a long bolt; [Izzy] gambled a little by cutting the groove for the O-ring with a table saw, but no fingers were lost. The cylinder uses a cheap bungee as a return spring, but an internal compression spring would work too,. Adding a second air inlet to make the cylinder double-acting would be possible as well. The video below shows the cylinder in action as a jig clamp.

True, the valves are the most expensive part of a pneumatic system, but if nothing else, being able to say you made your own cylinders is a win. And maybe you’ll get the fluid-power bug and want to work up to DIY hydraulics.

Continue reading “Shop-Made Pneumatic Cylinders From PVC And Plywood”

Adding Upgrades To A Stock Motorcycle

In today’s world of over-the-air firmware upgrades in everything from cars to phones to refrigerators, it’s common for manufacturers of various things to lock out features in software and force you to pay for the upgrades. Even if the hardware is the same across all the models, you can still be on the hook if you want to unlock anything extra. And, it seems as though Suzuki might be following this trend as well, as [Sebastian] found out when he opened up his 2011 Vstrom motorcycle.

The main feature that was lacking on this bike was a gear indicator. Even though all the hardware was available in the gearbox, and the ECU was able to know the current gear in use, there was no indicator on the gauge cluster. By using an Arduino paired with an OBD reading tool (even motorcycles make use of OBD these days), [Sebastian] was able to wire an LED ring into the gauge cluster to show the current gear while he’s riding.

The build is very professionally done and is so well blended into the gauge cluster that even we had a hard time spotting it at first. While this feature might require some additional lighting on the gauge cluster for Suzuki to be able to offer this feature, we have seen other “missing” features in devices that could be unlocked with a laughably small amount of effort.

Continue reading “Adding Upgrades To A Stock Motorcycle”

Temperature Controlled Fan Keeps Printer Cool

There are many annoying issues associated with desktop 3D printers, but perhaps none are trickier than keeping the machine at the proper temperature. Too cold, and printed parts can warp or fail to adhere to the bed. Too hot, and the filament can get soft and jam, or the motors will start clanking and missing steps. High-end industrial 3D printers have temperature-controlled enclosures for precisely this reason, but the best you can hope for with a printer that’s little more than some aluminum extrusion and an Arduino is a heated bed that helps but is no substitute for the real thing.

Like many 3D printer owners chasing perfect prints, [Steve Thone] ended up putting his machine into a DIY enclosure to help keep it warm. Unfortunately, there gets to be a point when things get a little too hot inside the insulating cube. To address this issue, he put together a simple but very elegant temperature controlled fan to vent the enclosure when the internal conditions go above the optimal temperature.

[Steve] picked up the digital temperature controller on Amazon for about $4 USD, and found a 60 mm fan in the parts bin. He then came up with a clever two-part printed enclosure that slides together to make the fan and controller one unit which he can place in a hole he cut in the enclosure.

A lot of attention was paid to the front panel of the device, including mid-print filament swaps to create highlighted text and separate buttons printed in different colors. The end result is a very professional looking interface that involved relatively little manual labor; often a problem when trying to come up with nice looking panels.

Whether it’s to keep from breathing ABS fumes, or to quiet the thing down enough so you can get some sleep, it looks like an enclosure of some type is becoming the latest must-have 3D printer accessory.

Disassembling Mouse Sensors For Tracking Tongues

We just wrapped up the Human Computer Interface challenge in this year’s Hackaday Prize, and with that comes a bevy of interesting new designs for mice and keyboards that push the envelope of what you think should be possible, using components that seem improbable. One of the best examples of this is The Bit, a project from [oneohm]. It’s a computer mouse, that uses a tiny little trackpad in ways you never thought possible. It’s a mouse that fits on your tongue.

The idea behind The Bit was to create an input device for people with limited use of their extremities. It’s a bit like the Eyedriveomatic, the winner from the 2015 Hackaday Prize, but designed entirely to fit on the tip of your tongue.

The first experiments on a tongue-controlled mouse were done with an optical trackpad/navigation button found on Blackberry Phones. Like all mouse sensors these days, these modules are actually tiny, really crappy cameras. [oneohm] picked up a pair of these modules and found they had completely different internal tracking modules, so the experiment turned to a surface tracking module from PixArt Imaging that’s also used as a filament sensor in the Prusa 3D printer. This module was easily connected to a microcontroller, and with careful application of plastics, was imbedded in a pacifier. Yes, it tracks a tongue and turns that into cursor movements. It’s a tongue-tracking mouse, and it works.

This is an awesome project for the Hackaday Prize. Not only does it bring new tech to a human-computer interface, it’s doing it in a way that’s accessible to all.

The Pre-CRT Oscilloscope

Oscilloscopes are especially magical because they translate the abstract world of electronics into something you can visualize. These days, a scope is likely to use an LCD or another kind of flat electronic display, but the gold standard for many years was the ubiquitous CRT (cathode ray tube). Historically, though, CRTs were not very common in the early days of electronics and radio. What we think of as a CRT didn’t really show up until 1931, although if you could draw a high vacuum and provide 30 kV, there were tubes as early as 1919. But there was a lot of electronics work done well before that, so how did early scientists visualize electric current? You might think the answer is “they didn’t,” but that’s not true. We are spoiled today with high-resolution electronic displays, but our grandfathers were clever and used what they had to visualize electronics.

Keep in mind, you couldn’t even get an electronic amplifier until the early 1900s (something we’ve talked about before). The earliest way to get a visual idea of what was happening in a circuit was purely a manual process. You would make measurements and draw your readings on a piece of graph paper.

Continue reading “The Pre-CRT Oscilloscope”

Northern Pike 3D printed plane

Awesome Looking 3D Printed RC Plane Is Full Of Design Considerations

Designing and 3D printing RC planes offer several interesting challenges, and so besides being awesome looking and a fast flier, [localfiend’s] Northern Pike build is definitely worth a look. Some details can be found by wading through this forum but there’s also quite a bit on his Thingiverse page.

Tongue-and-groove joint for the wing
Tongue-and-groove joint

Naturally, for an RC plane, weight is an issue. When’s the last time you used 0% infill, as he does for some parts? Those parts also have only one perimeter, making this thin-walled-construction indeed. He’s even cut out circles on the spars inside the wings. For extra strength, a cheap carbon fiber arrow from Walmart serves as a spar in the main wing section. Adding more strength yet, most parts go together with tongue-and-groove assembly, making for a stronger join than there would be otherwise. This slotted join also acts as a spar where it’s done for two wing sections. To handle higher temperatures, he recommends PETG, ABS, ASA, Polycarbonate, and nylon for the motor mount and firewall while the rest of the plane can be printed with PLA.

As you can tell from the videos below, [localfiend’s] flier is a high-performance 3D printed machine. But such machines don’t have to be relegated to the air as this RC jet boat demonstrates. Though some do hover on a thin cushion of air.

Continue reading “Awesome Looking 3D Printed RC Plane Is Full Of Design Considerations”